How to make a beautiful pedicure at home yourself. SPA pedicure at home. Video - Do-it-yourself pedicure at home: step by step instructions.
Many women give great attention the condition of the hands, but the legs need constant care even more, because they experience constant pressure every day. Many people think that pedicure is just beautiful pattern on the nail plate, but in fact, varnishing is only the final stage of a whole complex of manipulations. Not everyone manages to escape from the busy rhythm of everyday life to visit a beauty salon, so a quality pedicure at home is a very real phenomenon.
Especially in spring and summer well-groomed feet are an accessory that a woman cannot do without. It's good if appointments can be arranged with professional foot care in a home bathroom. With these foot care instructions. With little sensitivity and exercise you can also do your own foot care - within your own four walls.
Step 1: Enjoy a foot bath
Pamper your feet and pamper yourself with a soothing foot bath: not only does it please the soul, it also prepares the feet optimally for next steps foot care. Skin softens with warmth, just like nails. Summer pedicure tip: feet in warm milk and a teaspoon of almond oil bath. In this way, the nails and the cornea are optimally softened. At the same time, the effect of relubrication contributes to subsequent painting. Important: Do not forget to dry. Don't forget about legrooms.
The relevance of pedicure
Frequent long walking, especially on high heels, does not go unnoticed for the skin of the feet. She is very vulnerable, roughness, cracks, calluses and corns often form on her, all these problems must be eliminated so that the legs not only look attractive, but are also healthy. Therefore, they need to be helped to cope with daily duties, and a pedicure at home is a great opportunity to do this regularly.
Step 2: Smooth Skin Through Peeling
In peeling, also known as peeling, upper layer skin is removed. Sophisticated, gentle peeling substances soften the surface of the skin. Peels, for example, may contain salt or sugar crystals, fruit kernels, silicone beads, or rice grains. In addition to peeling off the top layer of the skin, exfoliation also promotes blood circulation. Skin feels wonderfully soft after use. However, the product should not be too rough so as not to irritate the skin excessively. Gently peel up to ankles. Dead cells are carefully removed in this way, and the cornea on the soles is already slightly muted.
Pedicure is carried out in stages: cleansing the feet, steaming, removing imperfections, treating the nails and skin around them, varnishing the plate. Having adapted, you will be able to quickly and efficiently perform all these actions with your own hands, and visits to the pedicure master will no longer be needed. The execution technique is quite simple, with the help of a photo instruction, you can easily master it. It is recommended to carry out the procedure at least 2 times a month, and preferably 1 time in 8-10 days, then the skin will become smooth, and the legs as a whole will become more attractive.
Step 3: Carefully remove the cornea
If you clean your skin regularly, you don't need to remove the cornea often. In this video, you can take a closer look at the two steps. Pumice stone, cornea, threads or sponges: There are many tools you can use to help you. But which option is really the best? Finally, the skin is a very sensitive organ. Our advice: if possible, do not use a planer for foot care. Working with this tool is not for inexperienced hands and can also be quite painful with a nasty injury.
Step 4: Shorten and Shape Your Toenails
For your pedicure, opt for a softer alternative like a pumice stone. Do not wear too much of the cornea. Depending on individual preference, you can pull out clippers, scissors, or files to cut your toenails. Whoever uses the file chose the gentlest way - but also the most time consuming. You have to keep your toes underneath so they don't slip away. The shape is up to you. Be careful not to damage the nail structure in any direction. Once all of the toenails are filed, you can remove the skin of the nail, for example with a nail remover.
Required Tools
In order to properly perform a pedicure at home, you must first purchase the necessary set of tools. Among them are the following devices:
- pedicure scissors or regular nippers;
- cuticle tweezers;
- callus removal machine;
- nail file, preferably glass;
- nail scraper;
- pumice stone or similar scraper;
- nail files for grinding and polishing;
- nail brush;
- polish, spacer pads and nail decorations optional.
In addition to tools, you can purchase any bath product (salt, decoctions, etc.), a special peeling foot cream, a nourishing cream (you can use a regular baby cream) and a cuticle softening cream (optional).
Step 5: Paint the nails in place
Let the gel work for a few seconds and gently apply pressure to the skin of the nail. Now the most beautiful part of home foot care. Lighten your feet with the nail polish of your choice. But also the natural classic French manicure look brings out beautiful results. To do this, apply varnish. When painting, the toe separator can prevent unsafe hammers. The paint is best from the inside. Do you want your toenails to be visually narrower? Then don't paint all the way to the edge.
Step 6: Foot Care
Cheating is allowed here. Massage the foot cream for a few minutes until it reaches its maximum in the shackles. This way you promote circulation and ensure that the product is absorbed into the skin as much as possible. So, feet up and pat on the shoulder. Taking care of yourself isn't hard at all, is it?
Types of pedicure
Before thinking about how to do a pedicure at home, you must first decide on the variety that you will use. There are 4 types of pedicure that can be done at home:
- Edged or classic. Removal of cuticles, roughness and corns occurs with the help of special tools equipped with blades. This requires maximum focus on the process, because you can injure the skin and touch the blood vessels. But the advantage this method is its economy, and everyone can master all the subtleties to make a pedicure at home safe with due zeal.
- Unedged or European. This method is considered safer, since the removal of the skin and cuticles is not done with blades, but with pumice stone and special creams, respectively. In addition, if you need to pre-steam with your legs, with a European this stage is omitted. For beginners, it will be easier to master this method, but with regular use, you will have to constantly spend money on creams and scrubs.
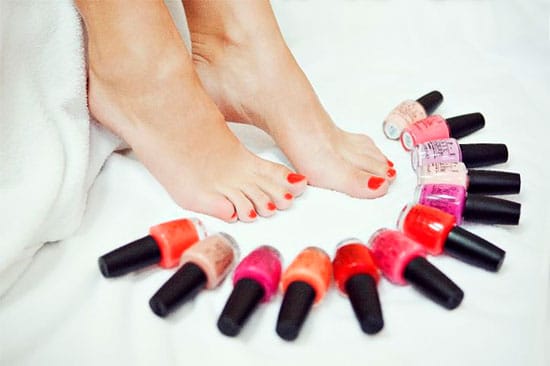
- SPA pedicure. This method involves improving the condition of the skin of the legs through relaxing procedures, combining business with pleasure. The complex of procedures may include massage, peeling, wrapping, paraffin therapy and other manipulations to your taste. Such a pedicure at home involves not only achieving results, but also enjoying the whole process.
- Hardware. Its purpose is the same as that of other species, but it is performed using just one device with different nozzles. Such a device can be purchased at a specialized store or ordered via the Internet. Usually, it comes with instructions for using nozzles and rules for caring for it. This method is very convenient, but the device is quite expensive, the price can reach several thousand rubles.
Recommendations for conducting different at home
Two Experts Reveal Foot Care Tips Within Their Four Walls - And How Nail Polish Lasts long time. Each person takes an average of a thousand to a thousand steps a day - and thus, during his life, three times more land. Most of body weight is supported by football. No later than in the summer season, a pedicure should be - but this can also be done at home.
Therefore, the expert recommends a gentle foot bath that softens the skin as a first step. "Subsequently, peeling should be used to gently remove the cornea." Then rough areas are treated with pumice. Practical: more and more more companies are launching battery-operated foot care tools that facilitate corneal removal. Under no circumstances do lay people come to the scalpel, which is often used in beauty salons. You can take too much skin, Kuhlman warns.
Step-by-step instructions for a classic pedicure for beginners
The classical method is used most often, because the use of baths has a beneficial effect on the skin of the feet, and the tools for it are available to everyone. To properly perform a pedicure at home, you need to carefully study all the stages of its implementation.
If the feet soften again, only the nails disappear. Whether it is shorter or longer is a matter of taste. However, they should not be trimmed or rounded too much or the nails may grow. Even if the nails have not been previously painted, any greasy residue should be removed with a nail polish remover. With a layer of undercoat they are protected from discoloration and then two coats of colored varnish. Red suits everyone, remarks the remark. "You just have to find the right nuance to match your skin tone."
Hardware pedicure at home
Generally recommended by a nail expert for those with pale skin tones. "Pastel colors look fantastic on medium skin tones," says American. The guys from Oliva can let off steam because they pour almost everything. If you make your own pedicure successful, your feet should be smeared daily with a rich cream - with cotton socks, the skin is especially soft at night.
Stage 1 - preparation of tools
Even if you are the only one using purchased instruments, it is necessary to treat them with a disinfectant solution each time before and after the procedure. Since they will be in direct contact with the skin and remove hardened areas, the bacteria that accumulate on them can enter the body. If this happens, an infection will form, and the skin at the site of their penetration will be inflamed, which will cause discomfort.
Going to your feet with a professional pedicure can be a very relaxing thing, but if you want to keep your feet groomed all the time, you can get the same result at your own home spa! We will give you some tips so that you can keep your feet soft and well cared for.
Starting a pedicure. Take a bath with warm water, towel and necessary utensils; Don't forget the pumice stone, pliers, cuticle scissors and file in good condition. Choose the shade of nail polish you're going to use and toss in some cotton. Try everything at your fingertips so you don't have to run around to find it in the middle of a pedicure.
Stage 2 - steaming with a bath
In order for the skin to be fully prepared for exposure, it is necessary to expand the pores and disinfect it. For this it is necessary in hot water(about 40 degrees) add any antiseptic solution, lower your legs into it and hold them there for 5-10 minutes. Everyone chooses the time for themselves, keep in mind that the skin should be softened so that it is easy to remove roughness. In addition to the antiseptic, you can add it to the water if you wish. sea salt, a decoction of your favorite herb or essential oil, this will make steaming more productive.
Place all pedicure utensils in a basket or container to make things easier. Wet your feet. Wet your feet for about fifteen minutes warm water with a special pedicure product or add a little oil to the water. In addition to relaxing, you will be able to soften your feet to make it easier to remove dry and dead skin.
Dry thoroughly. Be sure to dry between your toes as this is a very sensitive spot for bacteria to grow and dirt to accumulate. Dry your feet very well and pass the corner of the towel between your toes. Don't overlook your nails in shape. Long nails can damage your socks and even change the way you walk. When cutting, be careful not to overdo it because some nail can be buried. So don't leave them too flush or lemony. The shape of the nail should mirror the natural curve of the cuticle.
Stage 3 - nail treatment
After steaming, you need to carefully wipe your feet with a towel, after which the pedicure itself begins. Trim your nails first desired length, everyone chooses it differently, but it is believed that the nail plate should slightly not reach the edge of the finger. Its shape should be square, in no case round off the ends, otherwise you can earn an ingrown nail. Then it is filed, movements should be made only in one direction to avoid delamination, if desired, the nail can be polished and polished.
How to do hardware pedicure and manicure, medical pedicure
If your toenails have a little volume, you can use a file to match them up a bit. If you want to remove the cuticles, don't cut them because you might hurt yourself, it's better to gently push them against the rest of the skin. It will be easier after a foot bath.
Smooth legs. Soft feet are just as important as flawless nail polish. Removing unhealthy skin on a regular basis will help prevent thickening of some areas of the skin that can later split. This softness in the legs requires a little effort and dedication. Try to avoid the unpleasant razor completely, as using it reduces the risk of cuts and damage to the deeper layers of the skin. Instead, use a metal nose file or pumice stone. Rub them vigorously on black and dry skin areas, especially on the heels and metatarsals.
After that, carefully separate the cuticle from the nail with a spatula and remove it with your chosen method - cream or tweezers. If there is rough skin on the fingertips, it is removed at the same stage with a nail file.
Stage 4 - foot treatment
Classic pedicure at home must contain this stage. Using a callus remover, remove rough skin with gentle smooth movements, you need to start from the heel, moving from the middle to the edges. The rest of the foot, on which there are growths, is processed in the same way. Instead of a machine, you can use ordinary pumice stone, the result is almost the same. After that, you need to treat the skin of the foot with a low-abrasive pedicure file to remove the remnants of rough skin that did not succumb to the machine or pumice. If skin removal is difficult, you can keep your feet in the bath for another 10 minutes, only the water must be brought back to the desired temperature.
Doing this with some frequency will save you a lot of time in future pedicures. Removal of calloused skin will become smoother and easier after thoroughly moisturizing the feet. ![]()
Moisturize your feet. After such great job it's time to agree with your feet. Apply a special moisturizing product to your feet to keep them looking soft and smooth. Since the skin on your feet is much thicker than the skin on any other part of your body, you will need a very effective moisturizing product. For this, the intensive action of a moisturizing cream on dry feet is ideal.
Stage 5 - removal of cracks
If you have such problems, the previous step will not remove them. It is necessary to remove the skin around each crack with nippers, and then sand the area with a pedicure file. A simple pedicure at home is not able to completely overcome this problem, you will need additional procedures to get rid of it.
Pedicure gel polish at home
Take the time to give your feet a massage as you apply the cream. In addition to being very relaxing, it will stimulate circulation and help creams penetrate the skin well. Nails must be completely dry and free of cream residue before applying the first coat of enamel. To avoid enamel stains, place a pair of foam nail clippers.
Pedicure at home for beginners
First set the clear enamel layer as the base. This will help prevent nails from losing color easily. From time to time, let your nails stay away from always painted, as permanent color can cause them to fade, especially when using dark glazes.
Women who want to look flawless from head to toe should take care of their feet and toes, not only in summer period- the season of open sandals.
Specialized salons offer certain procedures to restore the well-groomed appearance of the legs.
But not all ladies have the opportunity to use their services, so it is very important to learn how to do a pedicure on your own.
Pedicure at home: types
Let each layer dry for about ten minutes. Nail color! Let the clear base dry for about ten minutes and then apply the color you like best. A suitable way to apply color is to place three lines of enamel, one in the center and the other two on the sides. After ten minutes, apply the second layer and finally, after ten minutes, apply the third and final layer. Let your nails dry for at least an hour.
Maintain your manicure! Everything is ready! And with a little care, you can get your pedicure done for a long time. To prevent nail splinters, place a layer of enamel twice a week. This will help prevent black skin. To help you in this endeavor, we are looking for the best jewelry for you to get an express pedicure at home or in the classroom with basics and rituals to suit all budgets.
Pedicure at home: tools and materials
Salon pedicure is a considerable financial cost. You can make your heels impeccably smooth, and your nails beautiful at home. There are two ways of foot care: hardware and classic pedicure. The first method involves the presence of a special machine. Today we will dwell in detail on a more familiar and affordable procedure - a trimmed pedicure.
For a thorough treatment of the feet and toes, we need the following tools:
1. Tweezers(nippers) are used to shorten nails. Choose a tool made of high quality steel with uniform sharpening. Double spring wire cutters will last longer. The width of their blade can be from 5 to 9 mm. The thinner it is, the sharper it is.
2. Cuticle nippers A great alternative to regular nail scissors. The tool is designed to remove burrs on the toes and gently trim the cuticle. Triangular tips and beveled edges of the nippers allow you to carefully process the skin.
3. Pedicure brush used in pedicure at home for delicate removal of the coarsened layer of skin after baths, as well as for cleansing cuticles and nails. The tool can be made from both natural fibers and artificial materials.
4. pedicure machine(scraper) is used for deep cleansing of rough skin in those areas where a hard brush and pumice cannot cope. A comfortable handle and replaceable blade tips allow you to make the surface of your feet perfectly smooth without special efforts. The scraper perfectly removes dry corns and corns.
5.Pumice- This is a porous pebble, with which you can easily polish hard areas of the skin on the feet. This tool must be comfortable shape which makes it easy to fit in the palm of your hand. The smaller the pores of pumice, the more delicately it affects the skin.
6. Cuticle spatula(pusher for manicure) - this tool for a pedicure at home has two functional parts. On the one hand, the product is equipped with a spatula, with which you can push back the cuticle. With reverse side there is a so-called "hatchet", which is designed for cleaning nails.
7. Grater for feet used to remove dead skin cells. The tool is chosen according to preferences and individual characteristics skin. Graters are:
. laser,
. glass,
. emery,
. ceramic.
8. Nail files different grits for nail shaping, sanding and polishing. There are the following types of saws:
. sapphire,
. ruby,
. diamond,
. ceramic.
9. Spacers for pedicure make it easy to apply nail polish. The fingers do not touch each other, which guarantees a high-quality coating of their varnish.
10. Disposable slippers will provide you with free movement around the room while the varnish is still wet.
11. foot bath. Modern pedicure baths are equipped with last word technology that makes foot care an enjoyable experience. It's about about hydro and vibration massages that remove fatigue, magnetic radiation that relieves discomfort in the joints, ultraviolet lamas that get rid of the fungus.
12. Relaxing essential oils added to water while taking baths. A few drops of this wonderful remedy will create a calm atmosphere and perfectly soften the skin.
13. Scrub or peeling for the feet will help to make a quality massage and eliminate dead cells.
14. Nail polish remover, cotton swabs and discs are needed to remove nail polish.
15. Lacquer, base, fixer will be required to create a nail design.
16. Moisturizer or foot oil.
17. Foot powder has a deodorizing effect and relieves excessive sweating.
Care tips for pedicure tools
When choosing accessories for a home pedicure, experts recommend not saving. It should also be noted that the service life of tools depends not only on their quality, but also on proper handling.
. At least once a month, lubricate the friction surfaces of scissors, nippers and tweezers with special oil. This will improve the smoothness of the accessory.
. Sharpen the cutting elements of the tools in time.
. Disinfect items before each use.
Pedicure at home: sequence of actions
1. Before a pedicure, you should thoroughly wash your feet and remove from nails old varnish. Disinfect tools.
2. We make a bath. Pour hot water into a regular bowl or bath. Add to it baking soda, a few drops of lemon juice, iodine and sea salt. It is also recommended to use any relaxing essential oils. Dip your feet in the water to properly steam them. This will take at least 15 minutes. Add hot water as the bath cools.
You can add shower gel or liquid soap to the bath. This will further soften the keratinized layer of cells. At the end of a pleasant procedure, wipe your feet with a towel.
3. We shorten the nails and give them a shape. Take nail clippers or nail clippers and cut in a straight line the part of the nail that sticks out. Experts advise giving nails square shape. This avoids such trouble as ingrown nails into the skin. Trim the cut with a nail file, moving from the edges to the center. Use a spatula to push back the cuticles and apply an emollient to them. Remove the cuticle and clean the nail plates with a pusher. A double-ended pedicure file will polish the nail plates so that they look shiny and smooth. Remove burrs with scissors.
4. Now we take a pumice stone and get rid of the rough skin of the feet and heels. Neat in a circular motion with light pressure, get rid of dead skin, dry calluses and corns. If the skin is too rough and pumice stone can not cope with it, then use a pedicure machine. Special peels and scrubs for the feet will help to fix the result.
5. Pedicure at home provides nutrition and hydration of the skin. Take a cream or oil and lubricate the legs with light massage movements. Also now you can make a mask for the skin of the feet. We put pedicure socks on our feet (regular food bags are also suitable) and socks. After 15-20 minutes, you will find how soft and velvety your skin has become.
6. You can start applying varnish. Treat the nail plate with a special nail polish remover to degrease it and ensure an even application of the decorative coating. First, we apply the base. After it dries - varnish. It is applied in two layers. This allows you to achieve a uniform saturated color. Special separators (spacers) will make the application of the product very comfortable, will not allow it to be smeared. We cover the nails with a fixative.
Many women have a natural question: how often should a pedicure be done? According to experts, the skin on the feet will always be well-groomed if the pedicure procedure is done once every 7-10 days.
Pedicure at home: design options
Many women want their legs to look not only well-groomed, but also chic. A beautiful juicy pedicure helps with this. Consider the most popular and spectacular nail design options that will allow you to look stunning in any situation.
Monochromatic pedicure
A plain classic pedicure looks simple and incredibly elegant. Due to its restraint and conciseness, it is always appropriate. Bright neon shades help diversify this type of design. Unexpected colors will accentuate the beauty of your feet. Also, the so-called "rainbow" will give a zest to any image. A pedicure will not be boring if each finger is painted with different colors.
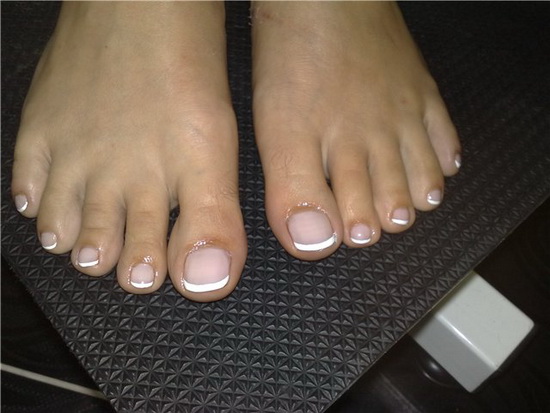
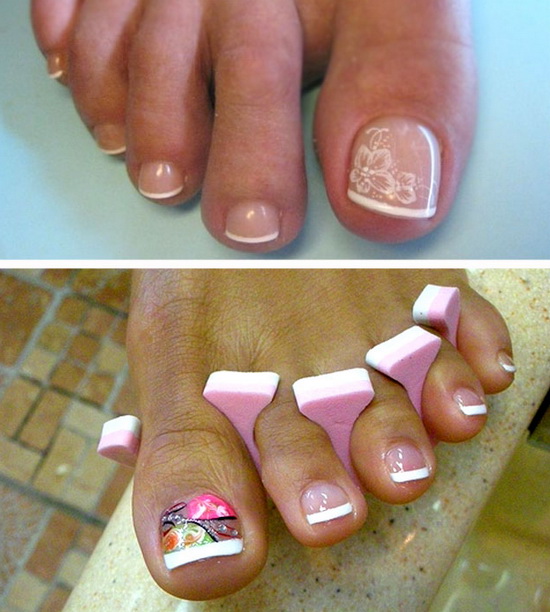
french pedicure
Stylish universal jacket never loses its relevance. It is suitable for both everyday and evening looks. A French pedicure with the right “smile line” looks perfect. For a change, you can make it some unexpected shade. Also, this type of design allows the use of lace, patterns and patterns. A modern jacket is distinguished by a variety of designs, but it always looks feminine and harmonious.
white french
Color French
French with an ornament
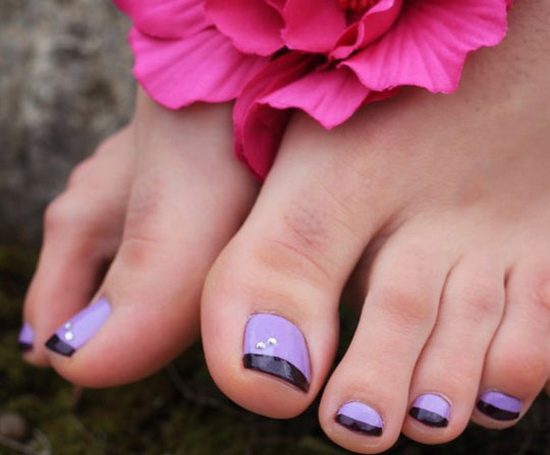
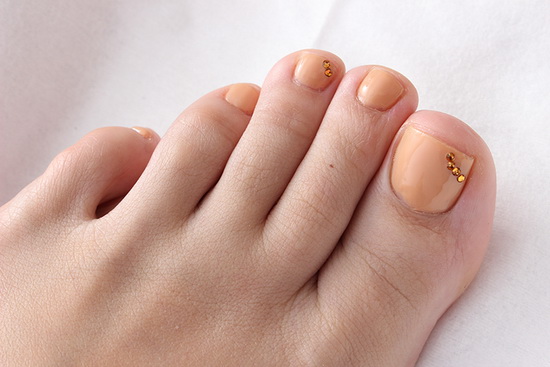
Rhinestones in pedicure
A shining decorative stone in the nails is excellent way demonstrate your exquisite taste and individuality. In this design, it is important not to overdo it and keep the pedicure light and not overdone.

♥♥♥
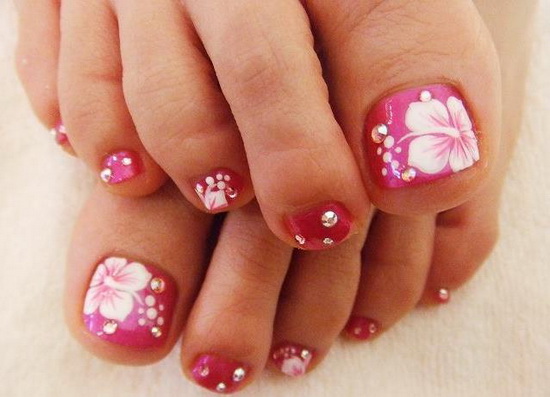
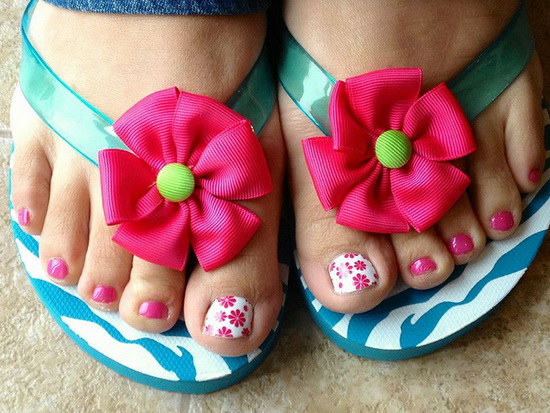
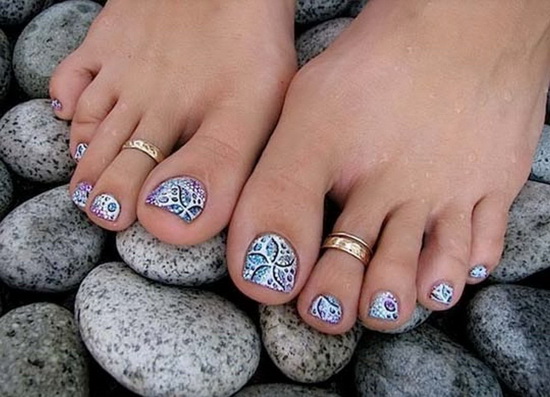
Pedicure with drawings
Drawings on the nails do not cease to be fashionable. Here, every lady can give free rein to fantasy. Floral and abstract designs remain the most popular. Such a pedicure liberates, gives femininity and looseness.
♥♥♥
Pedicure at home: professional advice
Your legs will always look perfect if you listen to the advice of professionals:
. Olive oil will help preserve the effect of a freshly made pedicure. It should be applied to the feet at night. It is better to wear cotton socks on top. This simple procedure will restore softness and flawless smoothness to your heels.
. From yellow nails you can save not only a special shop peeling. Scrubbing with coffee grounds helps to clean the plate from stains and restore a healthy color.
. You can even out the uneven surface of grooved nails with a sanding file and base polish.
. A bath of sage or bay leaf will reduce sweating of the feet.
. During the pedicure, do not forget to do a light foot massage. After all, it is there that there are many acupuncture points that are responsible for the health of the whole organism. Massage will improve blood circulation, relax and improve mood.
As you can see, every lady can master a pedicure at home. Do not neglect this useful and necessary procedure. Now you do not need to constantly spend money on visiting salons. Take care of your feet on your own in the presence of necessary tools pretty simple and nice. A fresh pedicure looks beautiful and gives confidence to any woman.
