Lunar manicure nail polish. How to make a fashionable and original manicure with holes
To create a fashionable "moon" manicure or, in other words, " reverse french”, you will need funds that seem to be found in any cosmetic bag: base coat, color and top coat. To create holes on the nails, you can use a color that contrasts with the main, “background” shade, or you can leave them transparent.
How to make a "lunar" manicure on your own, at home? We offer step by step instructions.
Method number 1
Treat the nail plate with a special degreaser or nail polish remover without oils in the composition. Apply a base coat in one layer - it will provide a better “adhesion” of the varnish to the nail plate.
Website
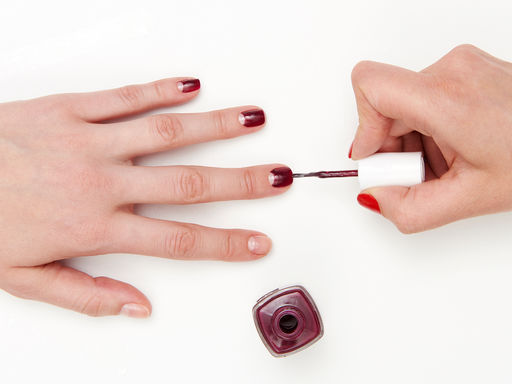
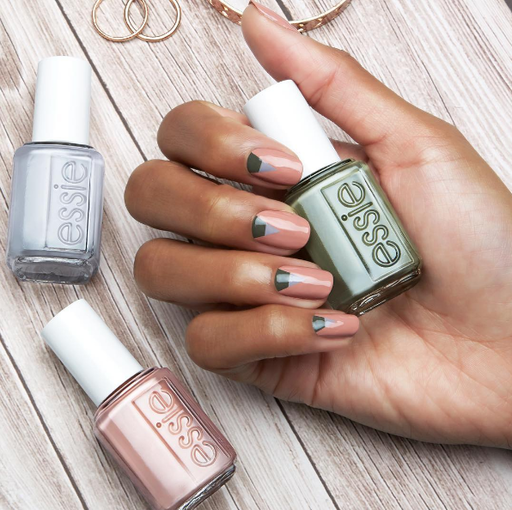
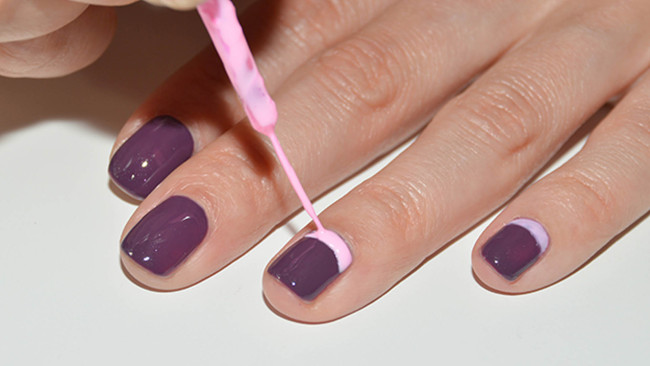
About two thirds of the nail, starting from the free edge, paint over with colored varnish (we used 935, "In the lobby" from Essie). Then paint over the corners with it to make a hole (for this, use a regular lacquer brush). Let the coating dry and apply a second, the same layer of varnish and wait a couple more minutes.
Website
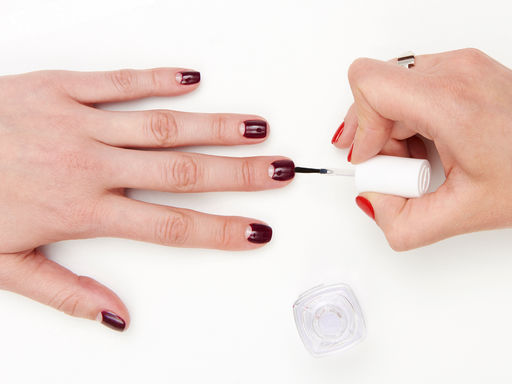
Finish off your manicure with a top coat. Ready!
Website
"Moon" pattern on the nails can be created in another way.
To do this, you will need special stencil stickers. round shape(they, in general, you can make yourself) or something that can replace them - for example, a band-aid.
What instructions to follow in this case? Remember the main steps.
Method number 2
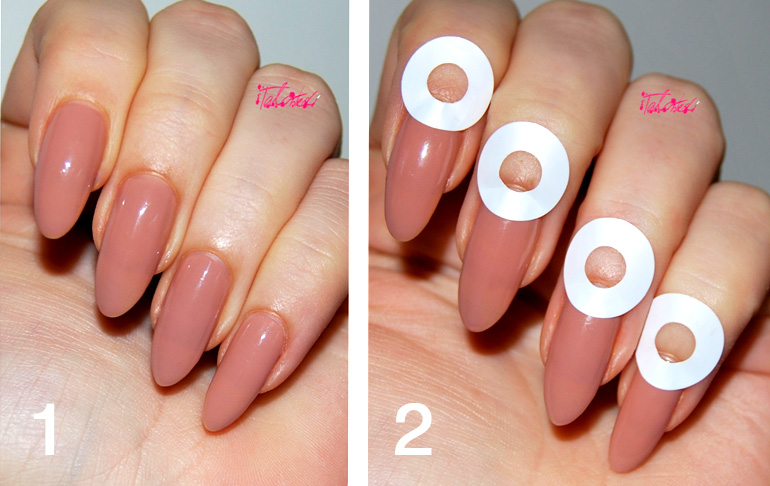
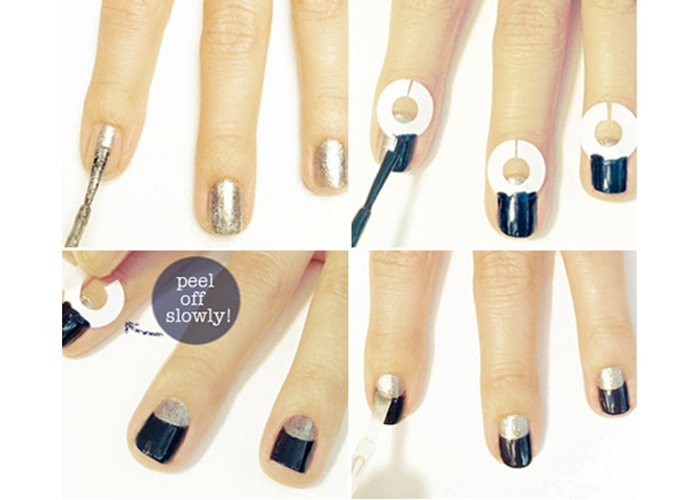
Apply a base coat and apply a round (or semicircular) stencil to the nail, starting from the base, so that it covers about a quarter of it.
Apply the main shade varnish on the nail plate so that the hole (it must be covered with a stencil) remains unpainted.
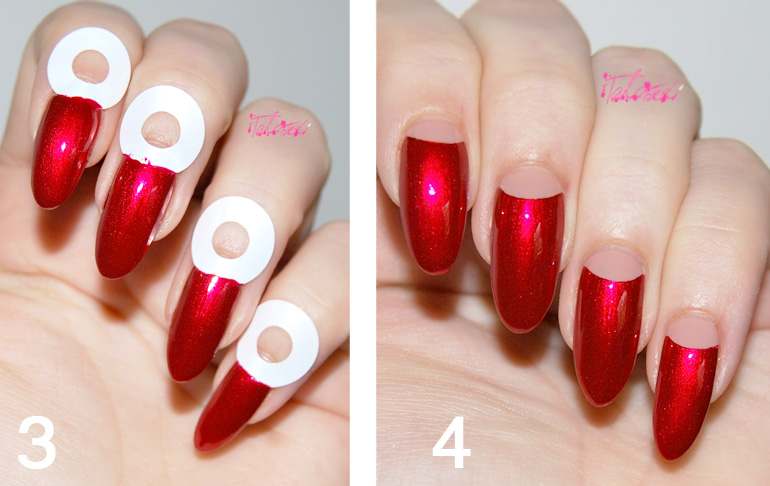
Cover your nails with a second layer of the same varnish, remove the stencil. If the coating is a little smeared (the base color polish will "go" into the hole), touch it up with an eye shadow brush or any flat brush dipped in nail polish remover. Before that, let the color coating “settle” a little (just wait a couple of minutes) - it should not be “fresh”, but not completely dry.
What other ideas for creating a "moon" manicure should be noted? Get inspired by Instagram photos!
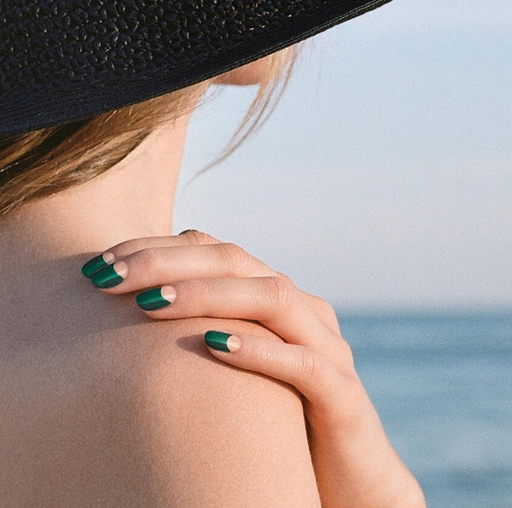
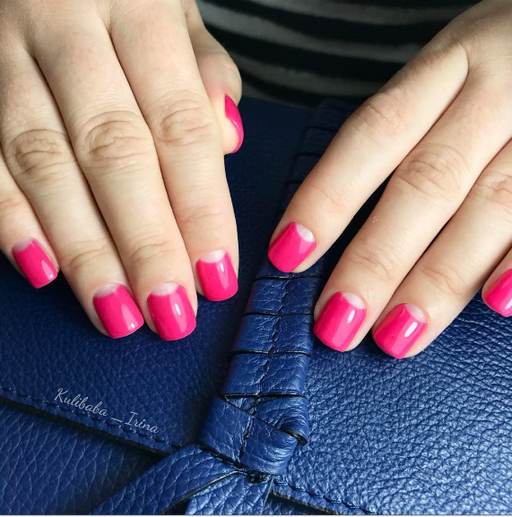
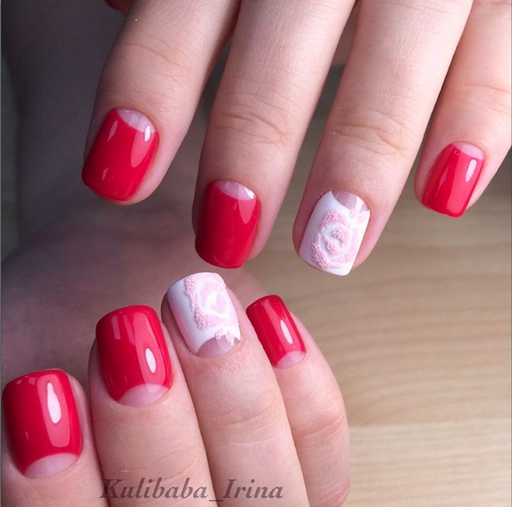
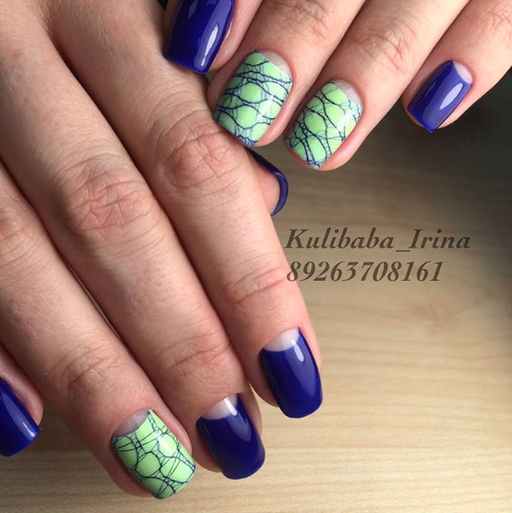
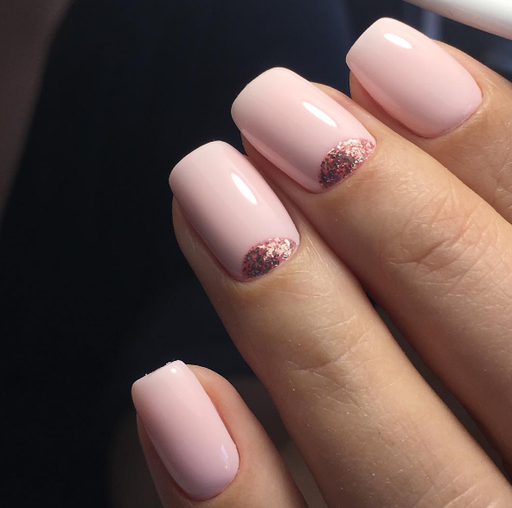
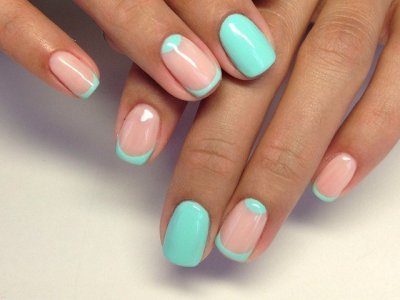
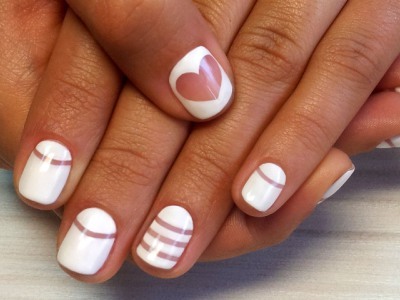
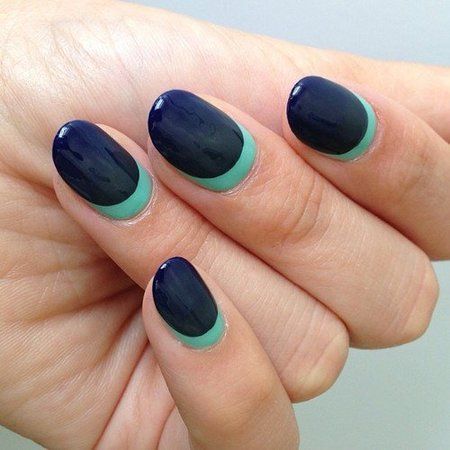
transparent hole
"Moon" manicure with transparent hole(if desired, it can be painted with a neutral nude varnish) simple, but perhaps one of the most original options for such a coating. However, in this case, you can experiment. For example, make a web-like pattern on several nails, or complement them with a rose-shaped acrylic powder pattern.
paintboxnails
Aliciatnails
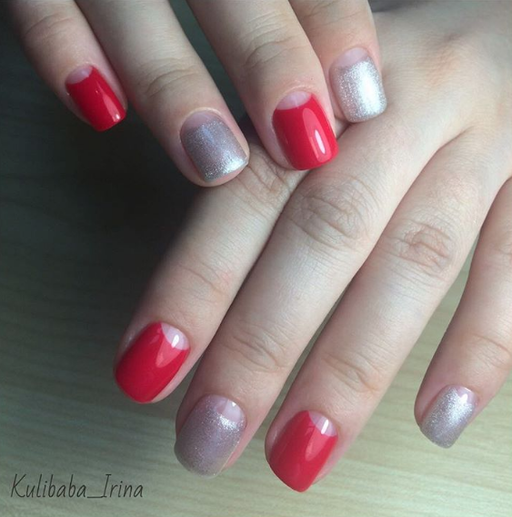
Kulibaba_irina
Kulibaba_irina
Kulibaba_irina
Kulibaba_irina
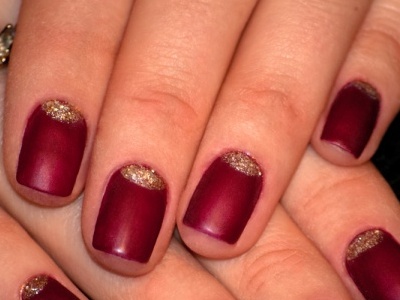
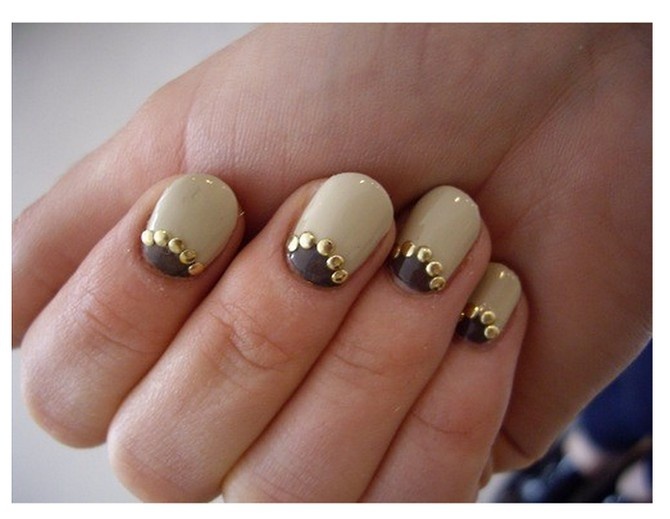
colored hole
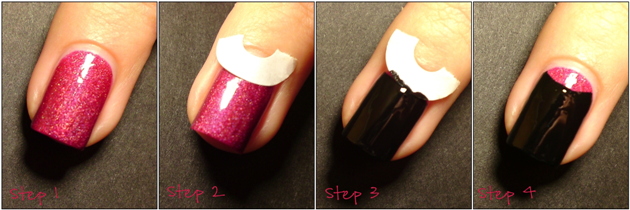
To create a “lunar” manicure with a hole that is not transparent, but colored, you must perform the following steps: apply a base coat, completely paint your nails with varnish of the shade that you have chosen for the hole, then apply a stencil and, on top, apply a second layer of varnish of the main color (such the method is relevant, first of all, for creating a coverage using ). Final stage- Applying a top coat to fix the varnish. The hole in this case can be either semicircular or, for example, triangular.
Aliciatnails
Kulibaba_irina
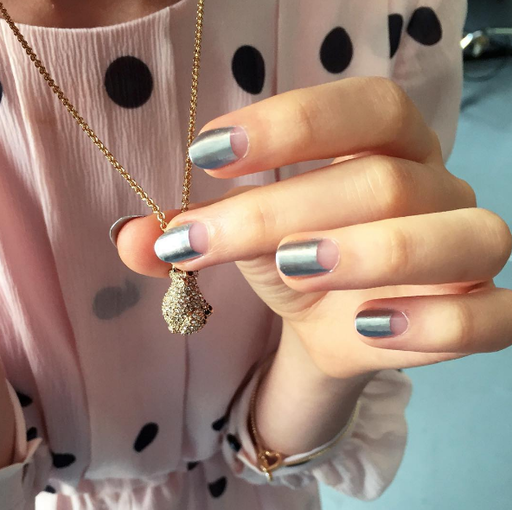
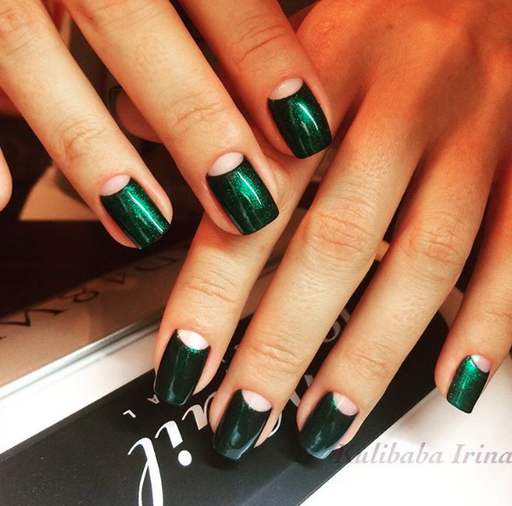
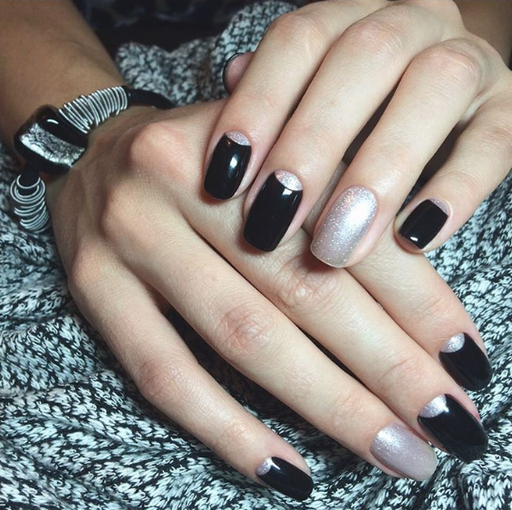
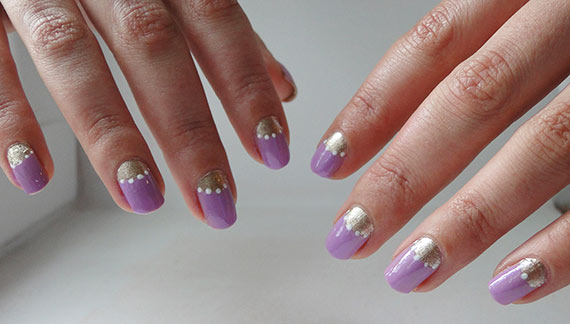
"Moon" manicure with glitter or metallic varnish
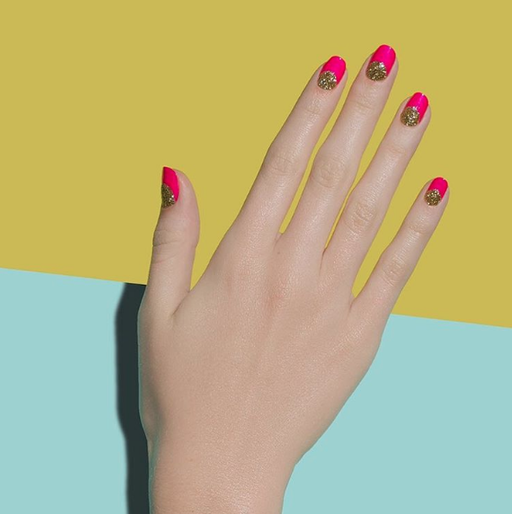
You can diversify the “moon” manicure, it seems, in a way that is already familiar to everyone - with the help of a varnish with a “metallic” shade or varnish with glitter. They, as a rule, distinguish exactly the hole, but you can also alternate it - create a hole with glitter or varnish with a metallic effect on several nails, then use it as the main color on other nails. Another option is to alternate varnishes with different textures, and leave all the holes transparent.
paintboxnails
paintboxnails
Krisdi_nails
Krisdi_nails
Krisdi_nails

Types of nail design are becoming more and more interesting and unusual, but for several years now, moon manicure has been considered quite popular. Any professional knows how to make holes on the nails.
But we do not always have enough time for beauty salons, so we have to take care of our hands on our own. So how beautiful and neat to paint the holes or, more correctly, lunula?
Using a stencil
The easiest way is to use a template. You can take a special round one, use a French template or cut it out of tape. The sequence of creating this beauty will be quite simple:
- Prepare your hands carefully Special attention cuticle - after all, all attention will be paid to it.
- Apply whatever shade you would like the crescents to be and wait for it to dry.
- Glue the template on the right distance from the base of the nail plate.
- Paint over the uncovered part, and after drying, quickly but carefully remove the sticker.
- It remains only to cover the result with a final colorless varnish.
This method is suitable not only for those who want to make a two-tone manicure. It will also help those who are looking for an answer to the question of how to make transparent holes on the nails. All steps look the same, but instead of applying the first coat of varnish, use a clear coat.
Stencils can also be used to create a moon jacket. To do this, at the third stage, two templates are attached - outside round sticker to the base of the nail plate, and the inner sticker from the side of the tip. It remains to paint over the main part and fix the result with a transparent coating.
Manually
This method is suitable for those who are interested in how to make holes on the nails without a stencil. There are at least two ways to create a moon design by hand. The first:
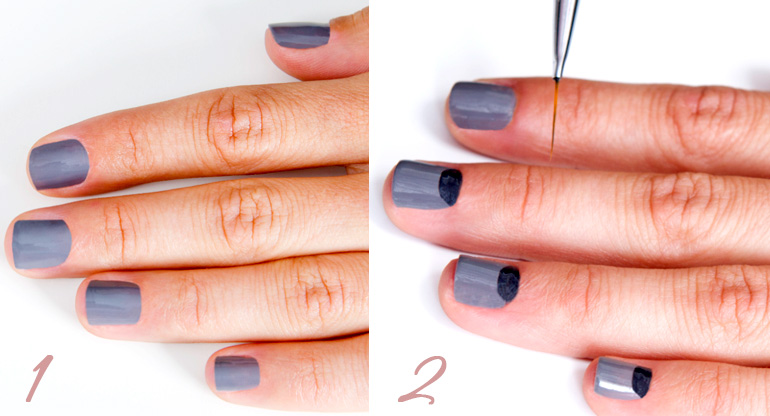
- Prepare your hands and apply base polish on them.
- With a thin brush, paint over the lunula, after marking the outline with dots - it will be more convenient to create an even outline.
- If the coating is not thick enough, apply a second layer.
- Apply a fixer.
In this case, the lunula will turn out to be slightly convex due to the thickness of the layers. If you need the opposite effect, paint the nail plates first with the color of the decorative element, and then apply varnish on top of the main part of the nail plate, without affecting the rounded area at the base.
The second option allows you to make a manicure without height differences:
- As always, get your fingers in order.
- With a thin brush, draw a crescent moon in two layers.
- Align the edges of the drawing with a corrector pencil. You can do this with a toothpick wrapped in cotton wool and dipped in a remover.
- Taking the brush again, carefully paint over the rest of the second tone.
- Apply a layer of fixer.
Lunar shellac
The methods for creating decor with conventional coating and gel polish are different. In the second case, standard preparation should include degreasing the nail plates so that the grip is as reliable as possible. Next, follow the instructions:
- Fully paint the nails with a shade for the lunula and dry them in a UV lamp for 2 minutes.
- Attach the stencil.
- We paint over the rest, remove the template and dry our fingers again with a lamp.
- We apply a fixative and put our fingers under ultraviolet light.
If you wish, you can do without templates and draw a crescent moon yourself, only this will require much more accuracy and perseverance.
How to choose a color
Usually, contrasting shades are used for lunar design. The most popular color for semi-circular decor is white. It looks great with any base. But do not limit yourself to such an example. You can always come up with something more original.
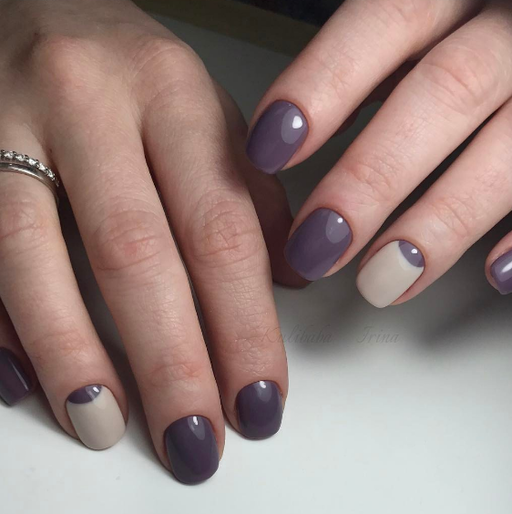
For example, you can combine different types one shade - dark and light tones of green, purple, pink, blue. Colors can be almost any. The choice will largely depend on what you plan to wear.
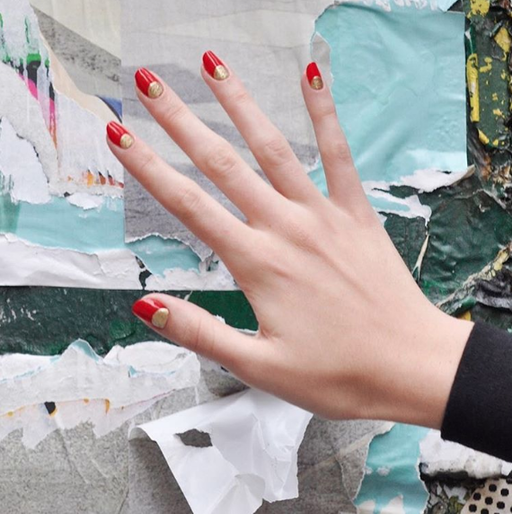
Another way to make the hands look more original is to use metallic colors. Silver or gold lunulae will look good with almost any shade and are great for evening style. This effect can be achieved with glitter paint or transfer foil. In the latter case, you will need to purchase a special glue.
In the moon manicure you can combine different colors, but the following combinations look most attractive:
- lime and brown;
- Red and black;
- peach or beige and black;
- brown and mint;
- red and orange;
- lilac and blue;
- pink and black.
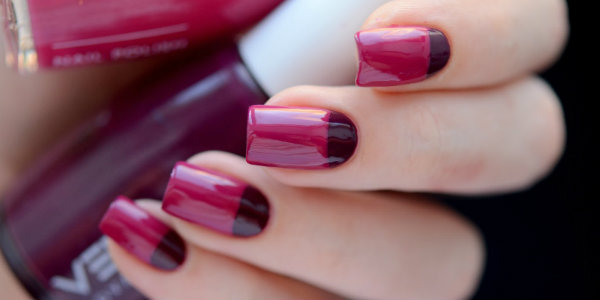
An interesting solution would be asymmetry. Example: all fingers have a red base with a dark lunula, and the ring finger has a red crescent and a dark background. Another idea - one of the fingers remains without decor, but completely painted in the color of the holes of other fingers.
How to add zest
The classic lunula design has become very popular in last years, so you won’t surprise anyone with them. A little higher, you learned how to make holes on nails with shellac or regular coating. Now let's figure out how to create something more non-standard.
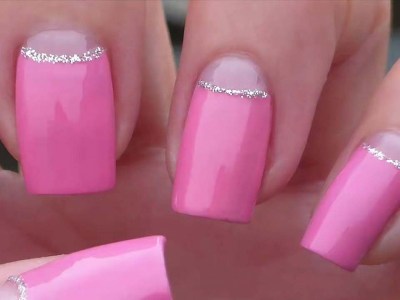
- The edge of the decorative element can be emphasized with a glitter composition. With a brush, draw the thinnest line right along the border of the two colors.
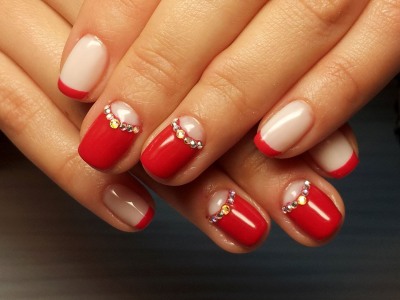
- Use rhinestones to add sparkle. Attach one large rhinestone to the center of the crescent border, or glue a few small ones to emphasize the border. Contrasting points can also be used for this.
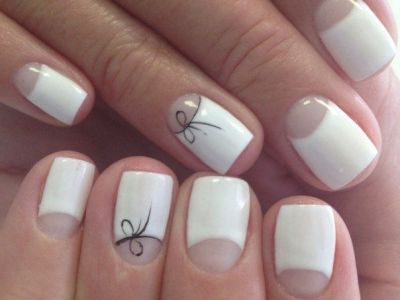
- Between the rounded element and the main color, you can draw thin line black and draw a bow.
- A hole can only be separated by a single line. A thin strip is glued along the border of the lunula even before the staining begins. The entire surface is covered with one varnish, and after drying, the strip is removed.
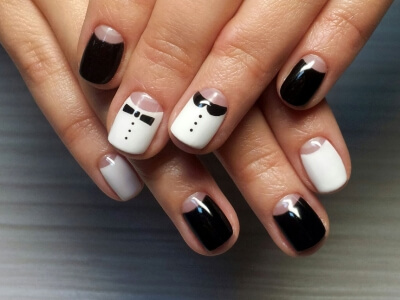
- On a white background with a transparent lunula, you can draw a collar and buttons in black.
Now you know how to make holes on your nails without the help of specialists, how to choose the right color and how to add zest to your manicure. Don't be afraid to be creative and come up with new ones. original solutions that are sure to impress those around you.
It is not necessary to contact a specialist to make an elegant moon manicure on your hands. You can master this technique at home - you only need desire and free time.
To look attractive and spectacular, women need to carefully care for their hair and hands. Good styling and neat manicure really give the girl confidence in her own irresistibility. But if the girls are used to looking after their hair on their own, then in the case of a manicure, you have to contact a specialist.
But in order to save money, the girls are interested in how to make a moon manicure at home. In practice, this turns out to be not so difficult: to learn, you only need a little free time and patience.
What is a moon manicure?
Most women prefer classic nail designs, which are distinguished by their versatility and modesty. Among these coatings, French and moon manicure are considered the most popular.
When performing a French, the master paints only the edge of the marigold to make a kind of smile. Lunar coating looks completely different - the varnish is applied to the base of the nail plate, like a hole.
It's interesting to know that moon design has been popular before. Women wore such a covering back in the 30s of the last century. Then almond-shaped nails, painted to match the dress, were in fashion.
What is the preferred nail shape?
Before you make a moon manicure with varnish, you need to give your nails desired shape. This design is quite versatile, and looks impressive enough on both long and short nails. Most often, girls choose short nails. square shape(often with rounded corners).
"Moon" is better not to perform on long pointed nails - such a coating looks rough, and often vulgar.
Design Options
It is worth noting that most girls have already abandoned classic varnishes and began to use shellacs. This type of coating is distinguished by its durability: the nails retain their neat appearance until the next correction.
If you don't know how to make a moon manicure with gel polish and you don't have necessary equipment Of course, it is better to contact the salon. There it will take a little time (the procedure lasts about an hour), and the result will definitely exceed your expectations.
Types of the "moon"
The popularity of the "moon" among women led to the emergence of new forms of this design:
- Classic - the entire nail is painted, excluding the growth zone (as in the 30s)
- Popular - the master paints the base of the nail in any color you like. This design is often combined with a French manicure using pastel-colored polishes. The result is an elegant nude finish.
- Dior - so called special kind coatings, which appeared quite recently. The master paints both the growth zone and the main part of the nail, leaving a transparent hole between them. Its width can vary depending on the wishes of the client. Such nails look equally good both in pastel colors and with bright and rich colors.
How to make a "moon" at home
Today, many girls are wondering how to make a moon manicure at home. In fact, this coating is not the most difficult, and therefore every girl can master it.
What will be required?
To master the coating technique, the first step is to acquire everything you need for this:
- Manicure set (for cleaning nails)
- Two types of varnishes (it is desirable to combine bright and pastel)
- French stripes
- Acetone (in case you need to tweak something)
- Fixative (can be replaced with clear varnish)
Step-by-step instruction
If you do not know how to make a moon manicure, but really want to see it on your nails, start by carefully studying the step-by-step instructions.
Initially, you should give the nails the desired shape and perform a deep cleaning of the cuticles. When the nails are prepared, you can begin.
The first step is to apply the main varnish (usually pastel colors) along the entire length of the nail. After waiting for the layer to dry completely, you should stick the stencils for the jacket at a short distance from the growth zone (choose the depth of the hole to your taste). This is followed by the application of the main, bright layer. Be careful not to go beyond the edges of the stencil - this will make the coating untidy.

At the end, the nails are covered with a fixative. If desired, the line of the hole on one or two nails can be painted over with shiny varnish or rhinestones can be used.
There is an option on how to make a moon manicure at home in a different way. To do this, immediately after cleaning, you should stick the stencils and varnish the nails in several layers. This design is easier to implement (you won't have to worry about bottom layer not dry enough) and looks more delicate.
Learning to use shellac
The advantages of gel polishes are obvious, and therefore more and more girls prefer it.
Many have already acquired everything necessary to perform such coverage at home. If you also want to understand how to make a moon manicure with shellac, be sure to go to a cosmetics store and purchase everything you need:
- UV lamp (there are miniature USB models that can dry nails in 10-15 seconds)
- The foundation
- Lacquer in the color you want
- Degreaser
- stencils
- Fixer
The technology of applying shellac is not much different from the usual coating of nails. But when using gel polishes, it is necessary not only to perform a manicure, but also to polish the entire surface of the nail with a buff. You should not overdo it - just remove the shiny layer.
After that, the base is applied and the nails are sent to the lamp for a few seconds ( exact time need to look at the box of your UV lamp, because the different manufacturers this figure varies).
Considering that shellacs are easy to work with and do not reprint, you can try to make a “moon” in the Dior style. To do this, carefully cut the French stencils (to make them thin) and glue where you want to see the hole.
In the growth zone of the nail, colored varnish is applied (at the base it is better not to use too dark tones - it will give the impression that you are sick or pinched the nail). On the other side of the stencil, apply any varnish that you like.
After waiting for the color layer to dry completely, you can carefully remove the stencils: an intricate manicure with a small transparent hole will appear on the nails. Next, the entire surface of the nail should be covered with a fixative (it can be in several layers) and sent back to the lamp.
At the final stage, the nails must be wiped with a degreaser to remove the sticky layer of shellac. When the manicure is completely ready, it is recommended to lubricate the cuticles with nourishing oil and enjoy the spectacular design for 2-3 weeks.
After learning how to make a moon manicure at home, you can safely experiment with colors and designs. During the training, you will need little "secrets" of the masters, which greatly facilitate the work:
- French stencils are usually removed after the varnish has dried, but if the coating is not of sufficient quality, the varnish may fall off. That is why it is better to experiment with the stencil in advance and understand when it is more convenient for you to remove it.
- The fixer and base must always be used - this will protect your nails from negative impact varnishes, and also make the coating more durable.
"Moon" is a truly versatile and stylish cover that is perfect for every woman. With such a manicure, you are not ashamed either in the office or in a restaurant, and therefore feel free to experiment with appearance your nails.
Learning to make a beautiful moon manicure on our own: video
These days, the moon manicure has gained a new lease of life, thanks to the fashion house Dior, who staged a fashion show where the models had their nails painted in the moon design.
Every girl who takes care of her appearance is always looking for ways to decorate her image. You can make a stylish hairstyle, or you can perform Beautiful design nails. Agree, well-groomed nails with interesting design always look beautiful and attractive. Someone is looking for the last fashion trends not only in clothes, style, but also in the design of their nails.
Now the moon manicure has become very fashionable, but do not think that this is something new. Lunar manicure was popular in the 20-30s of the last century and as it always happens, all fashion trends are back, slightly changed in a modern way, but the basics remain the same. At that time, nail polishes were only in their infancy and full coloring of the nail was considered bad form.
Therefore, fashionable ladies always left the base of the nail, its hole, unpainted. Hence the name - moon manicure. These days, the moon manicure has gained a new lease of life, thanks to the fashion house Dior, who staged a fashion show where the models had their nails painted in the moon design.

Today on site website we will show how to do a moon manicure, it is not necessary to contact the master in the salon for this, if you want it you can easily make your own at home. Lunar manicure should be done using special sticker stencils (can be replaced with adhesive tape) or an ordinary brush. The main thing here is accuracy, harmoniously matched colors of varnishes and, of course, well-groomed hands and nails.
How to do a moon manicure - use sticker stencils
Making a moon manicure using special stickers is very simple.
Would need:
- two varnishes different colors, preferably contrasting in color tone;
- sticker stencils (can be replaced with adhesive tape!);
- Top coat - optional. To smooth out unevenness and add a sparkling gloss, as well as to complete the design, it is advisable to use a transparent varnish (drying, top coat, fixer)
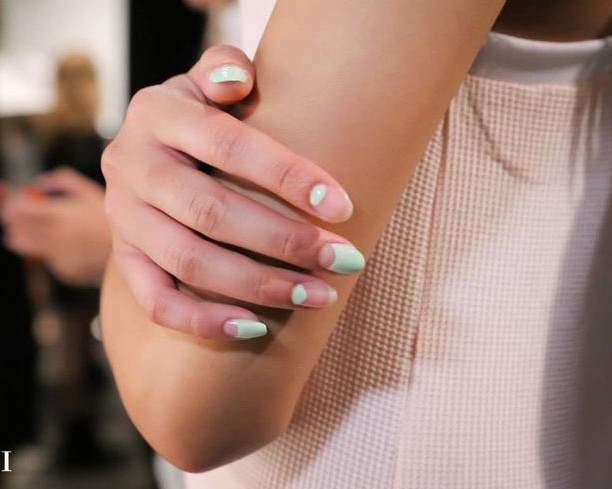
Step 1 Do a hygienic manicure - clean your hands and nails, move or remove the cuticle, give the desired shape to the nails with a nail file. Now you can apply on the nails the color that you want to see near the base of the nail (in the photo there is a delicate pink color)
Step 2 Place the stickers at the base of the nails on each finger as shown in the photo.
Step 3 Coat your nails with a second polish of a different color and let dry
Step 4 Can be topped with clear topcoat and cuticle oil applied. Lunar manicure is ready!
How to do a moon manicure with a brush
This requires some care in the execution of the design. Would need:
- Two varnishes of different colors;
- Thin brush;
- Rhinestones for decoration - to your taste at will;
- Finishing coat - optional.
Step 1 After hygienic manicure, cover your nails with base color polish. Let dry well.
Each fashionista will be able to independently make a beautiful moon manicure. The photos show step by step how you can make up your nails in an original way at home. The procedure is easy to perform using special stencils. Some girls have learned to draw a crescent shape on the nail plate by hand.
How to make a moon manicure - step by step photo stencil
 The image in the form of a crescent is the fashion trend of the season. Such famous people like Rihanna, Megan Fox, Irina Dubtsova, Alena Vodonaeva and other stars have been seen with a moon manicure. The image becomes interesting and attractive. This pattern is perfect for any event. A step-by-step photo of a moon manicure will help you properly apply varnish at home.
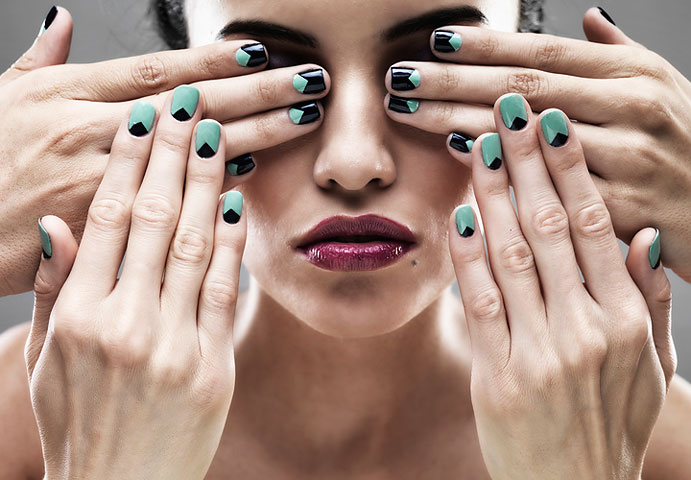
In a special store for cosmetologists and hairdressers, you can buy ready-made stencils for manicure in the form of a smile. Sometimes stickers are sold in departments household chemicals. The moon manicure technique is easy to use. 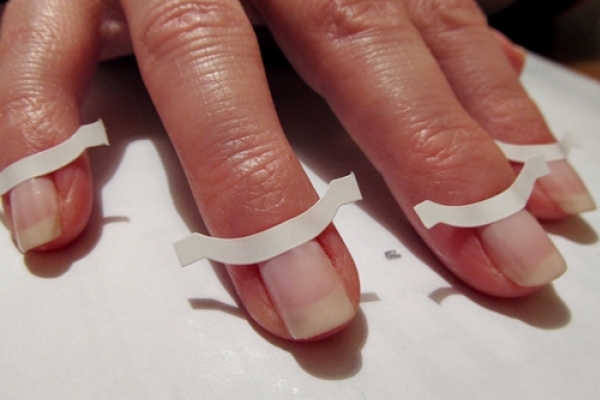
For the procedure you will need:

Such a simple option is available to every woman who wants to stand out. Lunar manicure, photo shown step by step, looks good on long, medium and short nails.
How to make a moon manicure without a stencil - step by step photo
 If a special stencil is not purchased, but you really want to make a moon manicure, then it is recommended to follow another step by step instructions. Some girls use scotch tape at home to mark the place of the “smile”. However, there is another technology. You can draw a crescent moon on your nails yourself or by hand.
To complete the procedure, you need to take 2 varnishes different color. It is recommended to choose contrasting shades. For example, as in the photo, red and blue varnish.
- The nails are covered with red varnish and wait for complete drying.
- A small indent is made from the base of the nail or lunula, covering the rest with blue varnish.
- After the second layer has dried, you can apply a base coat.
 In order for the “smile” to be even, you can use a lip pencil. With it, draw a suitable contour.
Moon Manicure Designs and Ideas
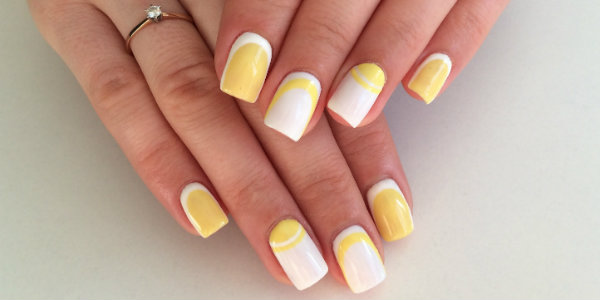
 Fashionable manicure can be varied. It all depends on the shades of varnish used, ideas and individual preferences. Stylish look you can create with a bright palette, or use pastel colors. Very often, masters use such combinations of varnishes as red, white, black, lilac, blue, purple, mint, green, turquoise, pink and other tones.
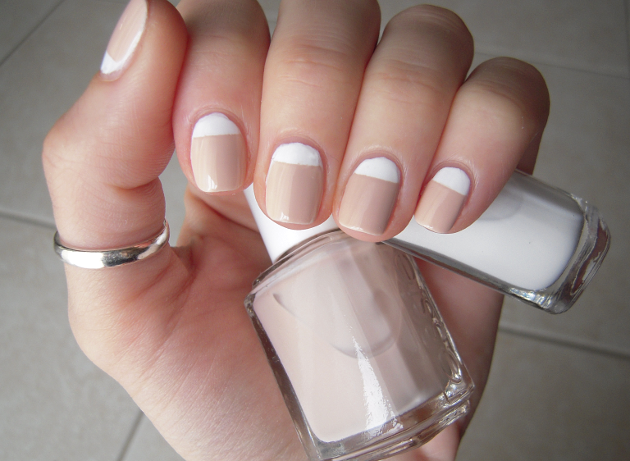
 If the border of the combination of two shades is not even, then you can mask this area with rhinestones or sparkles. The trend of the season is, which can perfectly harmonize with the lunar image.
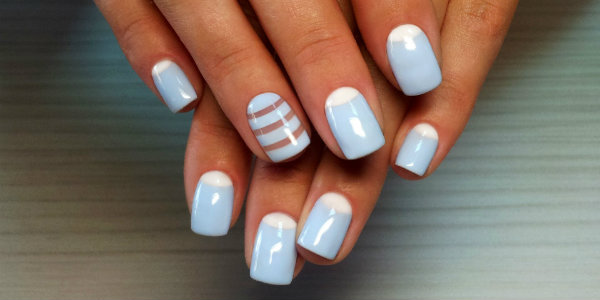
 Some masters paint all nails in lunar technology. Interesting image with alternation different options. So, for example, several nails can be painted in a monochromatic way.
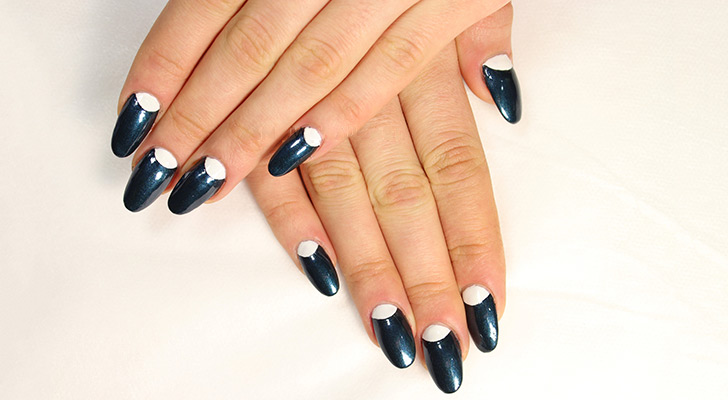
 When choosing a performance technology, it is recommended to take into account the event for which the manicure is being done. So, the image with pastel shades will become ideal option for work. And complete a festive or solemn image.
