Lunar manicure design. Lunar manicure - video. How to do a moon manicure with shellac at home
Nail design is more popular than ever. Beauty salons offer visitors more and more new techniques for decorating fingers. One of these options is in demand in the 20s, but then completely forgotten and again reminded of itself in 2007 moon manicure, which bears the second name "moon jacket".
Ways to perform a moon manicure
There are the following options for lunar manicure, performed using:
- stencil-stickers;
- colored foil;
- decorative brush.
Stencil-stickers
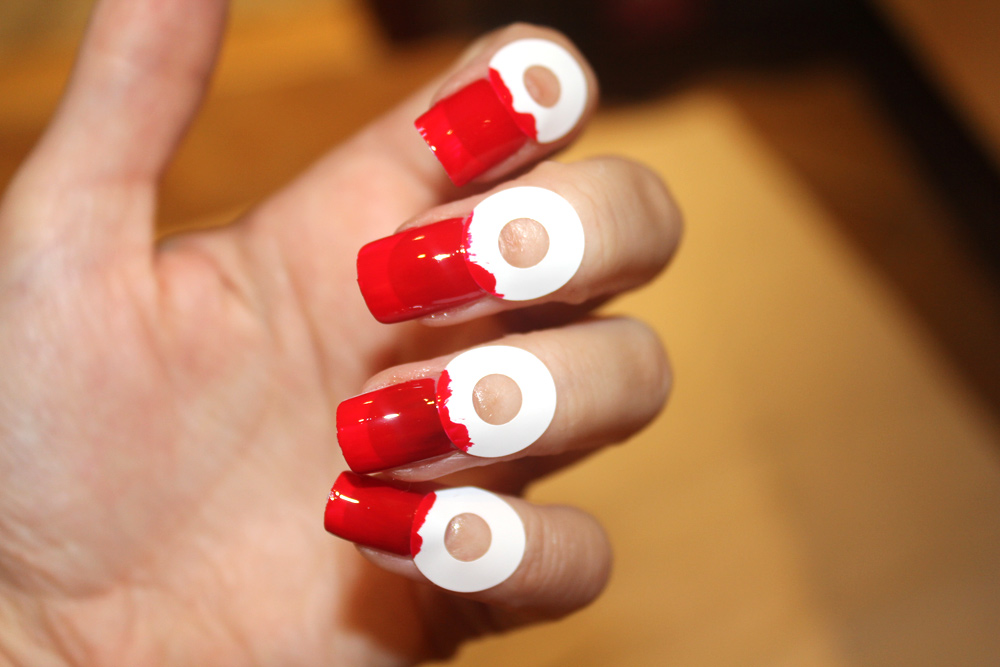
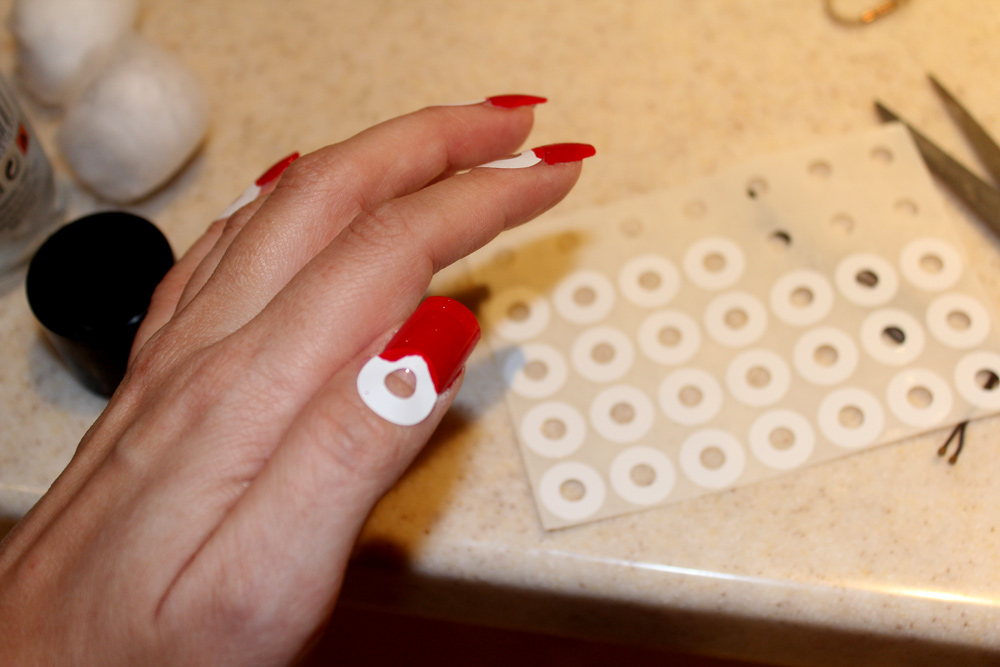
Lunar nail manicure with stencil
Lunar coverage is done as follows:
- Prepare for work the base coat, two types of colored varnish, top coat and stencils.
- Apply a base coat (one layer) to nails cleaned of old varnish and previously applied strengthening agents, well filed and having the desired shape and allow it to dry.
- Apply colored varnish - one or two layers and allow the varnish to dry completely.
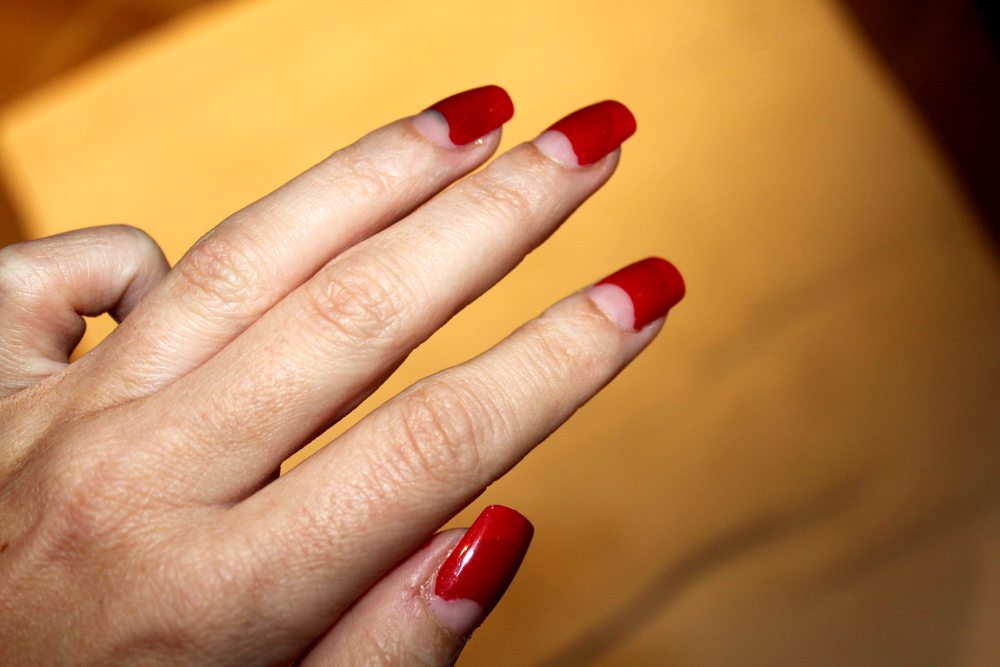
- Depending on the desired nail design, stick a stencil on each nail. You can make an imitation of a natural hole, or you can also make an “inverted jacket” if you stick the stencil not on the base of the nail, but on its end.
- Apply a second, contrasting varnish to the resulting hole, painting it completely.
- Let the varnish dry and carefully remove the stencil.
- Coat your nails with top polish and let it dry well.
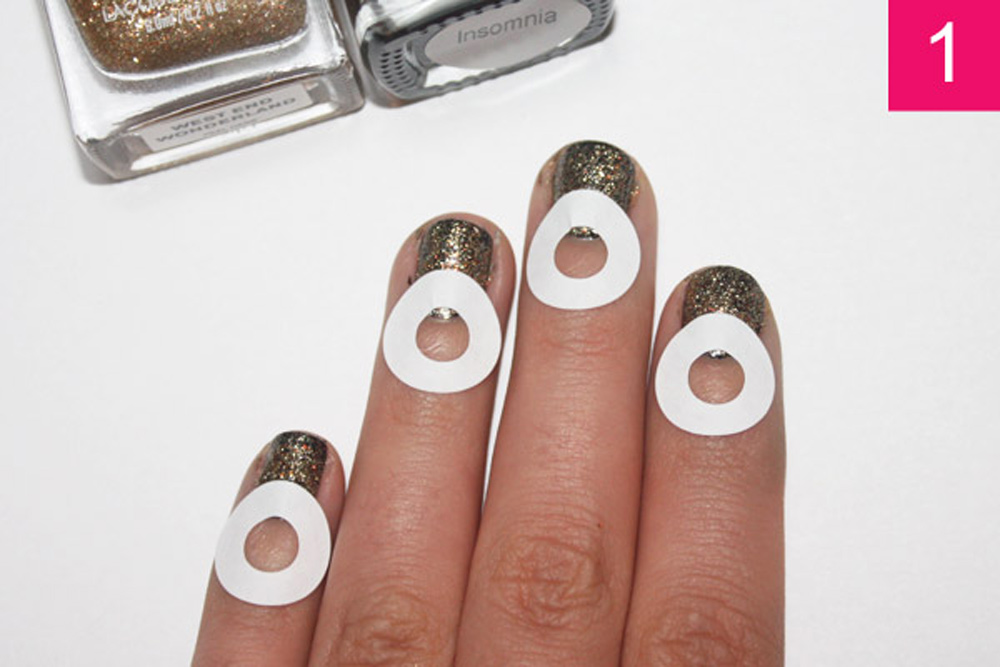
We stick stencils
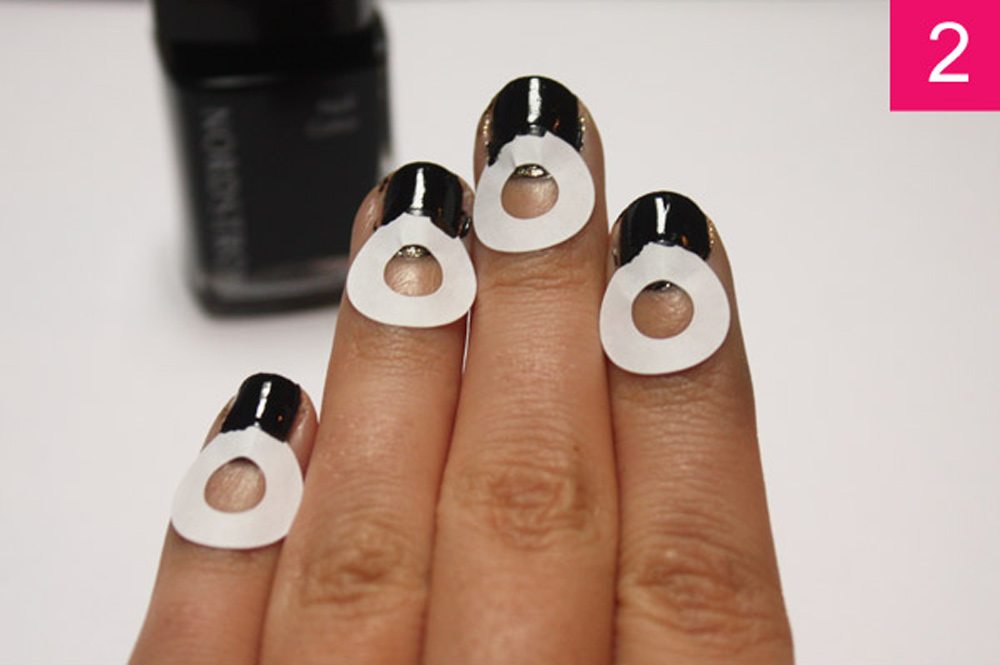
Applying the second layer
Result
Nail design with colored foil
How to make a trendy moon manicure without a stencil? To do this, you can use, for example, transfer foil. To create a manicure using foil, you will need:
- base coat;
- degreaser;
- gel polish;
- transfer foil;
- adhesive for transfer foil;
- top coat;
- Ultraviolet lamp.
Varnish set
The technique for performing such a jacket with a hole includes the following steps:
- Give nails comfortable shape, delete old varnish previously applied firming agents and degrease the nail plates.
- Apply one layer of the base composition and dry under a UV lamp.
- Apply 2-3 layers of colored gel polish and also dry under the lamp.
- Paint the nails with a top coat, then dry under the lamp and remove the sticky layer.
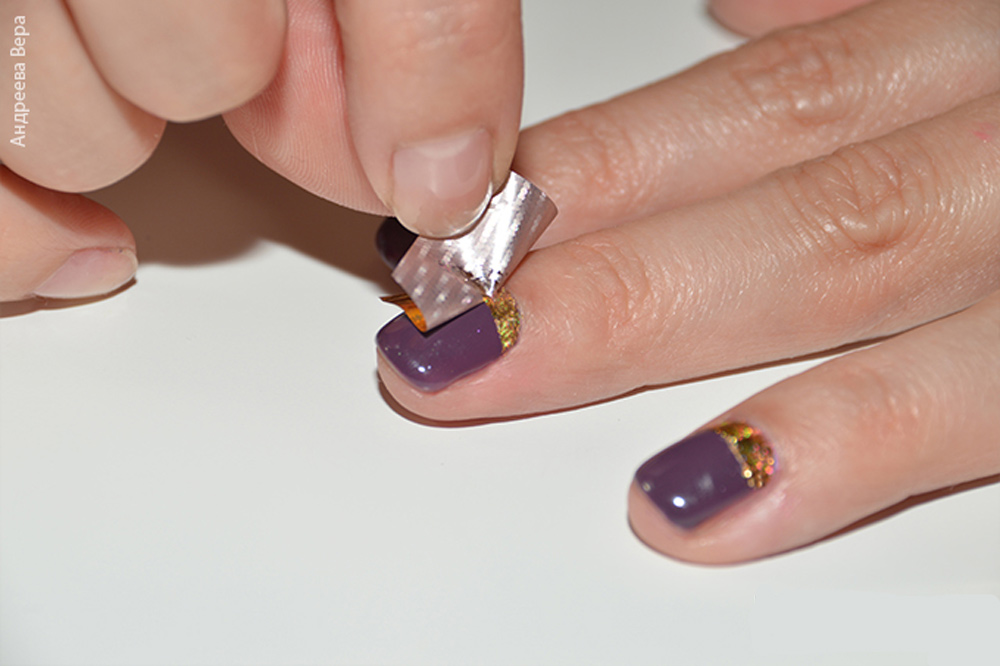
- Apply a layer of adhesive for transfer foil on the part of the nail where the crescent will be located, and allow the composition to dry (should become transparent).
- For convenience, cut small squares of foil - approximately the size of the width and length of the nail.
- Put a piece of foil on each nail with the matte side towards the place where the glue is applied.
- Press the foil firmly against the adhesive with your fingers, smooth it out, and then pull the foil off with a jerk.
- A colored strip from the foil should remain on the glue. If it is not there, apply a layer of varnish again, let it dry, then glue the foil and remove it with a sharp movement.
- Apply a top coat for gel polish to your nails or cover them with a regular top coat.
- Let your nails dry well.
Reverse moon manicure

Lunar manicure design with a brush
For this type of manicure you will need:
- basic composition;
- two types of colored varnish;
- top coat;
- decorating brush.
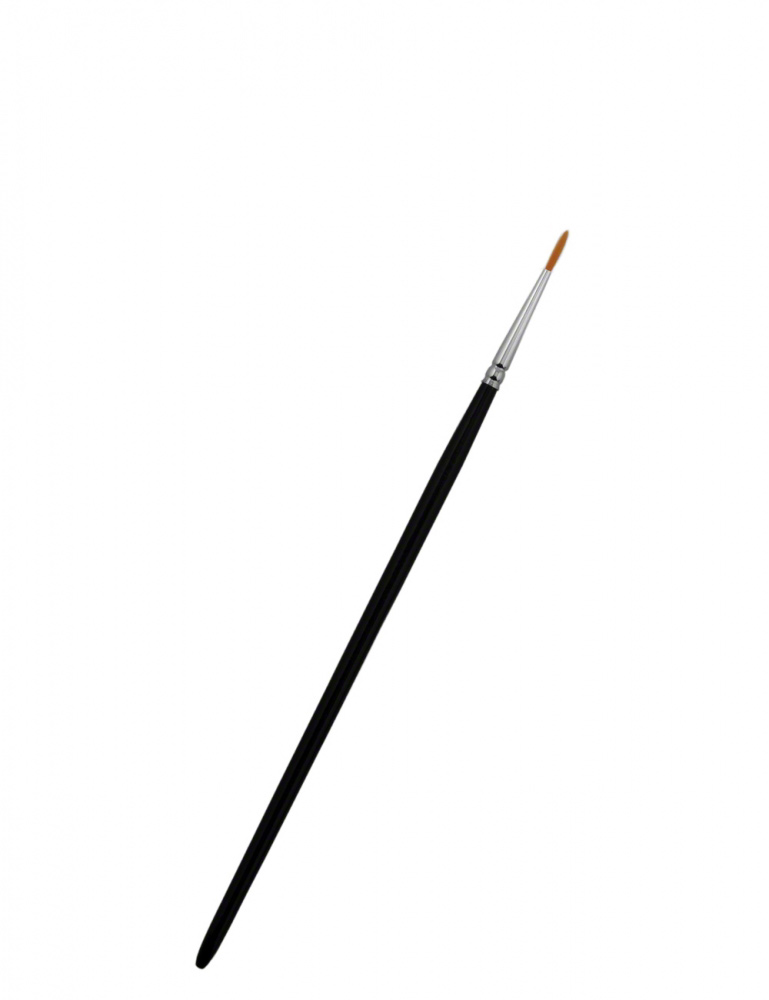
Tassel for moon jacket
The technique for performing a moon manicure with a brush consists of the following steps:
- Give nails desired shape, remove the cuticle (if necessary), old varnish, apply a layer of the base composition on the nails and dry it.
- Apply 1-2 coats of colored base polish on your nails and let it dry well.
- Take the second colored varnish, which will paint the hole on the moon manicure, dip a brush into it for decoration and outline the boundaries of the future crescent.
- Paint over the resulting area of the hole with the same varnish and let it dry.
- Apply a top coat on the nails and allow the nails to dry well again.
Transparent moon manicure
The technique for performing a transparent moon manicure is the same as for the usual decoration of nails in this way, however, instead of one of the colored varnishes, a transparent varnish is used. Instead, you can use the usual base, which is applied under colored varnish. Nails look well-groomed, beautiful and at the same time interesting.


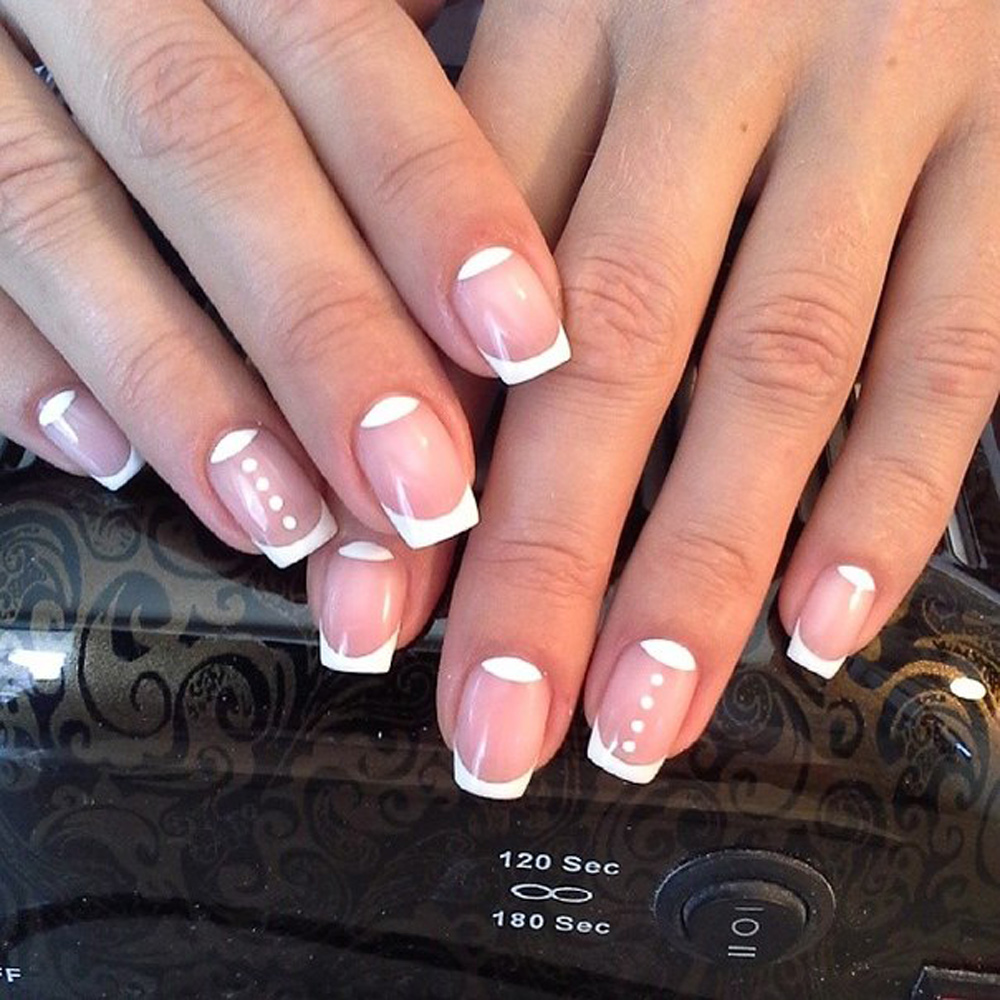
Creating a French Moon Manicure
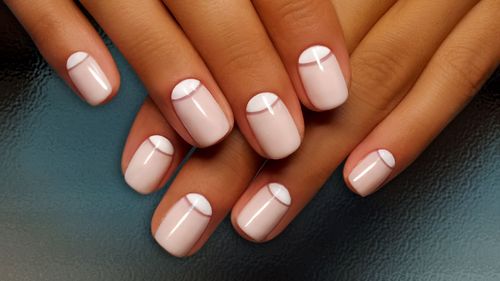
The Lunar French Manicure is the forerunner of the now popular Reverse Lunar Manicure. French variant nail coloring differs from the “inverted jacket” by the presence of varnishes of light, pastel colors and holes white color. This gives the nails a delicate, neat look, suitable for any look and any event.
The technique for creating such a nail decoration is quite simple: it requires the presence of stencils, a base coat, pink, beige or other light shade varnish, white varnish and a top fixing compound. Hole at french manicure is located not only at the base of the nail, but also at the tip and has a curved shape, so the stencil should be applied accordingly. After performing a manicure, the nails should be treated with a top composition and allowed to dry.
DIY moon manicure

Not all women and girls have the time and financial ability to visit beauty salons in order to get a moon jacket. How to make a moon manicure at home and is it possible? Yes, it's possible, and it's pretty easy to do.
So, for work you will need: a base coat for varnish, 2 types of colored varnish, a stencil and a fixer. If there are no stencils in the store, you can make them yourself by cutting them out of thick paper. Stages of creating a manicure:
- Clean the nails of the old varnish and products applied earlier, shape the nails with a file and cover them with a base base.
- After the base has dried, apply the colored varnish that will serve as the hole.
- After it dries, apply a stencil to each nail, cover part of the nail with it, apply another colored varnish and let dry.
- After that, remove the stencils from the nails, apply a fixer and also let it dry.
Many fashionistas do not know how to do a moon manicure at home on short nails without a stencil or how to draw a moon manicure with their own hands. Drawing a moon manicure, both for yourself and for someone else, is quite simple: you can use a thin brush and draw a hole on your nails, or apply a transfer foil that is sold in a store.
How to do a moon manicure correctly - French, gel polish, as well as where to see pictures and ideas of a moon manicure, the video instruction will tell in detail or step by step photo. You can find many master classes on the net, where experienced craftsmen will teach beginners how to make a moon jacket manicure, a crescent moon with holes, etc.
The most successful combinations of colored varnishes are:
- moon manicure red and white;
- blue;
- white french;
- black with gold or silver;
- white with purple;
- chocolate and white;
- yellow and orange;
- black and white;
- peach and black;
- beige and black;
- green and yellow, etc. - it all depends on the imagination of the fashionista.
The price of a moon manicure depends on the experience of the master, the cost of varnishes and other means used in the performance of the work. If you decorate your nails yourself at home, then the work will cost much less than in a beauty salon.
In recent years, the hands of beautiful girls are increasingly decorated with moon manicure. This is due to the fact that this manicure has an unusual design look that is easy to transform into different variations.
Some facts
Let's look at a few features of creating a unique moon manicure with gel polish:
- the decor of the manicure a priori looks original, but a special emphasis can be made thanks to various combinations of varnishes. For example, beige gel polish or interspersed with gold will perfectly emphasize the playfulness of burgundy color or the passion of red polish. Silver color can be used as a decor in conjunction with a white base, black and gold have the same compatibility. A hole highlighted with white varnish will make the rich color of lavender, turquoise or pale blue more distinctive;
- moon manicure lends itself perfectly to decoration. At the fusion of two colors on the nail, you can use rhinestones, manicure foil and other decorative elements;
- creating a moon manicure, you need to be as accurate as possible so that the lines are neat and clear, so it is best to use stencils;
- moon manicure is made out not only in a semicircle, a triangle option is also possible.
Art nail masters distinguish three ways of this manicure:
- The main material is foil. Luxurious manicure created with ordinary foil.
- Drawing a hole with a brush on the nail with a distinctive varnish color.
- Using French stripes or a regular stencil.
Most accurate stencil holes
Materials:
- a set of tools for basic nail treatment;
- degreaser;
- base;
- basic gel polish;
- contrasting gel polish for the hole;
- fixing agent;
- stencils (you can use an alternative to homemade stencils from adhesive tape or adhesive tape);
- lamp with ultraviolet rays for the drying procedure of gel polish.
How to quickly create a moon manicure yourself:
- Pre-preparing hands for manicure. We make baths using essential oils, as well as sea salt, which strengthens the nails well. This procedure is done to steam the cuticle and then easily remove it.
- We remove the cuticle and smooth the surface of the nails by polishing and grinding with a file of medium abrasiveness.
- In order for the gel polish to be evenly distributed on the nail plate, it must first be degreased.
- The next step involves applying the base coat. Drying in an ultraviolet lamp after application.
- Then the main tone of the gel polish is applied in two layers to each nail, while the layers are dried alternately under a UV lamp for about two minutes.
- After making sure that the main gel polish is completely dry, the stencil is glued.
- The hole is stained with another contrasting color of gel polish.
- The stencil is removed. This is followed by drying under a UV lamp.
- The final moment is the coating with a fixing agent, which also requires drying. An excellent moon manicure can conquer contemplators!
Foil is the main element of manicure

Materials:
- as in the previous version, a manicure set;
- base coat;
- gel polish of the required color;
- fixing agent;
- colored foil;
- nail glue for attaching foil;
- ordinary cotton swabs;
- lamp.
For this you need:

- We carry out all the necessary procedures preparatory phase (water procedures for hands with essential oils, removal of the steamed cuticle, smoothing the surface of the nails and its degreasing before the subsequent application of gel polish).
- The surface of the nail is covered with a base coat, and then dried under the lamp.
- Next, each nail is covered with the main color of the gel polish (please note that the color is saturated, at least two layers are applied). Drying of the first and second layers should be at least two minutes.
- Using a brush, glue is applied at the base of the nail. Here it is necessary to be extremely careful so that the sizes of the holes do not differ.
- Then we apply the foil with only the matte side to the glue. After the glue dries, fast moving remove unnecessary foil.
- To achieve the most ideal result, the foil procedure is repeated, since initially the foil does not always adhere evenly.
- The final stage involves coating with a top coat, and drying under a lamp for the usual two minutes. Enchanting manicure is ready!
Video - Master class on creating an unusual manicure
Creating holes with a brush
Materials:
- no doubt a manicure set;
- thin drawing brush;
- two different varnishes that go well together;
- means for degreasing nails;
- coating-base;
- fixative;
- nail polish remover;
- UV lamp.
Step-by-step instruction:
- The basic stage of creating a manicure, which provides for preparatory procedures (described in previous versions).
- Standard degreasing of the surface of the nail for uniform application of the main gel polish.
- Apply base and dry under UV lamp.
- Next, we apply the main gel polish, no less than two layers, with each layer drying for about two minutes under an ultraviolet lamp.
- Using a brush, draw a hole at the base of the nail with a distinctive varnish. It should turn out even and the same, so you have to spend a little time to be extremely accurate in the lines.
- At the end, cover with a fixative, dry and enjoy a successful manicure!
Remember that a little time spent at home will give you an incredibly stylish manicure that you can easily wear as a business option, or with the addition of decor, as an option for a party. Follow the instructions and you will certainly succeed!
In contact with
Lunar manicure consists in making holes at the base of the nail. In 2017, the moon manicure is at a premium among fashionistas. Many mistakenly believe that it is difficult to do it yourself. Let's figure out how to make a moon manicure with gel polish at home.
Lunar design with plain varnish
Before doing a manicure with gel polish, you need to master the technique itself well, work it out. To work out, examine step by step and make a lunar design at home, we will first use a simple varnish, and then we will use gel polish.
In 2017, the moon manicure will be the main trend of the nail industry. There are several types of lunar design. They differ in the following ways:
- Execution technique.
- The colors used.
- The shape of the holes themselves, which can be made in the form of an angle, arc or semicircle.
The photo shows that the inverted jacket is varied.
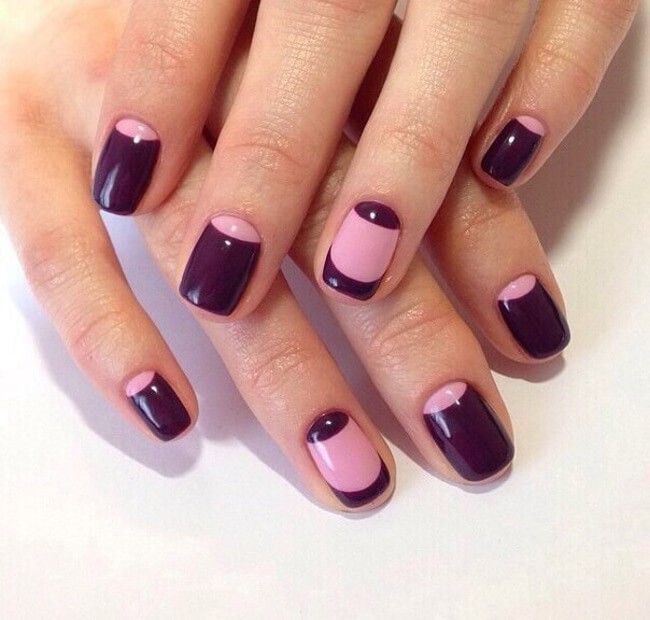
When choosing colors, please note that they should be contrasting. For example, a combination of red and pink will not look as advantageous as a duet of red and black. Also, moon manicure goes well with other types of design and nail processing techniques. It can be done with a classic jacket, decorated with rhinestones, stamping and so on.
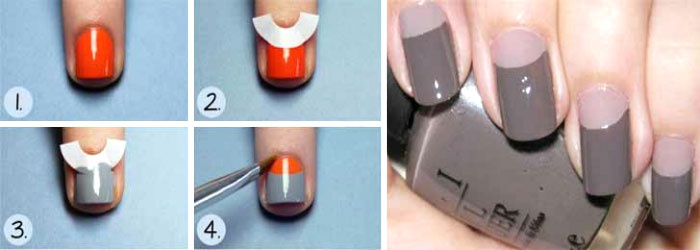
Instructions for performing ordinary varnish
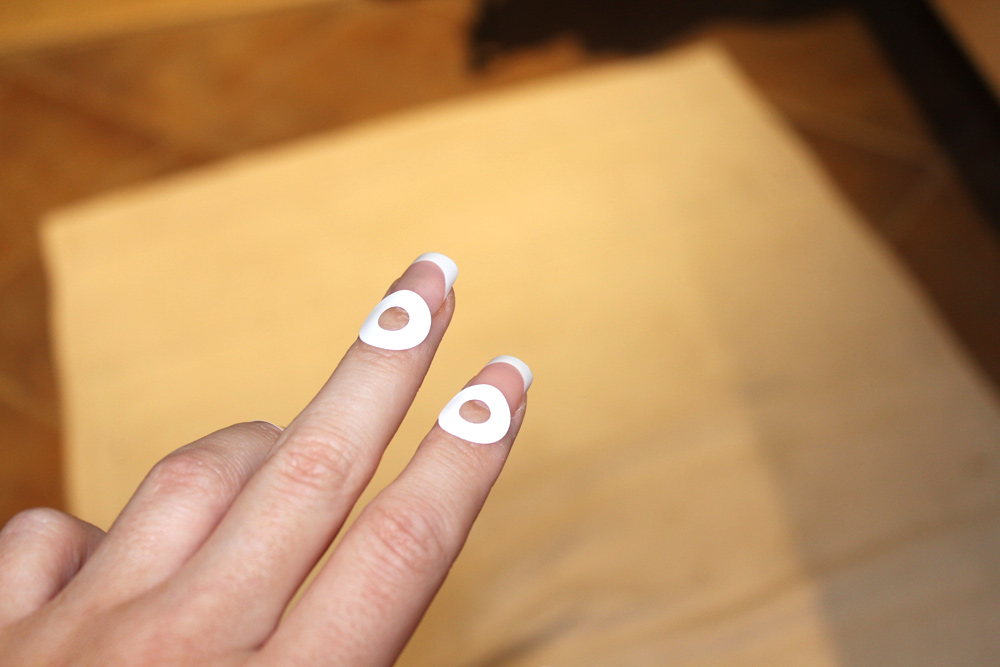
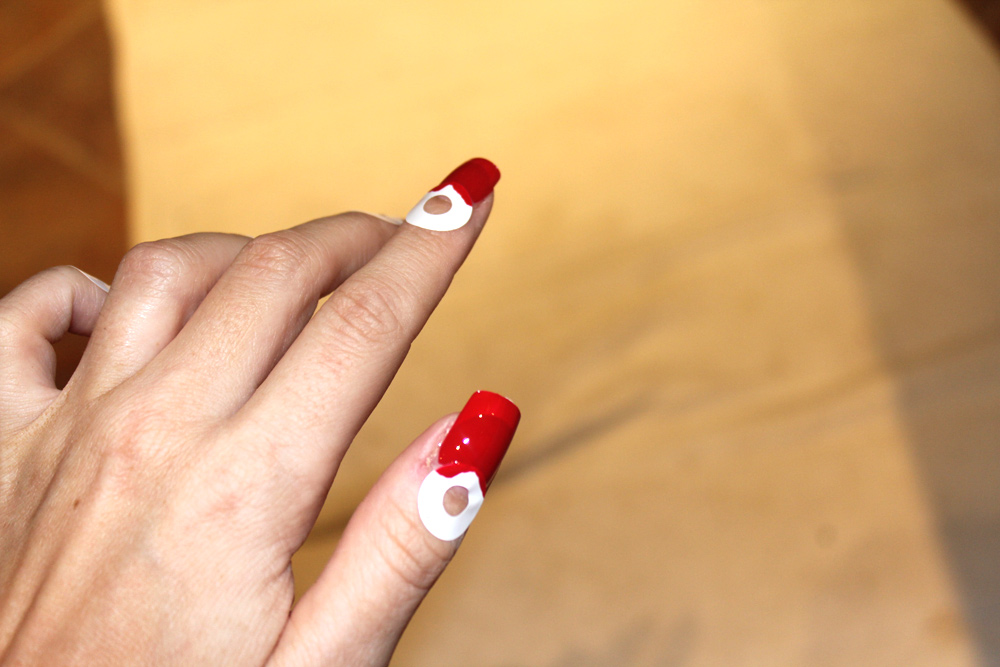
Before you do a moon manicure, prepare everything you need. First of all, these are varnishes of two colors. Also, to make holes, you will need stencils, a base for manicure, a special brush and a protective coating. Now let's take a look at the process step by step:
- We choose shades. It is best to make the hole in a light, soft color, and choose a catchy color for the coating itself.
- First of all, we do a hygienic manicure. Lunar manicure implies a perfectly removed cuticle, without torn edges and other things. All attention will be drawn precisely to the base of the nail plate, treat it with special care.
- When the nails are ready for applying varnish, namely, first carefully apply the base. This ensures a smooth application of the varnish itself and increases the wear time.
- After we apply the main varnish. Keep in mind that it is better to choose a matte varnish. Mother-of-pearl varnish will not give a clear hole, and an inverted jacket will look sloppy.
- When the varnish dries, glue special round stencils. You need to stick them in such a way that the hole remains free. Next, fill the open hole with a contrasting shade and immediately tear off the stencils. Do not leave the stencils until the lacquer dries, otherwise the lacquer layer will be removed along with the stencil.
- If you plan to additionally decorate the nail plate, then apply decorations along the border of the holes. If you make decorations in the center, then they will distract from the main element - the holes themselves. Ideas for design you can emphasize from the photo.
- In the final, it is necessary to apply a fixing coating.
If you're good at drawing, you can ditch the stencils and instead make holes directly on the decorative varnish layer with a thin brush. If there are no special stencils, they can always be replaced with ordinary adhesive tape.
Lunar design with gel polish
So, we got acquainted with the technique and learned how to make holes with ordinary varnish. Now let's look at how to do a moon manicure with gel polish at home.
Such a fashionable trend in 2017 has several advantages:
- It is easy to make at home;
- It looks advantageous on short and long nails;
- Can be combined with any look.
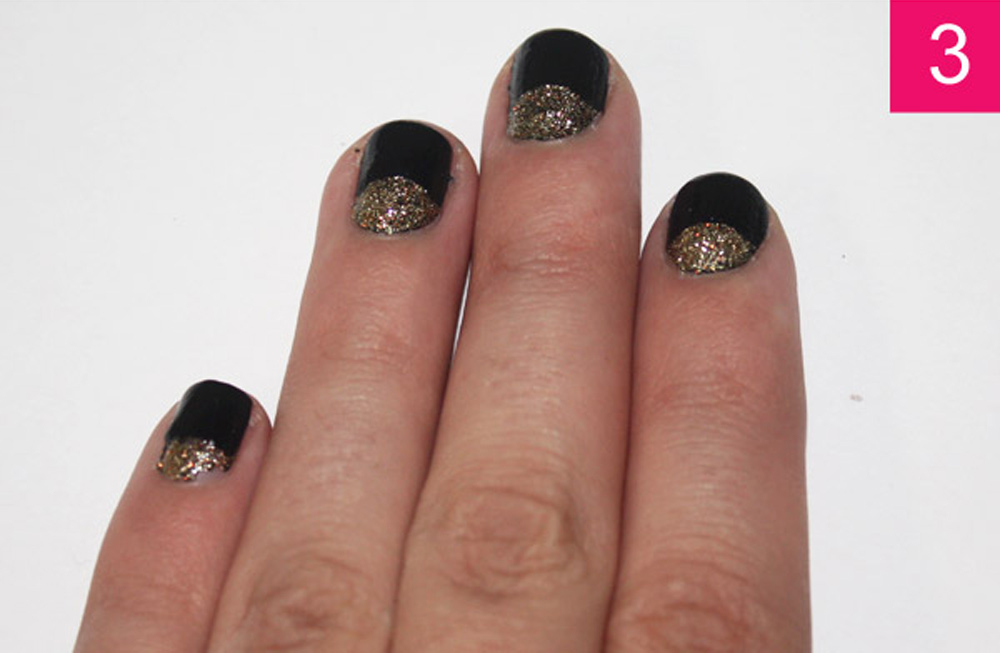
The main difference between a manicure made with gel polish is its durability. Also gel polish has a special shine, thanks to which nails with a moon manicure made of gel polish look especially festive and solemn. If we talk about the most winning combinations, then this is undoubtedly classic black with white, black with red, luxurious black with gold.
Consider how to make a moon manicure with gel polish step by step, but first we list everything you need. First of all, these are gel polishes themselves and an ultraviolet lamp, as well as smooth wipes, nail polish remover, stencils, degreaser.
Moon design instructions with gel polish
- As before, we first do a hygienic manicure, give the nails the desired shape.
- We degrease the nail, which will provide increased adhesion of the varnish and the nail plate.
- We apply the base and dry the nails under the lamp for half a minute.
- We apply one layer of decorative gel polish and dry the nails for half a minute.
- We apply a second layer of decorative varnish and dry for a minute and a half.
- We glue the stencils and carefully apply the second decorative varnish, painting over the area of the hole.
- Dry your nails for two minutes.
- We fix the coating and dry the nails again for half a minute.
- If you plan to further decorate your nails, then decorate them and dry them again.
- We remove the top sticky layer and lubricate the cuticle with natural oil for maximum hydration.
Today there is a large number of manufacturers of gel polishes and each of them offers a wide range of shades. But, unfortunately, the quality is not perfect for everyone. Essie brand varnishes are best suited for wells. Essie is a company with international name specializing in the production of high quality nail care products.

With the help of the presented photos and videos, you can easily and quickly make a lunar design yourself. Choose for manicure only quality products because the health of your nails depends on it.
Gel polish can make any nail design and moon manicure is no exception. The simplicity and elegance of the moon manicure become a real decoration for your pens if the design is made with gel polish. Persistent glossy shine and durability are the undeniable advantages of gel manicure.
Types of moon nail design
A feature of the moon manicure is that the nail hole stands out with a varnish of a contrasting shade. To do this, you can use a stencil or a thin brush. In this case, the shape of the hole (line of the moon) can be different:
- The classic line of the moon exactly repeats the outlines of the natural hole of the nail plate. It is convenient to use a stencil to draw it.
- If you use a V-shaped stencil to draw the line of the moon, then you will get a moon manicure called a chevron.
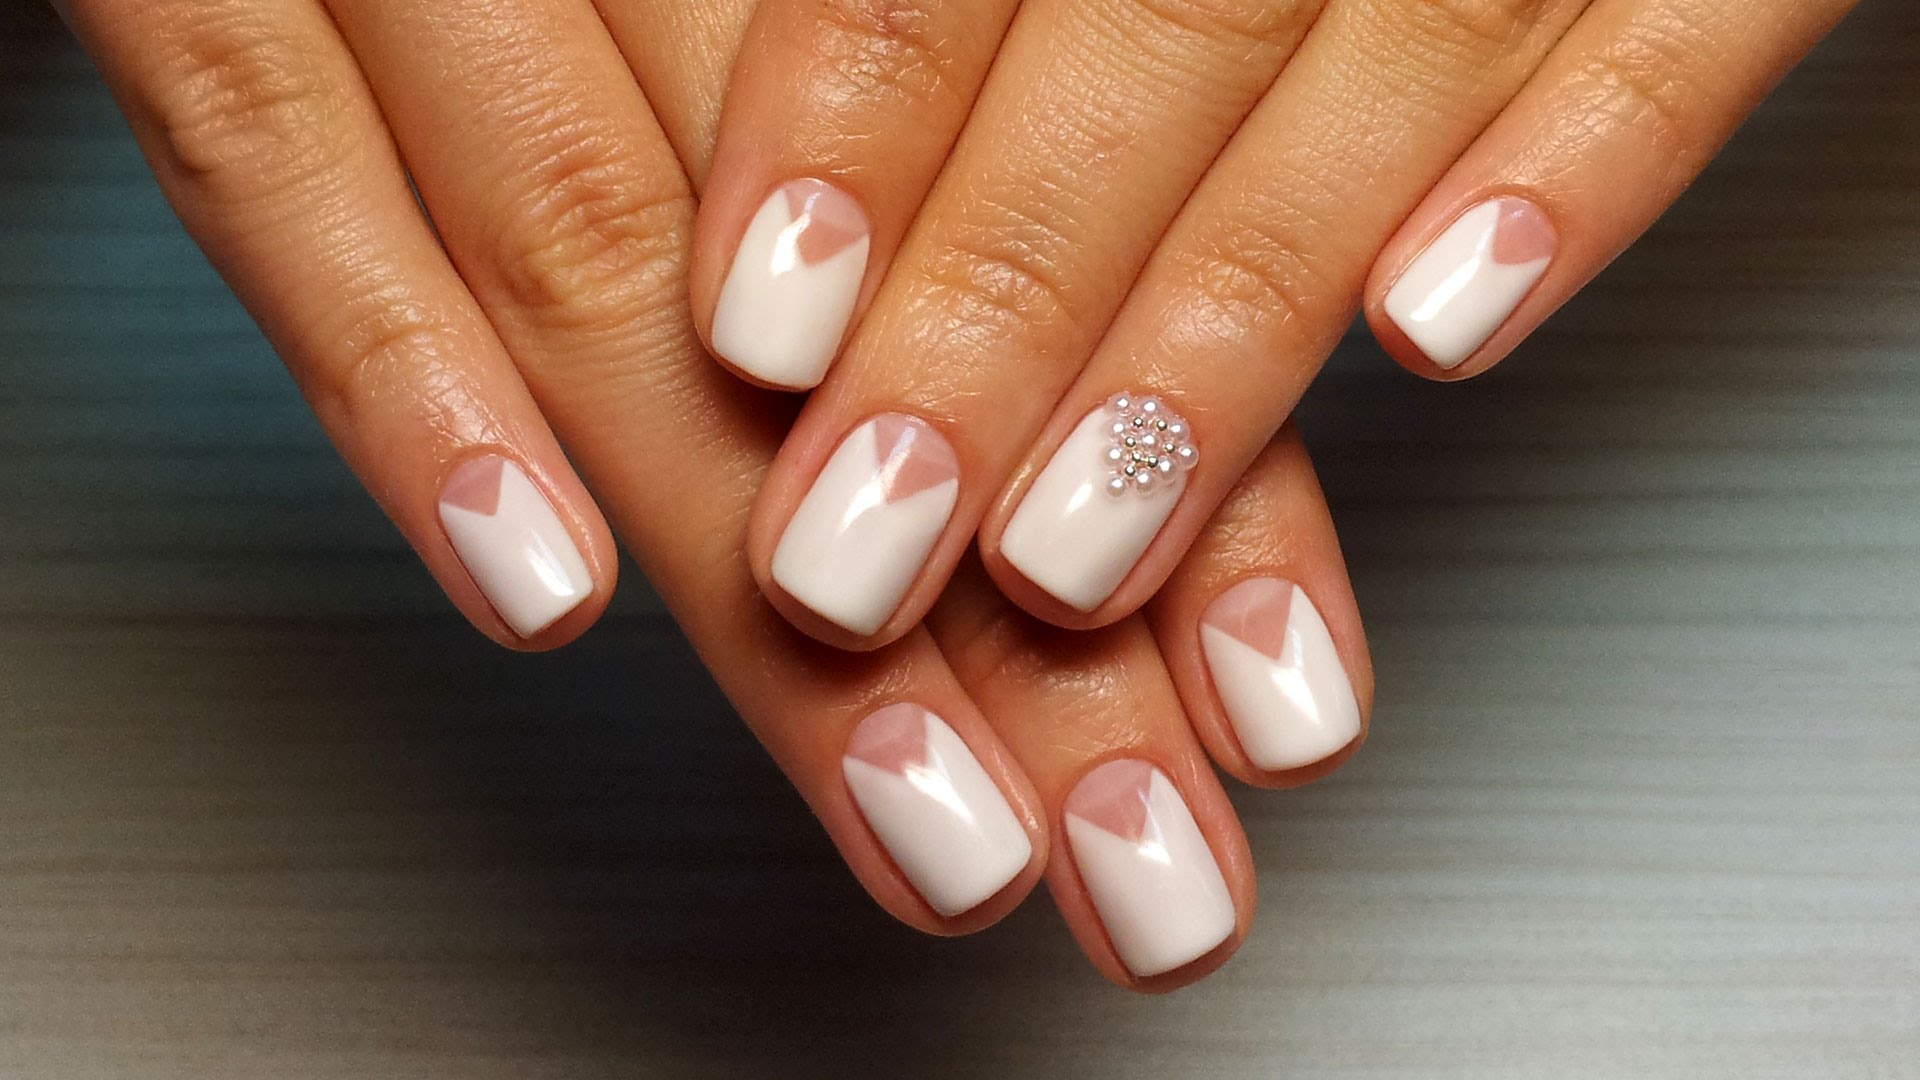
- A lunar design with a moon line bent in the shape of a nail is called an inverted jacket. In this case, a contrasting color varnish is applied in a thin strip at the base of the nail plate. In this case, the ends of the line can end in different height and reach almost to the top edge of the nail. A stencil is not suitable for drawing such a line, you need to take a thin brush.
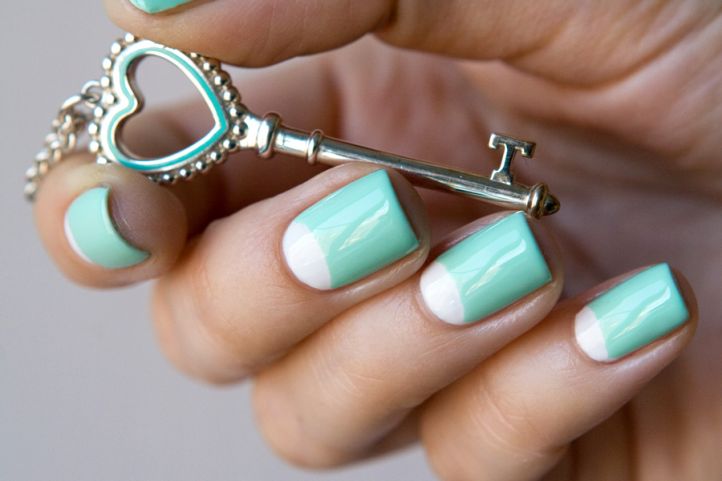
- Sometimes in a moon manicure, not only the line of the moon stands out, but also the tip of the nail plate, as in a classic French manicure.
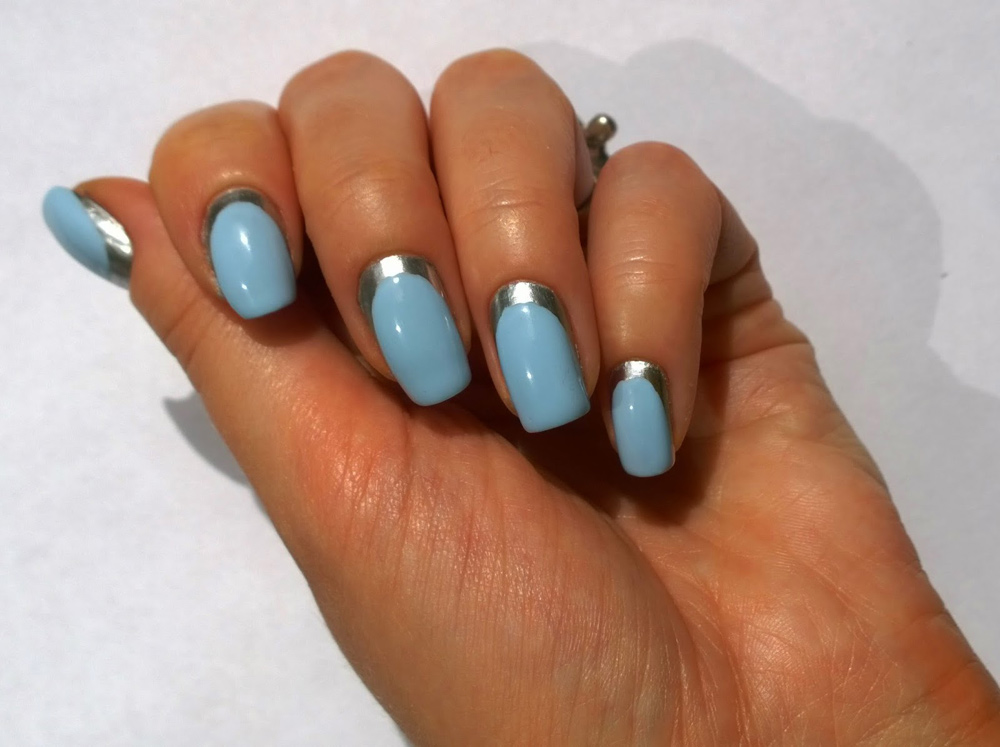
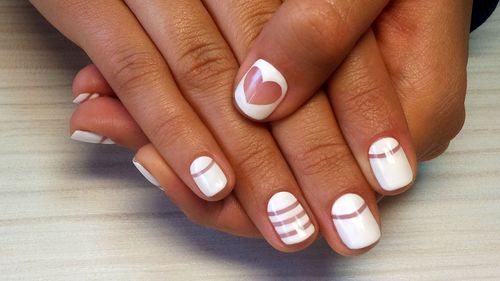
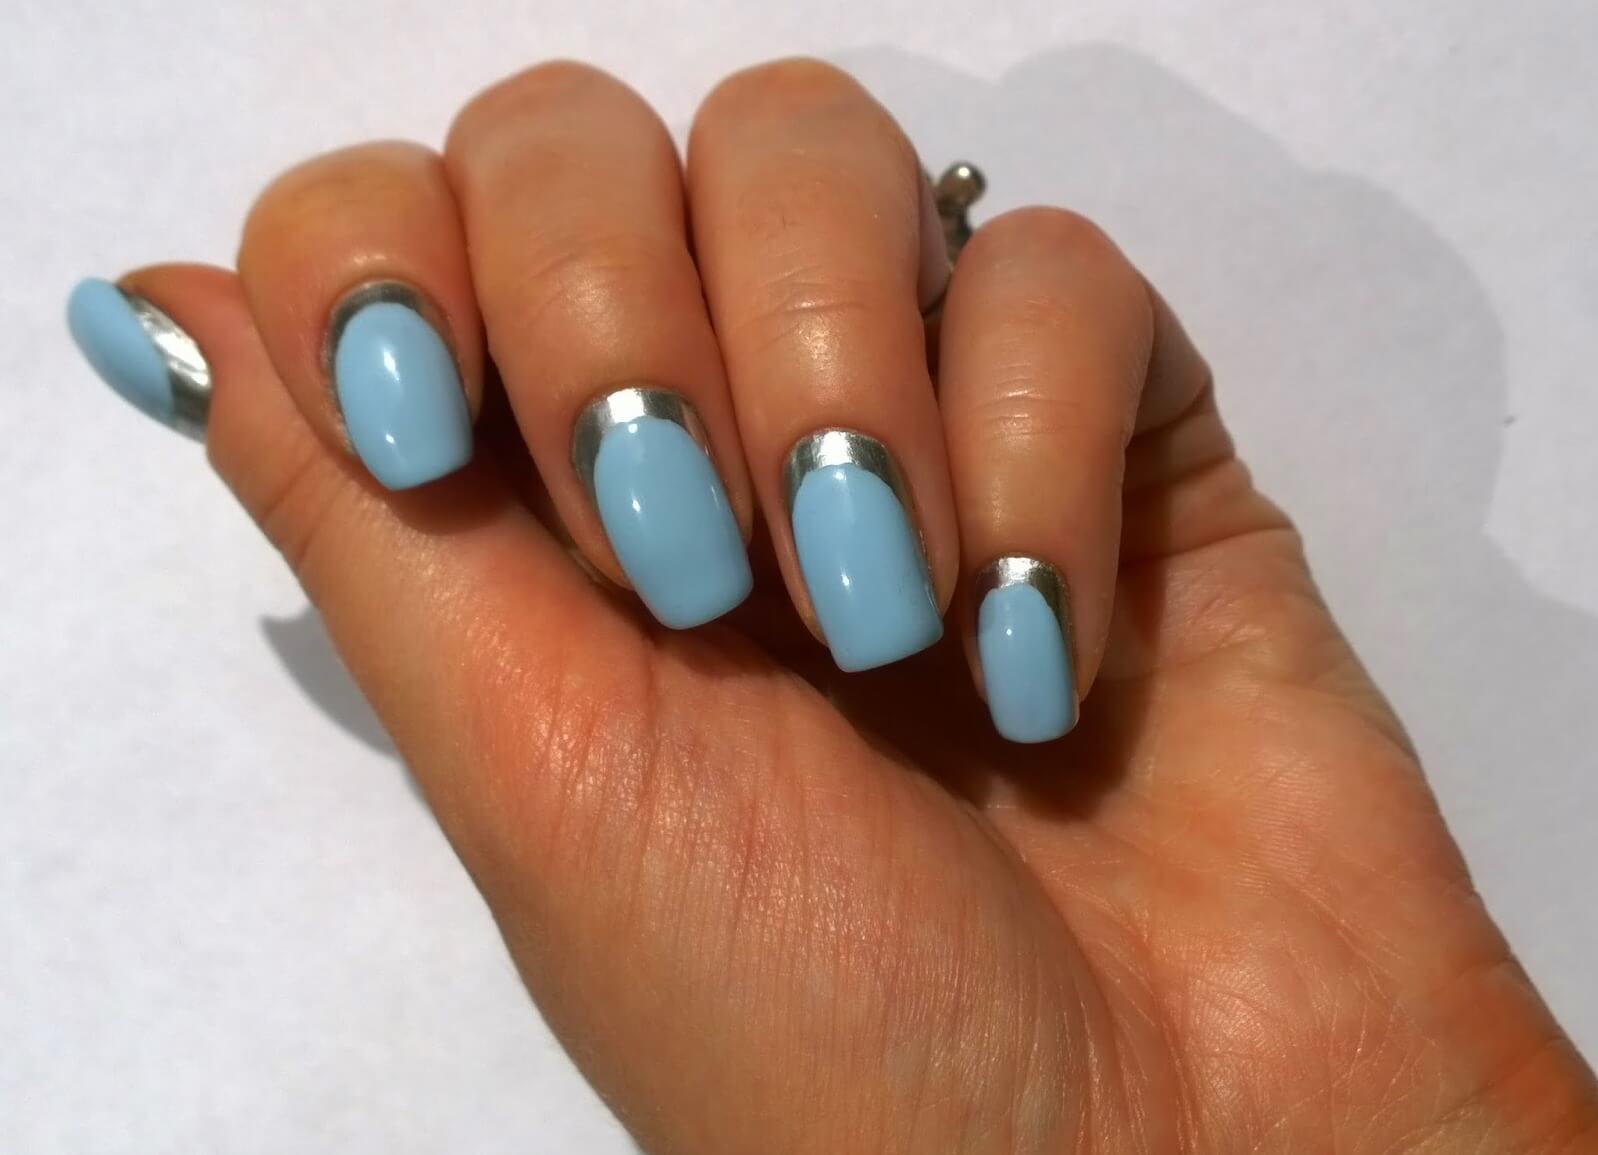
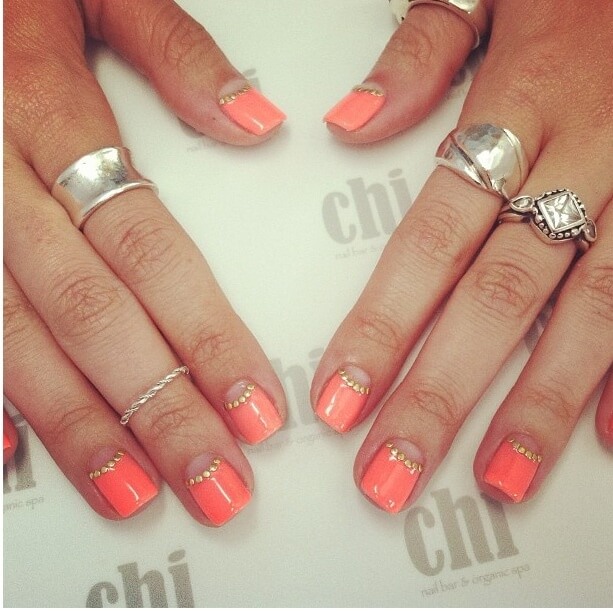
Lunar design looks very beautiful on short nails. It can be done with varnishes of different colors. In addition, you can use varnish of the same color, and to highlight the lunar zone, take foil, golden varnish, silver sand or flock. To decorate the moon manicure, you can use rhinestones, painting, self-adhesive strips and beads.
Rules for working with gel polish
It doesn’t matter if you are going to do a moon manicure or some other nail design with gel polish, the rules for working with it are the same in any case:
- In order for the gel polish to last longer on the nails, they need to be sanded, removing the stratum corneum, degreased and covered with a primer.
- All layers of gel polish should be thin and even. To apply the gel, it is better to use a special brush, which allows you to distribute the composition well on the nail plate.
- Gel polish is dried under an ultraviolet lamp.
- Each layer is dried separately.
- It is necessary to observe the required drying time, which is indicated on the bottle with varnish.
- If the gel polish is not dried out, then it can be removed from the nail in a whole layer, so it is better to slightly exceed the drying time.
- Gel manicure should definitely be fixed with a special finishing agent.
Ideas for a moon manicure with gel polish
To decorate your nails on a festive or ordinary day, you can choose interesting moon manicure ideas. The gel allows you to get a long-lasting and beautiful moon manicure that will last you up to two weeks. At the same time, throughout the entire period of wearing, a persistent glossy shine will remain on your nails.
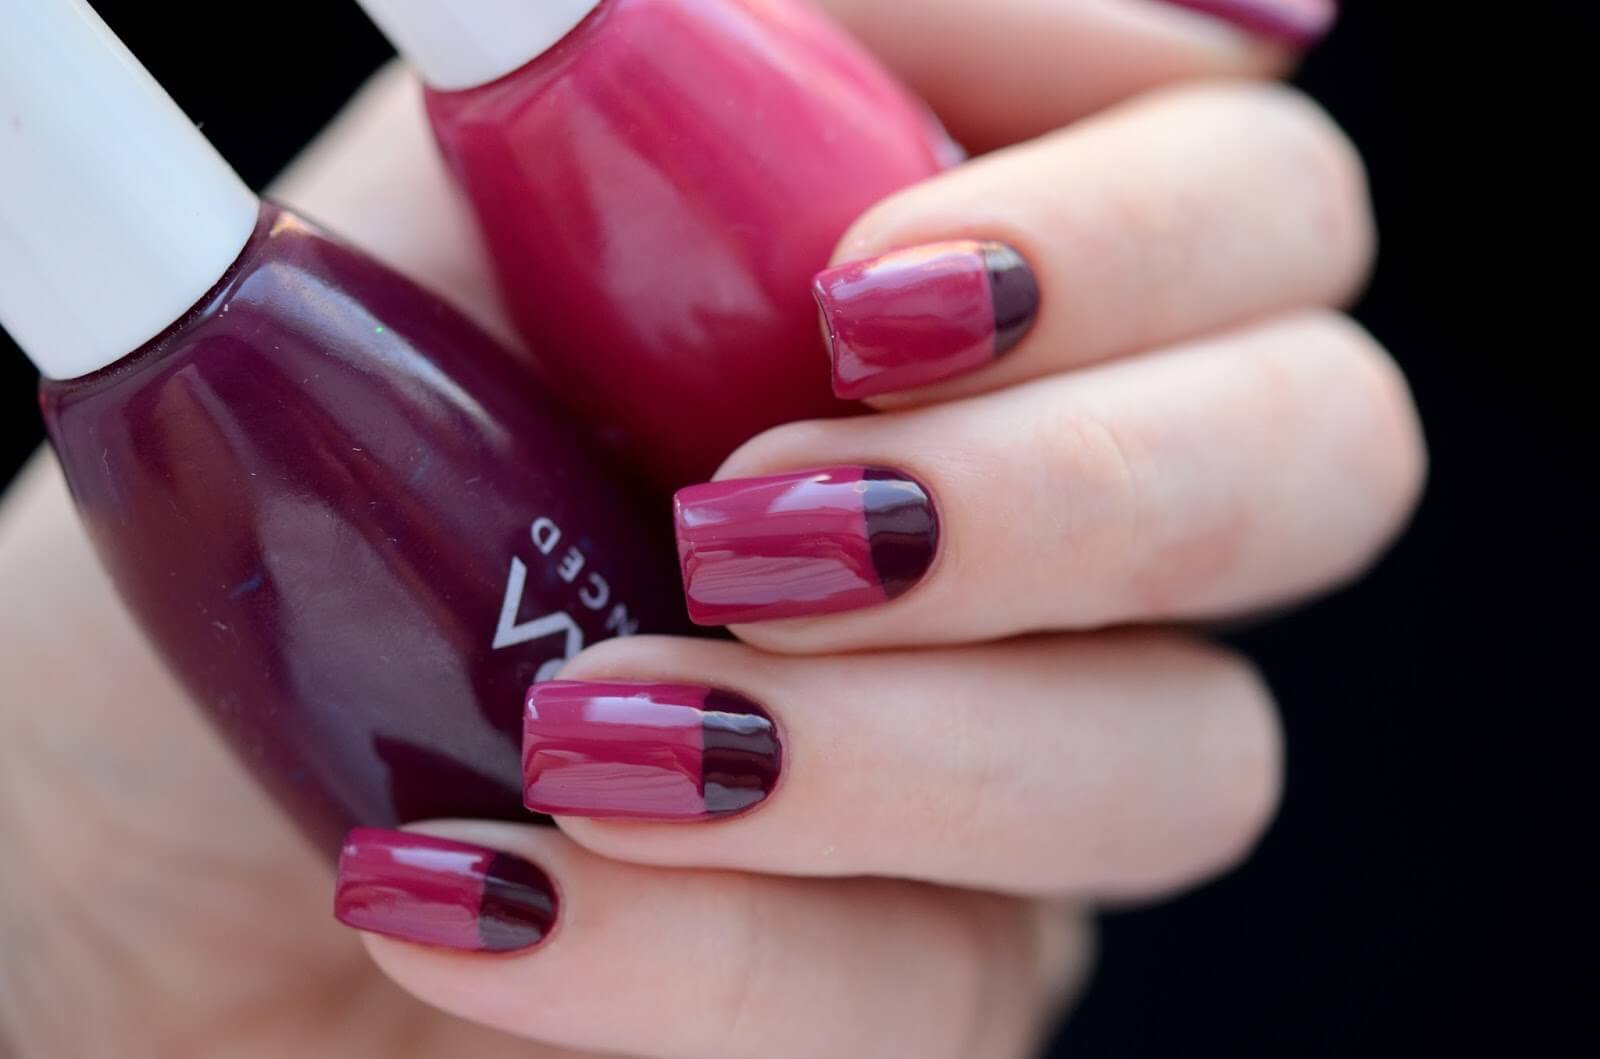
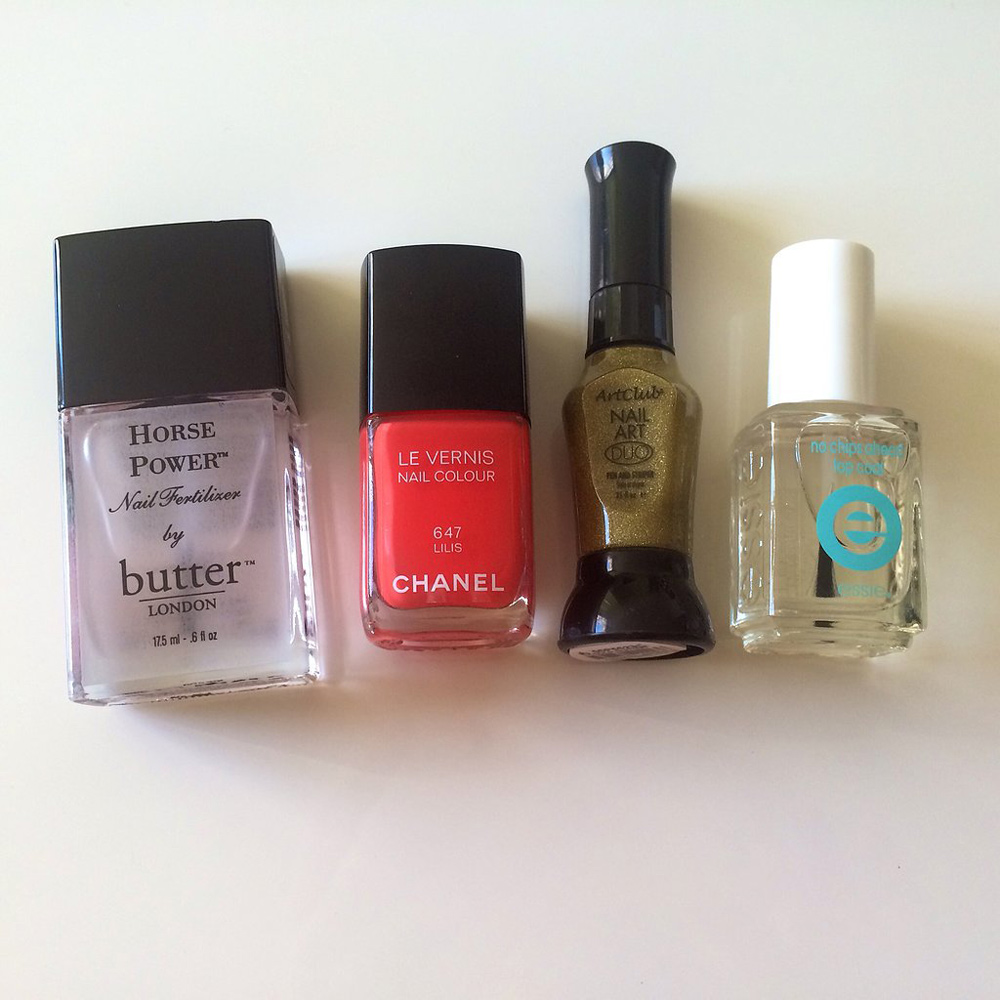
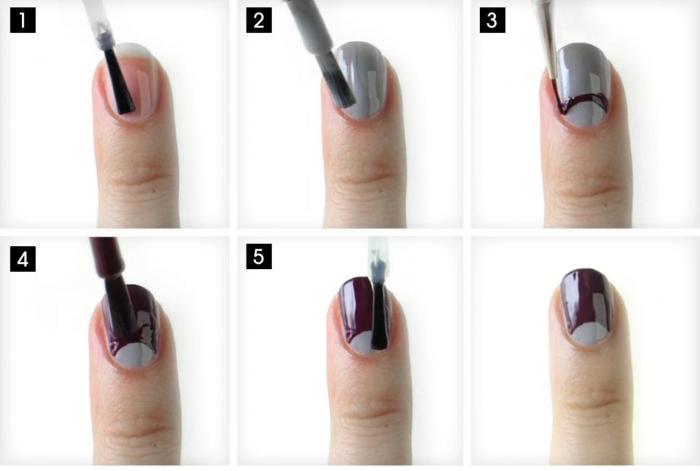
This design is very easy to do. To do this, you need to take gel polishes in contrasting shades. burgundy, french stencils, degreaser, adhesive thinner, primer, nail file set, UV dryer, finisher and fine brush. Manicure is performed in the following order:
- We do hygienic manicure. It is better to remove the cuticle in an unedged way. We correct the shape and length of the nails with nail files. The surface is polished, degreased and covered with a primer, which is dried under the lamp for several seconds.
- Now we apply a light burgundy lacquer on the entire surface of the nail and dry it under the device for several minutes. If the coating is very thin, you can make a second layer and also dry it.
- Remove the sticky layer with a special solvent.
- Now, along the line of the moon, we sculpt a stencil for a jacket. We paint the area of the nail hole with a varnish of a dark burgundy shade. It is better to use a thin brush. Remove the stencil carefully. We put the nails under the lamp for a couple of minutes.
- We apply a transparent finishing agent to all nails and dry it under the lamp for several seconds.
To perform such a spectacular and stylish manicure, you will need red and white gel polishes, French stencils V-shape, primer, finish, degreaser, dispersion layer thinner, fine brush. Manicure is done in this order:
- After a hygienic manicure, we grind the surface of the nails, degrease and cover with a primer. It should dry a little under the lamp.
- Now we make a two-layer coating of red gel polish on all nails. Layers should be thin and even. Each of them is dried under a UV device separately.
- Remove the dispersion layer with a special solvent.
- We delimit the zone of the nail hole with a stencil and paint it with white varnish. To get a white-pink shade of varnish, as in the photo, it is enough to complete one layer. We get rid of the stencil, and dry the nails under the lamp for a couple of minutes.
- We apply the finishing composition and dry it under a UV device.
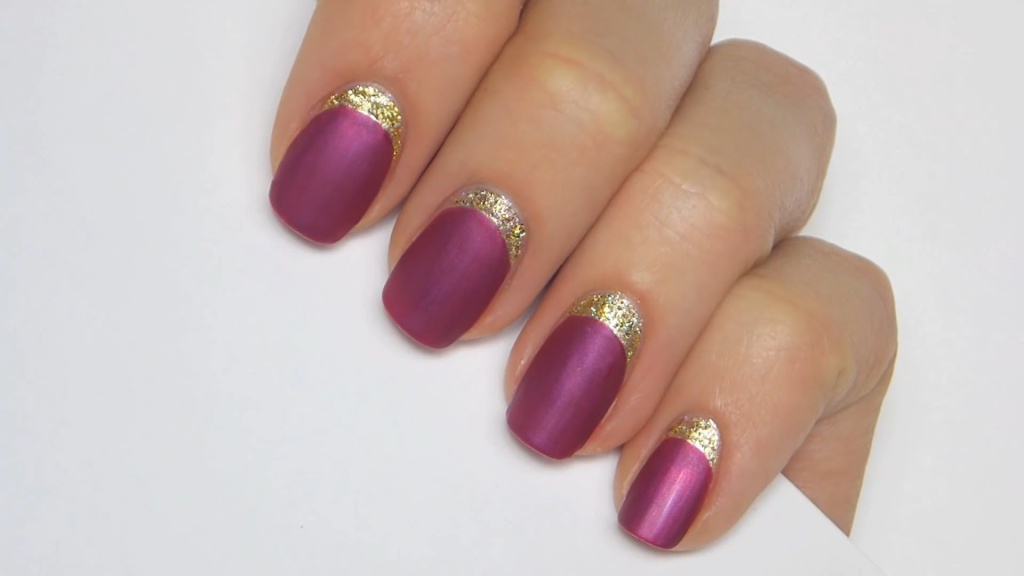
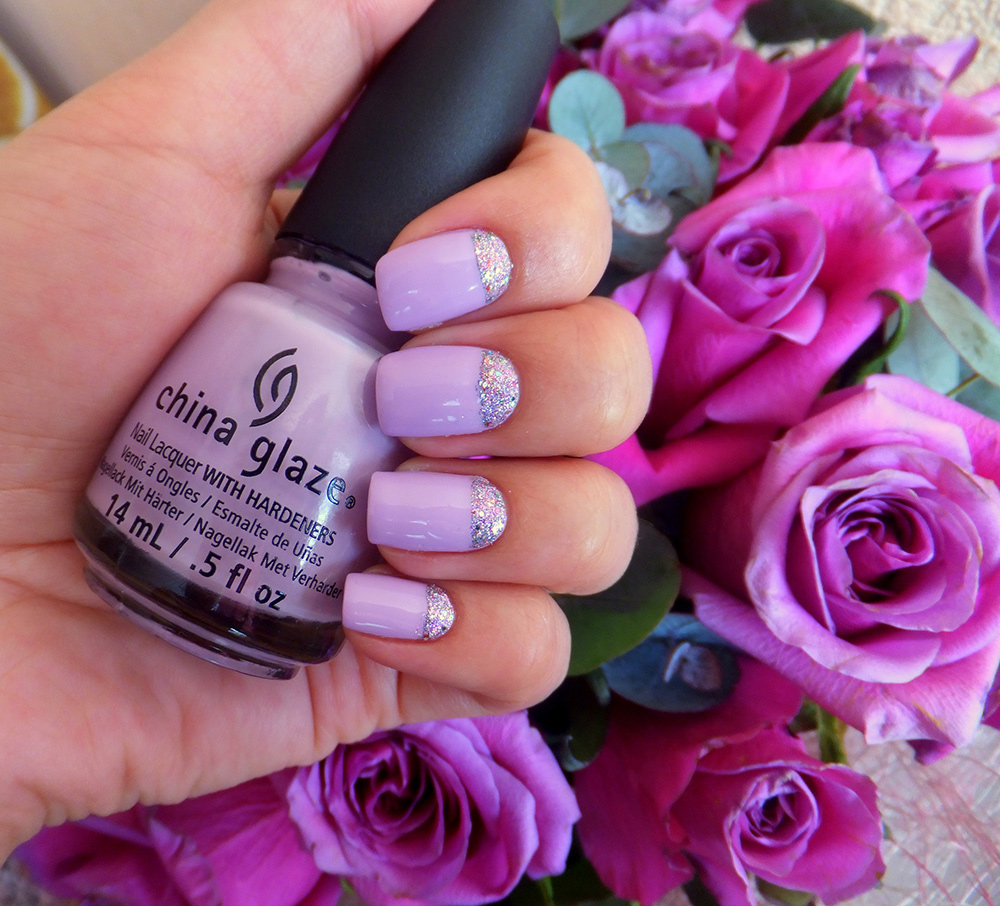
To perform such a nail design, you should stock up: lilac-colored gel varnish, glitter varnish, thin brush, matting finish, primer, degreaser, solvent.
- Apply a primer to the prepared nails and dry it under the lamp.
- Next, paint the nails with lilac-colored gel polish so that the nail hole area remains unpainted. Dry your nails under the appliance. If required, you can make a second coat of coating and dry it.
- Now apply a matte finish coat on the painted part of the nail.
- We paint the nail hole with two layers of varnish with golden sparkles. We do not apply a finish to this area so that the gloss of the varnish does not fade.
In the network of Moscow salons "Manicurof" you can order a moon manicure with gel polish. In our catalog you can choose interesting idea such a manicure. To register for the procedure and clarify prices, you should call us at the phone number indicated on the website.
Lunar nail design is a manicure method in which the holes are not painted over or covered with a color that contrasts with the rest of the coating. This area forms a crescent-shaped pattern at the base. Such a manicure is a fashionable trend in design that allows you to show your imagination. Any idea, a combination of colors, the addition of rhinestones, patterns will decorate and add originality to the nails.
For a moon manicure, you need a small set of tools and materials:
- base coat;
- color coating different colors;
- UV lamp;
- comfortable thin brush;
- fixing varnish;
- special gel polish
If you are not ready to turn to the master, then you can perform a high-quality manicure at home. To perform, you will need the tools and materials indicated above, as well as patience and accuracy, detailed descriptions process in photo, video format are available on the Internet.
The technique of applying moon nail design can be divided into several stages:
- Correction of the shape, processing of the edge of the nail plate, removal of the cuticle.
- Degreasing.
- Application of the base coat, drying under the lamp for 1 minute.
- Application of the main color in two layers with drying under the lamp for 2 minutes.
- Application at the base of the pattern in the shape of the moon in a contrasting color.
- Applying a layer of fixing varnish, drying for 2 minutes.
- Final treatment with a disinfectant, treatment of the removed cuticles with special oil.
Manicure is universal and suitable for both long regrown and extended nails. If it is not possible to wear Everyday life long nails, French design is suitable for short ones.
It is not difficult to create an original manicure, you need imagination and fresh ideas. Experiments with colors are possible, the main thing is that they be contrasting. Adding intricate patterns, rhinestones, nail art, will give a unique look to the nails.
The advantages of this type of manicure lie in the beauty and versatility of design, moon manicure is possible in delicate colors, as well as in bright and rich colors. Suitable for various events - from wedding manicure to daily business style.
Design options:
- acute lunar (the base of the nail is covered in the form acute angle);
- lunar with a jacket (combination of two classic styles);
- lunar with negative space (only the nail hole is painted);
- reverse moon manicure (a novelty of the end of winter, instead of a hole, the contour of the nail is painted).
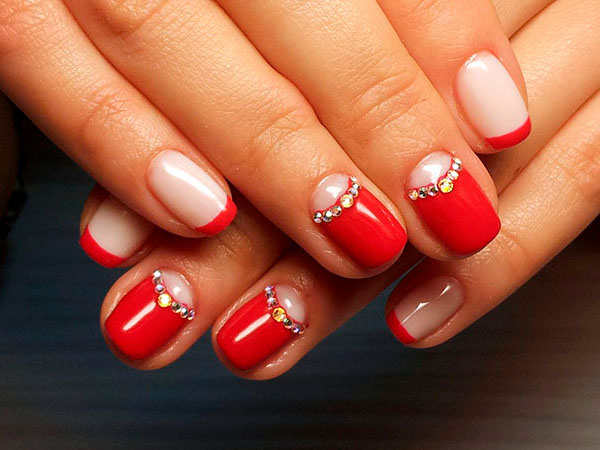
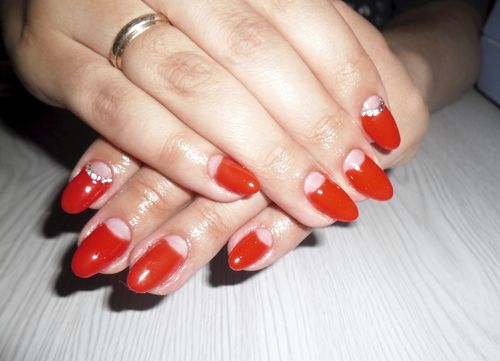
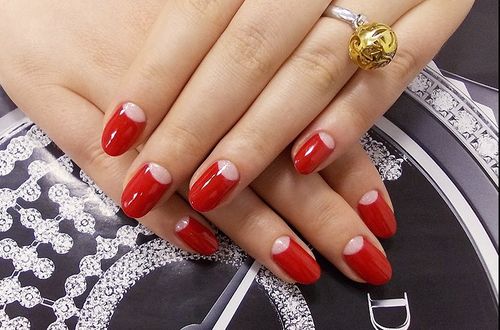
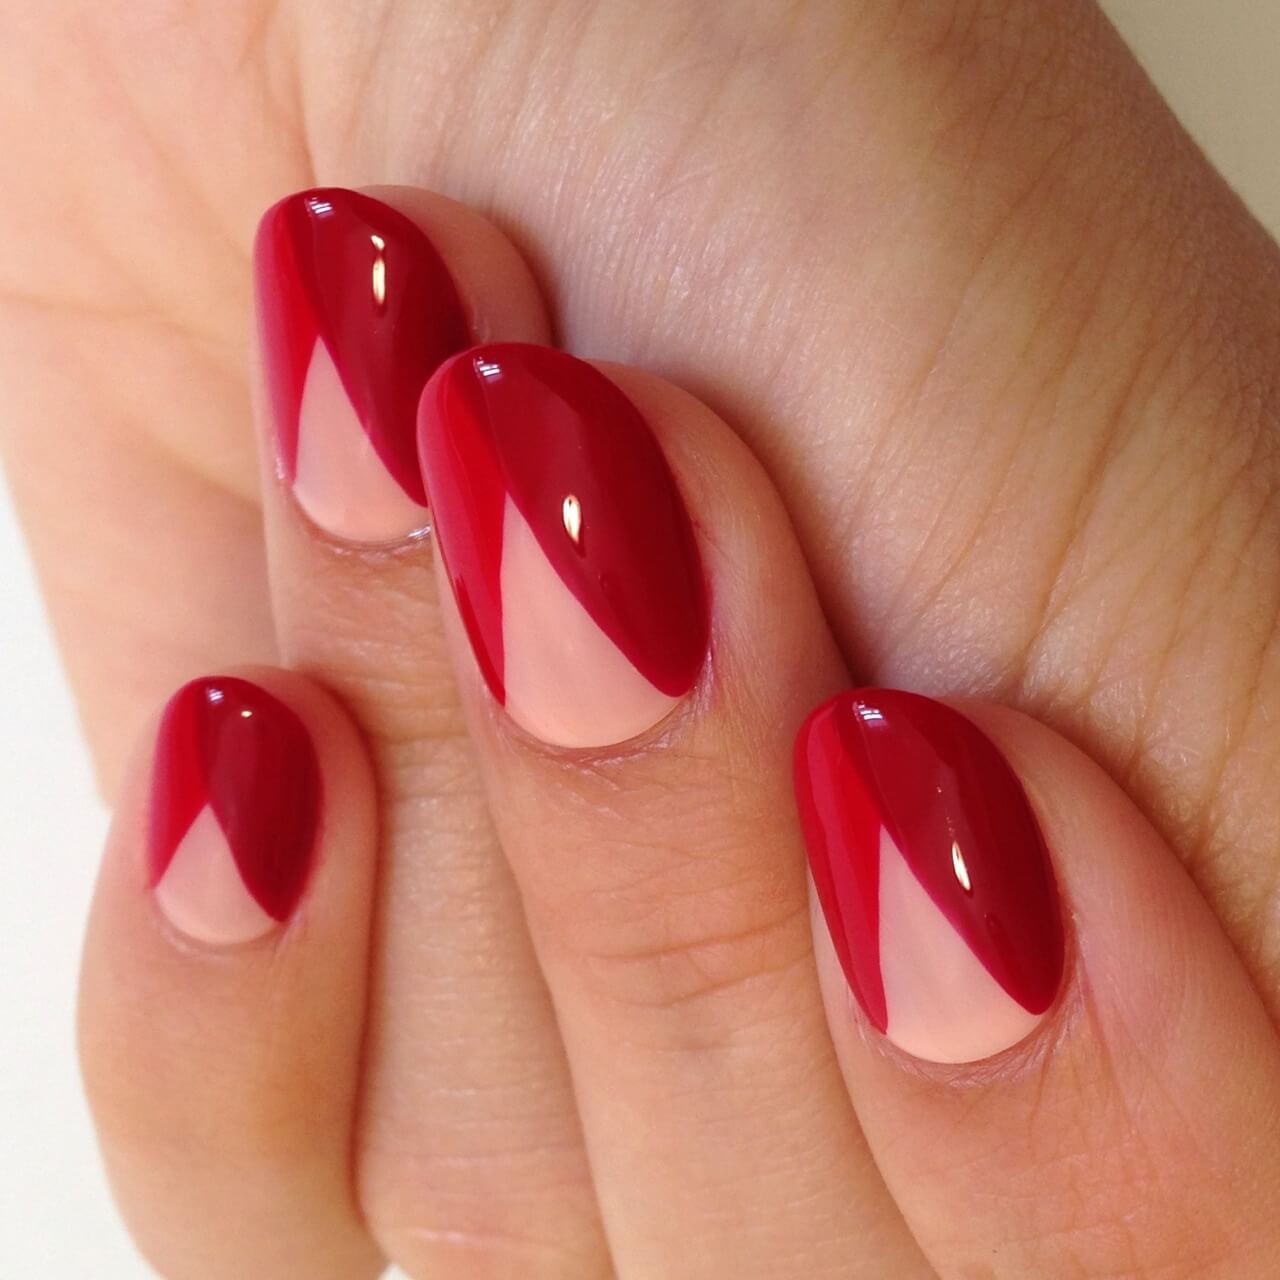
Red moon manicure: shades and combinations, matte and glossy version
A red moon manicure is an option using classic red as the base color. Whatever trends become popular, the classic style of nails will always be a win-win option and will emphasize the sense of style and the image of a business, self-confident woman.
Choosing the right shade is possible only with a combination of makeup color, accessories and the image that needs to be created.
The combination of shades in the moon manicure can be different, the white, black, pink, silver, gold color of the lunula is perfect for the base red. Instead of the usual varnish and gel, you can use an innovative shellac, this will give your nails a more well-groomed and natural look.
Important
Red moon manicure is appropriate for a casual work look, business meetings, receptions and celebrations, official events, going to a restaurant.
This combination is suitable for business, successful woman, which has formed personal preferences, strictly adhering to its own style. The classic color of the nails refers to the completion of experiments with appearance and the establishment of a sophisticated finished look.
- The version with the use of matte red varnish will allow you to give your nails a strict well-groomed look, emphasize the features of the moon makeup, and create a noticeable contrast. More suitable for a casual work look, to prepare for an important official event.
- The glossy red lacquer option is ideal for creating a bright, memorable look. Gloss will add saturation to the color and enhance the effect of the contrast with the shade of the nail hole. Appropriate for celebrations, holidays, dates, in a nightclub.
Lunar manicure on short nails: shapes and lines, options, color matching
 Lunar manicure on short nails, thanks to the versatility of the design, also looks great. Due to the specifics of the work, the requirements of the management, constant typing on the keyboard, it is not always possible for fashionistas to wear long nails, and they have to limit themselves to short nails, but this is not a reason for a girl to leave her nails without decoration.
The shapes and lines in the moon manicure on short nails do not differ from the execution of the design on long nails, with the exception of a small nuance that is important for fashionistas. On short nails, vertical lines will look more harmonious, simple geometric figures, visually lengthening the nail plate.
At the stage of preparing nails for manicure, to create the perfect look, a short nail must be given oval shape or round it slightly towards the edges to avoid the square finger effect. Also, it is necessary to erase the old varnish, degrease the nail plate, remove the cuticles.
Variants of the moon manicure on short nails:
- using a stencil (a regular French stencil attached to the hole is required);
- using a thin brush (it will require a certain skill and accuracy, the hole is painted over manually);
- using foil (making a crescent-shaped stencil from foil, gluing the foil to the hole and painting over the rest of the nail plate, except for the stencil).
The implementation of the lunar design consists of the following steps:
- application of a special composition that protects the nail;
- applying the selected color to the well, waiting for complete drying;
- sealing the painted hole with a protective layer, stencil;
- staining with a contrasting color;
- removal of the stencil, coating with a transparent varnish.
For short nails, with a moon manicure for the base color, you should choose light colors that visually lengthen the nail plate. Otherwise, when choosing a shade, one should be guided by the compatibility of colors, the contrast between the base and the color of the hole.
Bright moon manicure with gel polish: the complexity of execution and instructions
 Bright moon manicure - original way express individuality, show imagination, creative approach to manicure, dilute gray days juicy flowers and good mood.
Lunar manicure with gel polish recent times gained great popularity. Gel polish has many advantages over ordinary polish - it's ease of application, drying speed, color stability, safety, hypoallergenicity.
The implementation of the lunar manicure design with gel polish is not very difficult even at home, subject to a number of rules and application technology.
Instructions for applying gel polish:
- Preparation for the application of gel polish by removing the old varnish, moisture and applying a special degreaser.
- Applying base gel.
- The selection of a shade and the application of gel polish in a thin layer, the gel is applied in several layers with the obligatory drying of each layer.
- Painting the end of the nail plate.
- Coating with a finishing gel, a layer slightly thicker than the main one.
A bright manicure using gel polish is perfect for giving an image of femininity, freshness, vivid emotions. This type of manicure will be a great addition to bright summer clothes, unusual accessories. Suitable for an informal event, birthday party, friendly party, beach holiday, costume party or just make friends marvel at the bright look.
Brushes for design and gel nail extension Gel brushes.