Orange nail design. Fruit manicure: interesting ideas
There is a huge selection of fruit designs on nails. Which fruit to give preference to depends only on the fair sex, and often on her mood.
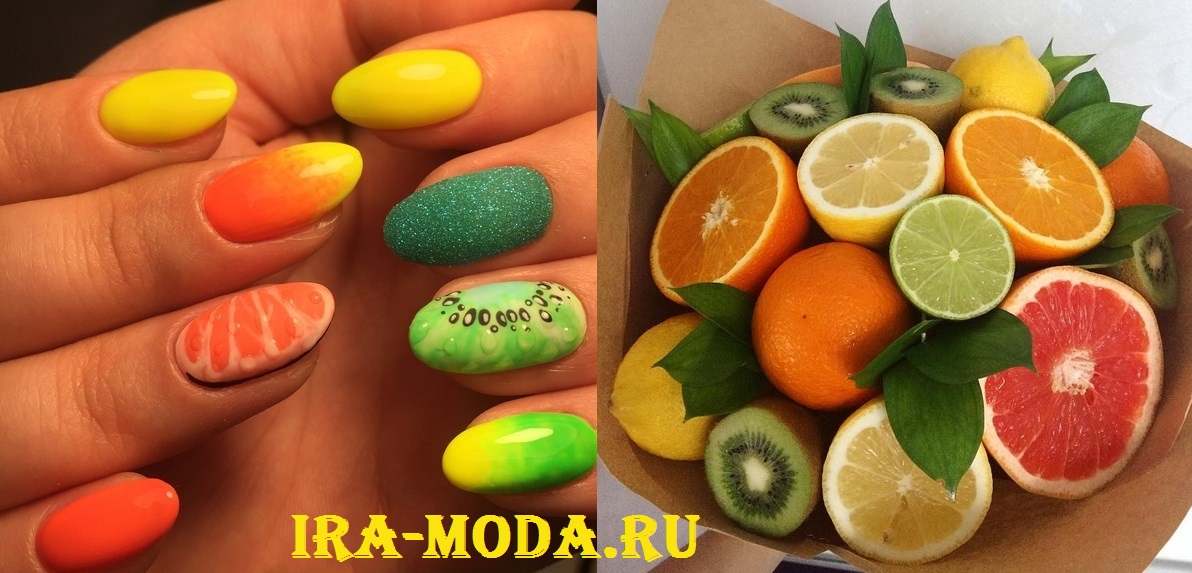
Summer is the best wonderful time year, which pleases people not only with its warm weather and sunshine, but also with a light carefree mood. In warm weather, you always want something unearthly, juicy and bright. Therefore, a fruity manicure on nails, which is suitable for the hot season, will be a great idea. Fruits on the nails will bring positive notes to the owner of the manicure on weekdays, as well as cheer up in any situation.
Fruit manicure can be varied. It all depends on the imagination of the fair sex. But main feature such creativity is that for drawings it is best to use varnishes saturated and bright colors, after which the finished image is covered with a special protective composition - the tone of the colors will remain for a long time.
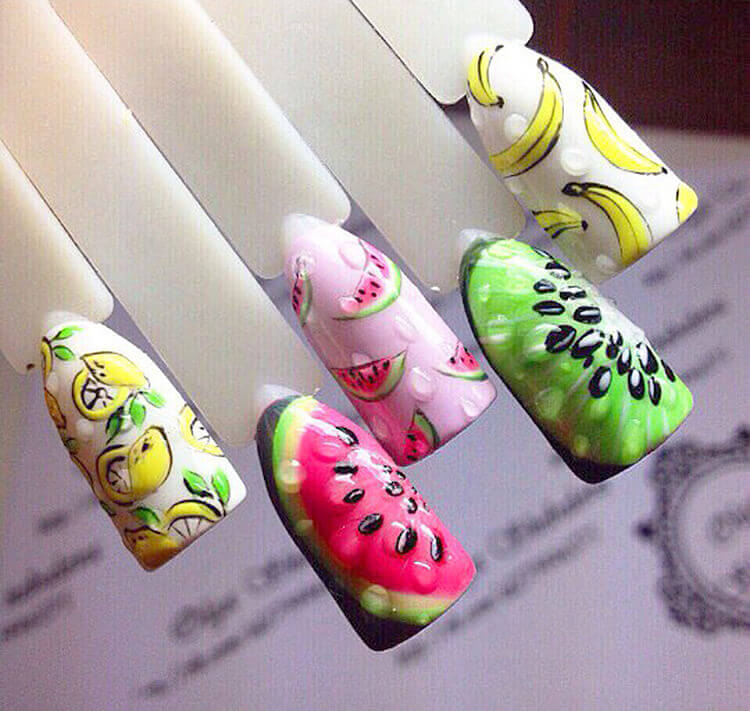
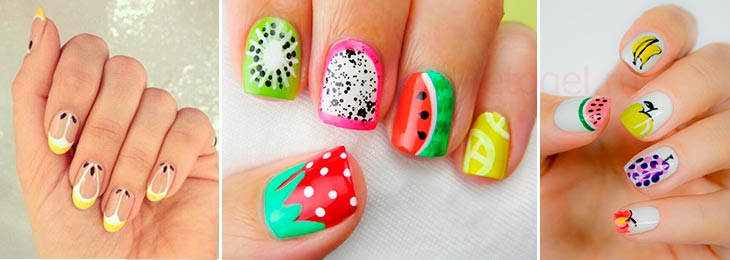
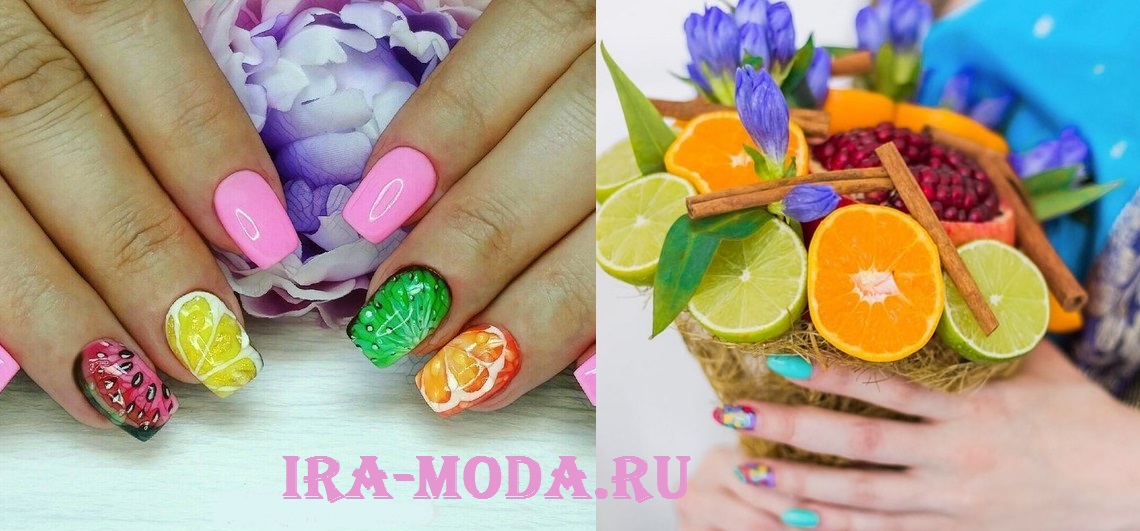
Slices of exotic kiwi, juicy watermelon, orange or red strawberries look relevant and very beautiful, and even a girl who does not have much experience in creativity can draw them. The most important thing is to determine what kind of drawing you want, then proceed to creativity.
Fruits on the nails are ideal for the summer season, they create a truly bright and unusual image of their owner. In addition, they are relevant for club parties. You can use a variety of techniques, while using both traditional rich colors and unusual, creative ones.
Fruit manicure on the nails can be done in various ways. There are the most popular:
▬ Fimo is used to create a fruit manicure;
▬ Fruits are depicted along the entire length of the nail;
▬ Fruits are drawn on 2/3 of the length of the nail plate;
▬ Fruit slices are depicted at the top of the nail.
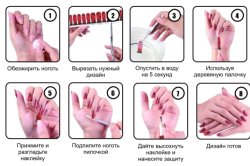
When creating a fruit manicure, you must:
➀ Carefully consider the pattern, the colors used, as well as the size of the fruit, if the girl is at a loss with the choice, then you can look at various images from ready-made options manicure.
➁ Proceed to the selection of the pattern on the nail. To do this, you can first apply the selected pattern to one nail, see how it will look, and also decide which color is better to use.
➂ When using several fruits on one nail, choose which colors are best combined with each other, and then distribute them throughout the nail.
➃ As the girl decides on the choice of fruit, first cover the nail plate with a special protective varnish, on which the image will be applied.
➄
The last step is the application of a transparent varnish on the finished drawing, which will help to preserve the design for a long time. Bright summer manicure is always relevant for any lady. Therefore, nails with such images will complement the mischievous image, make it airy and unsurpassed in the hot season.
Fruit nail design can be done different ways. The main thing is to decide what the girl wants to see on her nails, choose a pattern, and then start creating. If the fair sex cannot decide on the fruit that will be on the nail plate, in this case several types can be used, each of them will decorate a separate finger.
In order to perform fruit nail design, you need to prepare the following tools and materials:
☑ Leveling base;
☑ Colored varnishes or paints. The palette should include green color for the image of kiwi slices, light green shade, black varnish, which depicts stones in exotic fruits, orange and beige for the image of orange slices, raspberry coating for the image of raspberry and watermelon.
☑ Transparent fixative manicure;
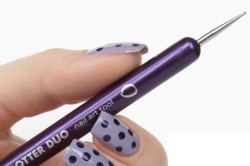
☑ Thin brush;
☑ Fimo;
☑ Orange stick;
☑ Dots;
☑ Toothpick.
After preparing all the necessary tools, you can begin to create a composition. For this you need:
❶ Tidy up your nails, take care of the shape of the nails and cuticles, and sand the surface of the nail plate well.
❷ After the nails are prepared, get to work. First of all, cover them with a leveling base, create a background. For nails that will show raspberries and a slice of watermelon, make it black, for kiwi - green, for orange - orange.
❸ We apply kiwi as follows: it is necessary to make an oval of a light shade, small rays should depart from it, then with the help of dots, apply black dots between them, which will imitate seeds, after drying, fix with a top layer.
❹ An orange slice is depicted in a similar way. On an orange background, it is necessary to make a small circle, from which identical rays of a light shade depart, make pale streaks between them, and also depict small seeds, after completion, cover with a top layer.
❺ A watermelon slice is depicted against a dark background, a raspberry slice is drawn, inside which seeds are applied with a dots, and along the edge with a green varnish, a watermelon peel is fixed with a protective layer.
❻ Raspberries are drawn on a black background using the appropriate color varnish, and only one color is used for the image.
❼ For a three-dimensional pattern, you can use a transparent varnish, which is applied with drops on fruit slices in a chaotic manner, this is the method that will give the composition a spectacular effect.
Fruit nail design can also be created using fimo, which are sticks made of polymer clay. In a thin section, they have a rich scope. Manicure with their help is easy to do:
➀ Apply a thin layer of gel.
➁ Attach the selected element to the nail plate.
➂ Fix with a layer of gel so that there is a flat surface of the nail plate.
➃ If the drawing protrudes somewhere, then given element needs to be cut with a saw.
➄ Cover with a finishing layer.
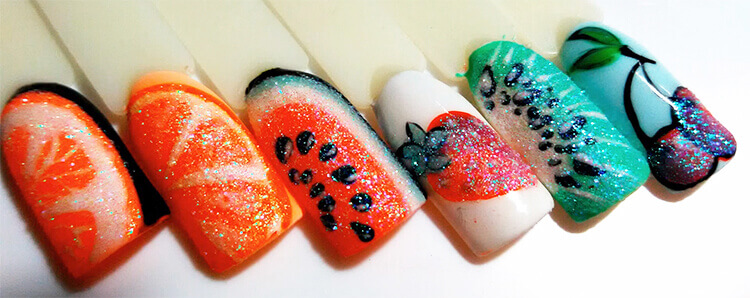
To create a sugar fruit nail design, special sparkles or glitter are used, which allows you to create a sugar effect on the nails. At the same time, it is applied after the main fruit pattern, while the varnish is not yet dry. After that, they are covered with a finishing layer. Glitter can be applied both over the entire fruit on the nail, and on a specific element.
Drawings - fruits on nails
Drawings - fruits on the nails - can be applied both throughout the nail and on a certain part of it. In order to make an original summer fruit manicure, you need:
◉ Prepare nails for work, polish the work surface.
◉ Decide on a pattern that will decorate the nail plate.
◉ Apply a leveling layer. When drying, set the main background - in this case, white.
◉
Next stage- an image of fruit, a different pattern is applied to each finger.
◉ To facilitate the work, you can use fimo with a certain fruit for each nail. Gently stick to the nail, smooth the surface. French jacket with fimo elements looks great.
◉ It is easier to use special stickers for nail design - do not treat them lightly. All experienced professionals regularly use sliders in their work.
◉ The last step is fixing the finish layer.

When drawing details on your own, you should arm yourself with different brushes for nail art. The most important thing is to depict a smooth outline of the picture - this is a guarantee of a neat appearance the entire final composition. But if the idea is a cartoon design, shading is also suitable.

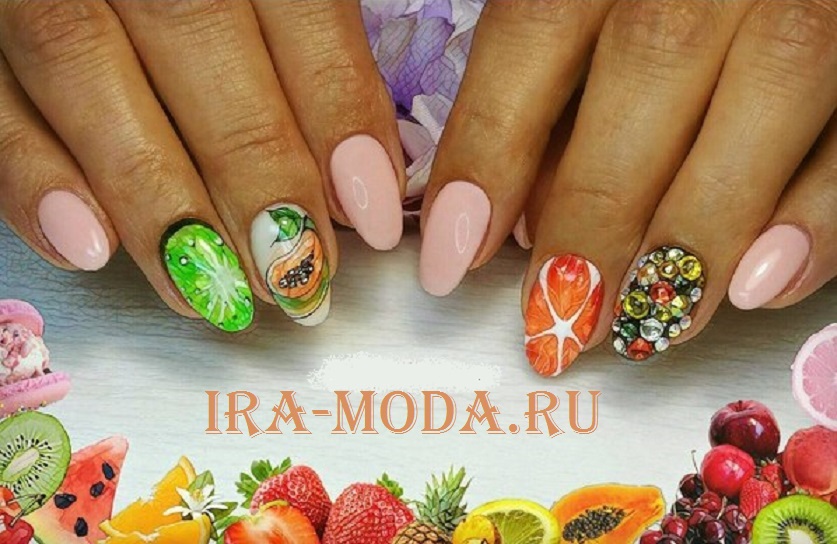
Another in an unusual way applying fruit manicure is to use different sizes fruits on individual nails. So, for example, on some nails only a slice can be depicted, on others fruits in a reduced form, and their number can be very different. You can show a fragment of the slice in an enlarged view, or the upper peel. Similar option quite unusual, perfect for creative outfits and images.
Drawings - fruits on the nails - this is a great idea that is guaranteed to add brightness and lightness to the summer look of every girl. Nails will always look great, perfectly complement the image for warm and unforgettable days.
Fruit nails video
If you want the same juicy fruits on your nails, then watch the video. You will see the wonderful works of the masters, and most importantly, learn how to make such fruits on nails with drops or a sugar design.
Fruit manicure is an original nail art idea that emphasizes the tenderness and femininity of ladies' hands. A stylish fruit nail design is created for special occasions. It is performed using various manicure tools, high-quality varnishes, photo and fimo design, and other options. Exclusive nail art is easy to do at home.
Fruit nail design with fimo
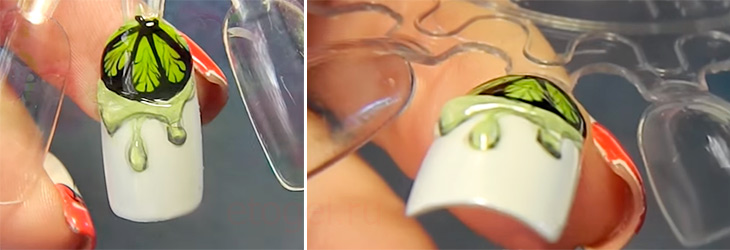
Fimo (rolls, rods, sausages) are polymer sticks. Their transverse sections are formed by plates with images. The material for the manufacture of tools is polymer clay. Sticks-bars are 5 cm long, 3-5 cm in diameter. Fruit manicure is performed using fimo, which depict various fruits. Sticks can be bought in specialized stores that sell products for nail art. They are sold whole or sliced with packaging. To create an attractive manicure, you need to purchase:
- fimo (whole sticks are pre-cut into thin slices with a blade that comes with the kit);
- nail polish remover;
- manicure set;
- decorative varnish;
- base;
- fixative;
- softening cream;
- thin brush.
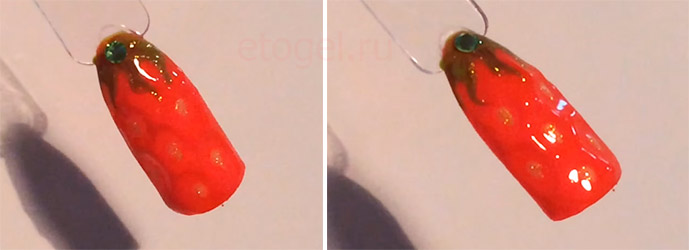
The nails are prepared for varnishing according to the standard scheme: with a cotton swab moistened with nail polish remover, the nail plates are degreased, the hands are lowered into a bath with medicinal herbs, in which the cuticle softens. Then it is removed, a softening cream is applied. Nails attached desired shape, nail plates are processed with a grinding nail file. A base coat is applied, dried, then the nail plates are covered with decorative varnish, dried. We lower a thin brush into the base, put a drop of varnish on the nails in those places that are planned to be decorated with fruits. We take pre-prepared and cut into thin slices of fimo, set it on the droplets of the base, press it to fix it, and dry it. Decorated nail plates are treated with a top coat. A finished manicure with fruits may look like in fig. 1 and 2. Manicure can be complemented with rhinestones and sparkles. Fimo nail art ideas are perfect for celebrations and holidays when a lady needs to look stylish, bright and flawless.
Nail art with apples
For artistic painting of nails exists a large number of options that amaze with elegance and beauty. Fruit nail design requires minimal artistic skills. It can be done by depicting original ripe apples on the nail plates. A wonderfully executed manicure will emphasize the beauty of a lady's hand. To create an apple nail design, you need to purchase:
- varnish base;
- top coat;
- manicure set;
- nail polish remover;
- decorative varnish (for an apple, you can choose a yellow, red, green tint, also brown, gray or black for the image of the handle);
- dots;
- brushes.
Preparation of nails is done according to the classical principle. After forming the shape of the nail plates and applying the base, we begin to draw an apple with decorative varnish with a thin brush. The image can be made on all or only on some nails, it is applied in the center or on the side. In creating fruit nail art, a lot depends on the author's imagination. It is advisable to first consider all the subtleties of apple design. The contours of the apple begin to be depicted in the middle of the nail, the lines are drawn to the tips of the nail plates. The fruit is drawn completely or only partially, along the contours it is necessary to paint over the nail plate in 2 layers, allow the varnish to dry. A thin brush is dipped into black varnish, lines are drawn up from the apple, which symbolize the cuttings, and dried. Green or yellow leaves are drawn near the cuttings, depicting them as small ovals. After drying, the apple manicure is covered with a top coat.
We decorate nails with fruit photo design
The process of applying photo design is simple, does not require any artistic skills. The procedure does not take much time, and the result surprises and delights. The principle of creating a photo design is based on gluing special photographic images. Photo design kits are purchased at nail art stores.
To create an attractive manicure, you must purchase:
- photo design kits with fruits;
- nail polish remover;
- manicure set;
- transparent base coat;
- top coat;
- special composition for degreasing nail plates;
- tweezers;
- scissors;
- decorative red gel polish (you can use any other, combined with photo design);
- pusher with rubber tip;
- nail file;
- rhinestones;
- dots;
- cosmetic glue.
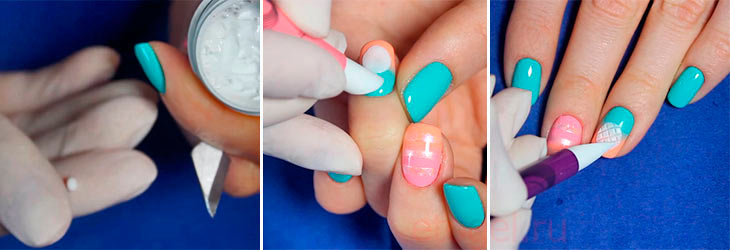
The procedure for preparing the nail plates is normal; after preparation, the nails are degreased with a cotton swab dipped in a special liquid. Then apply 2 coats of clear base coat. After applying each layer, the varnish must be dried. The unnamed nails are left blank. Take a photo design kit. It is a cardboard on which a thin self-adhesive film is placed. The decor is cut into the necessary fragments. Then 1 fragment is taken, 1/2 of the fruit photo decor is peeled off from the cardboard substrate, while the substrate is bent 2 times. The decorative film is straightened. It is installed on the nail, the installation is started from the growth line.
Using a pusher with a rubber tip, the pattern is smoothed out, the second half of the substrate is removed. The decorative film is pressed against the nails. Excess parts of the film are cut off. A photo design protruding beyond the free edge of the nail platinum can be cut with scissors or filed down with a nail file. Nail art is complemented thin line jacket, which is applied with decorative red varnish. This procedure is done with 8 nails; 2 ring fingers covered with red gel polish and, if desired, decorated with rhinestones. Then all nails are covered with a top coat, dried. Photo design of nails is ready.
An attractive fruit manicure is performed on natural and artificial nails, he is involved in creating an exotic image of the fair sex.
Juicy fruits are a great idea for hot summer nail designs. This manicure goes well with summer outfits and is perfect for a vacation.
Bright colors will cheer you up even if the weather outside is not encouraging.
You can draw a design in the form of a watermelon or kiwi yourself - use it already ready-made technicians.
Examples of fruits on nails with gel polish
Whatever fruit you choose to apply, you need to perform the traditional preparation of the nail plate.
- First of all, you need to take care of removing the cuticle,
- Give the nails the desired shape, remove the shine with a buff.
- After applying and drying the base coat, you can proceed to the design.
Let's analyze several techniques for drawing different fruits using gel polishes.
bright kiwi

- We apply light green gel polish on the nail plates - this will be the substrate for our kiwi.
- Draw an arc in black or brown along the nail - this will be the border of the peel.
- With white we perform the middle of the kiwi - we make an arc along the side of the nail and paint over it. We make it the same shape as the black line.
- From the center of the middle we paint over the rays of different lengths and thicknesses. We place it under a UV lamp.
- We cover with a top coat and, without drying it, imitate kiwi bones with black gel polish - draw dots. You can also put dots on the coating before applying the top. We fix in the lamp.
- Brown paint over that part of the nail that remains beyond the black border. We paint over in two layers, each polymerize in a lamp.
- We cover the design with a top and place it in UFL.
- We remove the stickiness. You can sand the surface with a buff so that there is no shine.
- We make another layer of brown gel, sprinkle with transparent acrylic powder on top. We send it to the UV lamp.
- We clean off the excess with a brush. On the green part we place transparent dots of the gel polish, going a little on the black ones.
- Fix and remove the sticky layer. Ready!
VIDEO INSTRUCTION
Juicy lime
- Apply white gel polish on the nails and place under a UV lamp.
- We draw the outline of the lime in green - for this we apply light green gel polish around the hole. We polymerize in a lamp. We do two layers to get a rich shade.
- Black draw the outline of the fruit (you can take White color), for this we circle the green hole with a thin black line of gel polish. We also draw veins and slices with a brush. We should get an imitation of a lime in the context. We fix under UFL.
- With a gel polish of a paler shade than the main light green color, we draw drops of juice on the white part of the nail, as if oozing from a juicy tasty lime. We polymerize.
- We cover with a top and fix in a lamp.
- To create volume, you can apply voluminous drops of the top on the “juice” and dry it again under ultraviolet light. After removing the sticky layer, you can enjoy the result.
VIDEO DESCRIPTION
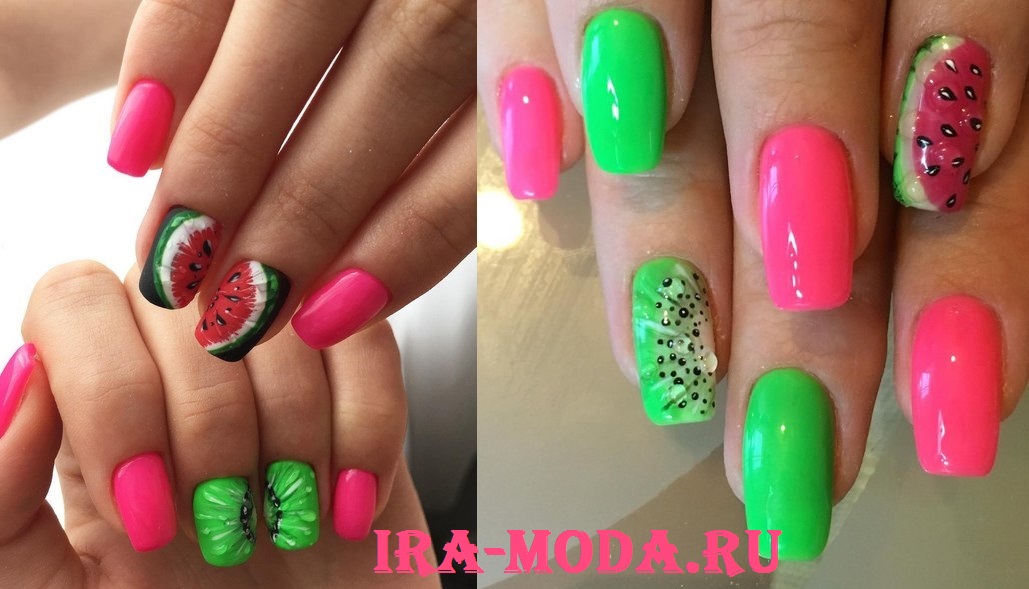
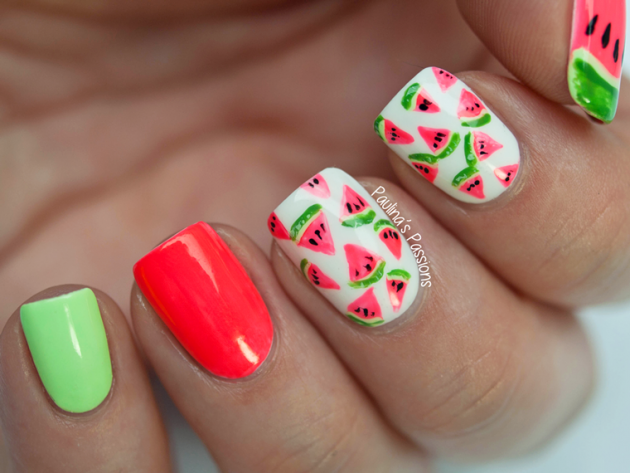
summer watermelon
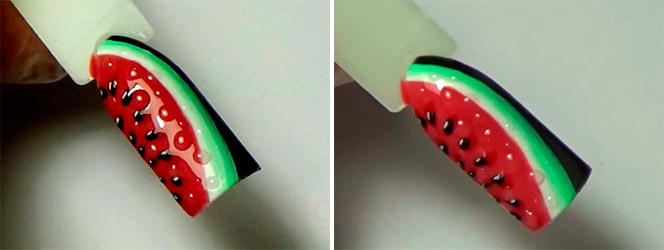
- Painted with dark green lacquer lateral side nail along its entire length, forming an arc slightly concave towards the nail fold.
- Mix some green gel polish with white. It should be a soft green color. With this color we draw a line butt to black. The width of the light green line should be narrower. Cure in a UV lamp.
- Mixing pale green with white to get a shade even a little lighter. We join a new strip with a light green gel polish and polymerize.
- We make one more docking line, only this time white, fix it in the UFL.
- Let's make the pulp of our watermelon red-pink. You can, by analogy, mix red or pink with white to get a tone that is as close as possible to the tone of watermelon pulp. Paint over the rest of the nail. We make two layers, each dry.
- We dilute the dark red gel polish with a small amount of top coat and draw windows with it - dots for seeds on the pulp. Dry in UV light.
- We collect a little black gel polish on the dots and put the droplets in the painted windows - we get seeds. We fix under the lamp.
- We put highlights on the seeds with white color - polymerize.
- We cover the drawing with a top - we fix it in the UFL. Next we take thick top or sculpting gel for applying volume dots.
- We remove the stickiness and put down dots of different sizes along the zone of the pulp of the fruit. Since the material does not flow, they will turn out to be voluminous. (After removing the stickiness, our watermelon will shine beautifully.)
- Dry in a lamp and remove the sticky layer. On this manicure can be considered complete.
VIDEO SCHEME
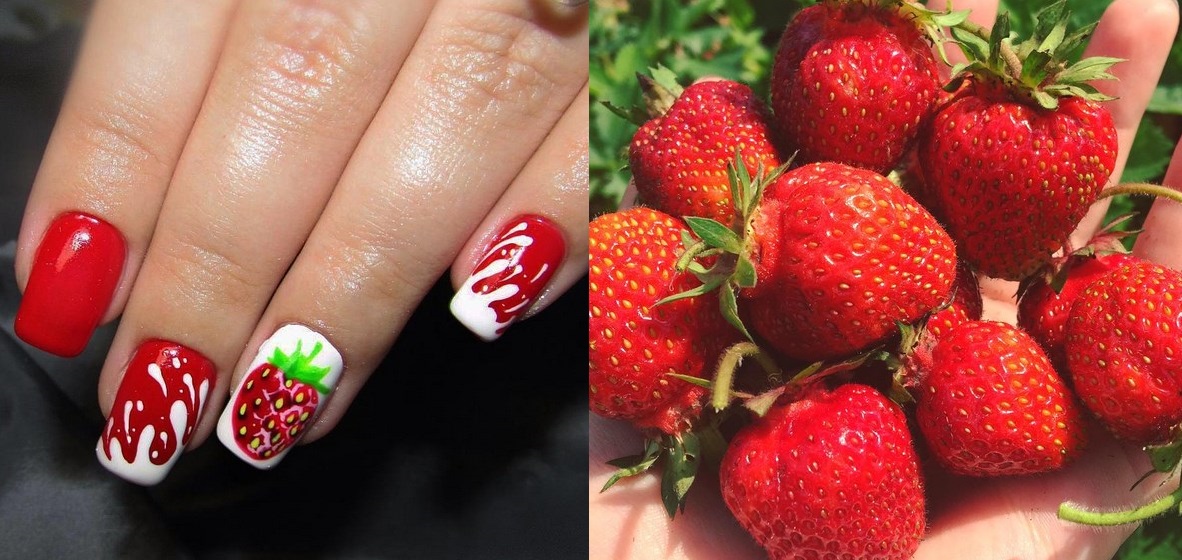
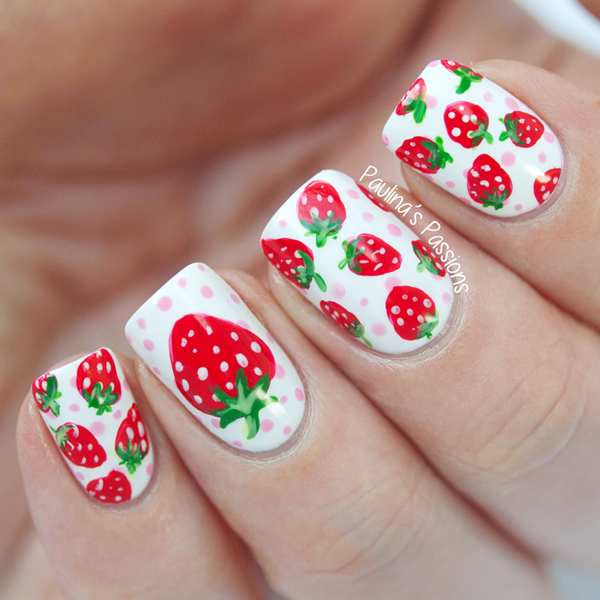
Appetizing strawberry
- We cover the nails with red gel and dry them in a lamp.
- In green, draw the leaves at the base of the nail (you can use two shades of green). We put dots with golden varnish - these will be grains. We fix in the lamp.
- We make a relief with red varnish, which is used to make the substrate. To do this, draw a few wavy lines, outlining the bones. The side part and the base can not be touched - we concentrate on the center of the plate. Dry under the lamp and make the second layer of relief. polymerize again.
- Apply a thin top coat. You can apply a little sparkle to the leaves and decorate with a large green rhinestone. We fix under the lamp.
- We remove the stickiness. We get delicious fruits on our fingers!
VIDEO
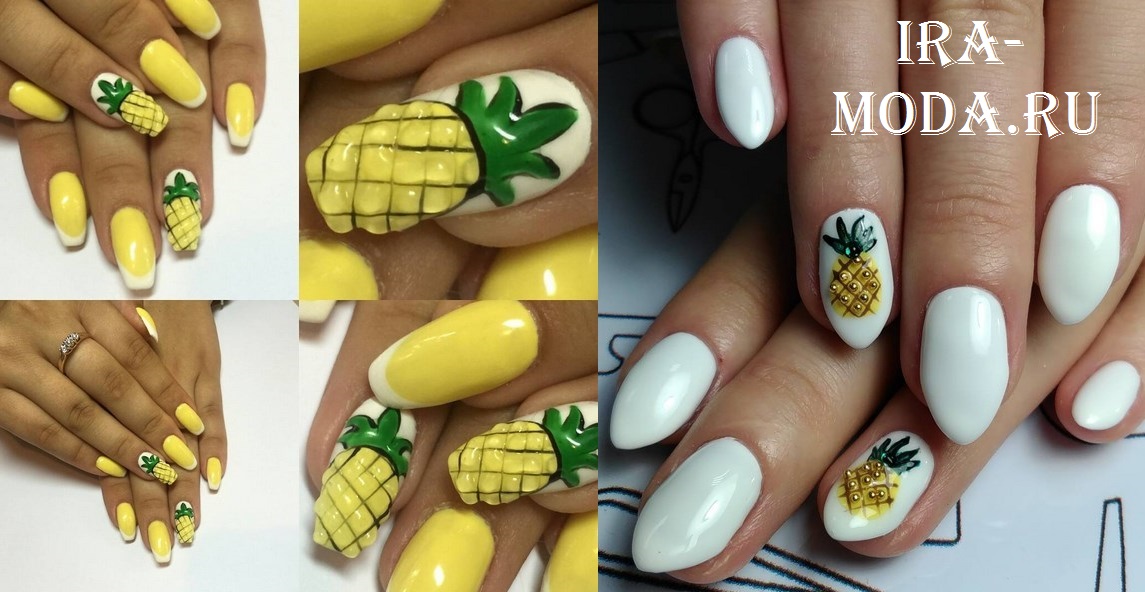
Technique of drawing fruits with gel plasticine Trendynails
Plasticine Trendynails is unique material for modeling. It allows you to get realistic volumetric details.
With it, it is convenient to create designs with flowers, animal figures and, of course, fruits.
It is easy to use and dries quickly under a UV lamp. Consider how with the help of such plasticine you can create a delicious pineapple.
Operating procedure:
We prepare the nails for manicure according to the standard scheme, we make a full coating of gel polish.
- We wipe the finger with a clinser so that the plasticine does not stick to the finger when rolling. We roll a ball of white plasticine, roll it into a thin flat cake with a finger along the nail. With a special silicone brush, you can slightly trim the shape.
- With a silicone hatchet brush or other tool convenient for you, we make notches that imitate the architecture of a pineapple. It will turn out a thin mesh, like a peel. We push the grooves carefully, without using the tool on the material.
- With a manicure hatchet, we put small dots in each cell.
- With a silicone brush, roll out another ball of plasticine - this will be the pineapple tail. We place it near the cuticle zone. We form sharp leaves from the ball. Dry under a UV lamp.
- Let's add details - we use gel paste to make thin strokes along the contour of pineapple diamonds to emphasize the texture. The paste should not flow down the diamonds, otherwise the pineapple will turn out sloppy. We put a couple more strokes on the tail of the pineapple. We polymerize in a lamp. Plasticine does not need to be covered with a top, so the design can be considered complete.
- Better less, but better - it is enough to decorate with a pattern only one or two nails on each hand to attract attention.
- Do not be afraid to experiment - as a substrate, you can use not only one color, but, for example, a gradient with a transition from one tone to another.
- Decor elements such as sequins, rhinestones, ribbons will complement fruit designs.
- Even if you have short nails, the summer design will look beautiful - indulge in juicy shades.
- If you are going to relax at sea, then it is better to refuse convex elements in the design - such a manicure can last a little less than usual.
Use not only ready-made drawing techniques - come up with your own, and then your summer manicure will impress others.
Fruit nail design can be done in a variety of ways. The main thing is to decide what the girl wants to see on her nails, choose a pattern, and then start creating.
 If the fair sex cannot decide on the fruit that will be on the nail plate, in this case several types can be used, each of them will decorate a separate finger. When drawing details on your own, you should arm yourself with different brushes for nail art.
 The most important thing is to depict a smooth outline of the picture - this is a guarantee of a neat appearance of the entire final composition. But if the idea is a cartoon design, shading is also suitable.
 Another unusual way to apply a fruit manicure is to use different sizes of fruit on individual nails. So, for example, on some nails only a slice can be depicted, on others fruits in a reduced form, and their number can be very different.
Fruit nail design 2018 photo new trends
You can show a fragment of the slice in an enlarged view, or the upper peel. This option is quite unusual, perfect for creative outfits and images.
![]() Drawings - fruits on the nails - this is a great idea that is guaranteed to add brightness and lightness to the summer look of every girl. Nails will always look great, perfectly complement the image for warm and unforgettable days.
Drawings - fruits on the nails - this is a great idea that is guaranteed to add brightness and lightness to the summer look of every girl. Nails will always look great, perfectly complement the image for warm and unforgettable days.
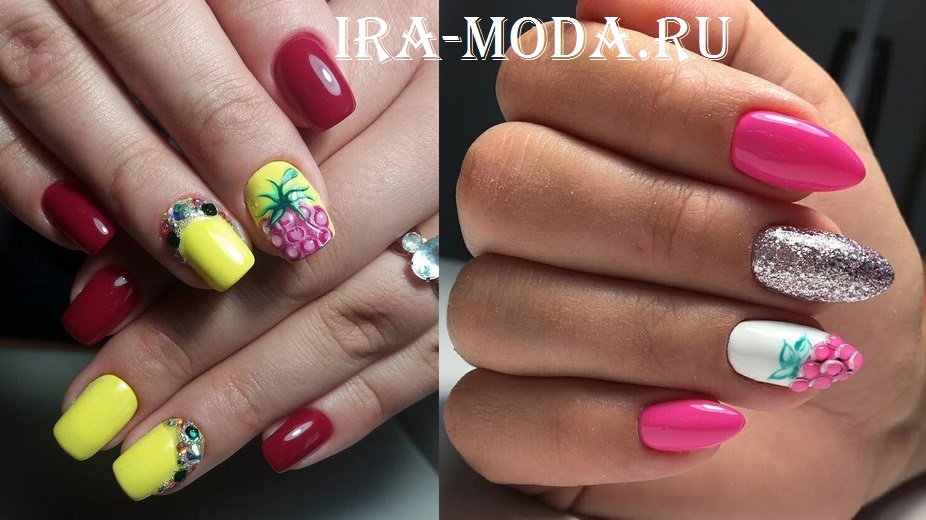
 One of the most popular options summer nail design gel polish are fruits and berries on the nails. These can be cut fruits that look juicy in this form: lemon, orange, kiwi, watermelon, pineapple, lime, coconut, etc. Or whole: cherries, strawberries, raspberries, blackberries, grapes.
You can make drawings of fruits on nails both singly and in compositions, for example, by combining cutaway fruits with whole fruits, adding leaves, umbrellas, cream, etc. looks even more realistic, juicy and incredibly tasty!
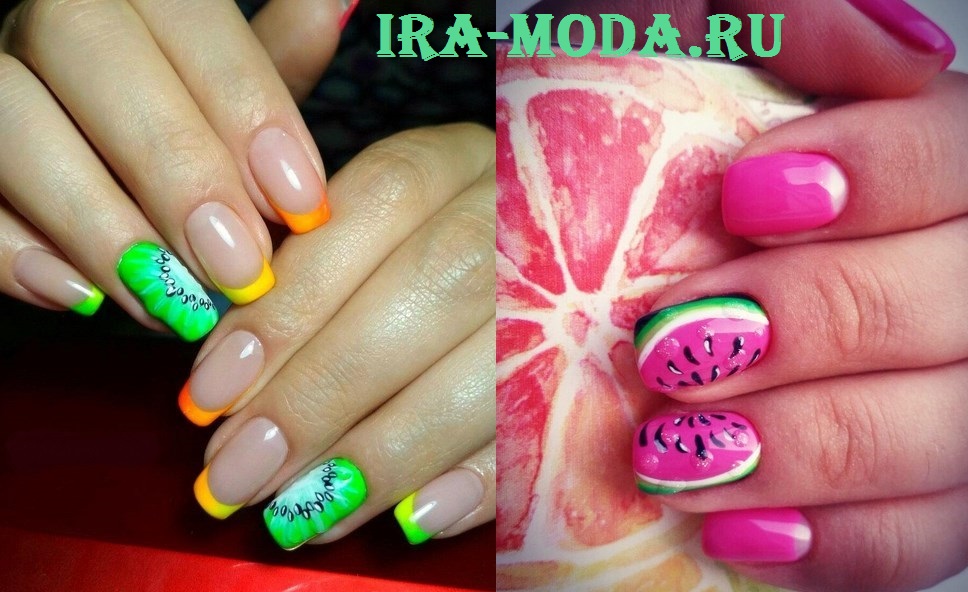
Juicy manicure with watermelon photo 2018 ideas options
Manicure with watermelons - perfect for the summer. Beautiful red watermelons on your nails will surely cheer you up on hot days. This nail art looks very bright, it seduces fashionistas with its juiciness. There are hundreds of options for bringing a berry manicure to life, from a gradient design to a watermelon pattern that is as similar to a real one as possible. What pleases the fruit design is that it is not necessary to have artistic talent, visit a manicurist to draw a slice of a juicy watermelon on one or all nails.
Watermelon manicure on nails is very popular. It is easy to create even at home. The main thing is to think about what color shades will be used. In general, watermelon is considered a beauty berry. With its help, various masks are used to improve the skin of the face, based on it, they follow a diet that allows you to throw off excess weight, well, and now they are used to create a beautiful and stylish manicure. Watermelon on nails looks not only flawless and stylish, but also optimistic. Nails decorated in the presented style will always delight a fashionista, cheer up, even on a rainy day.
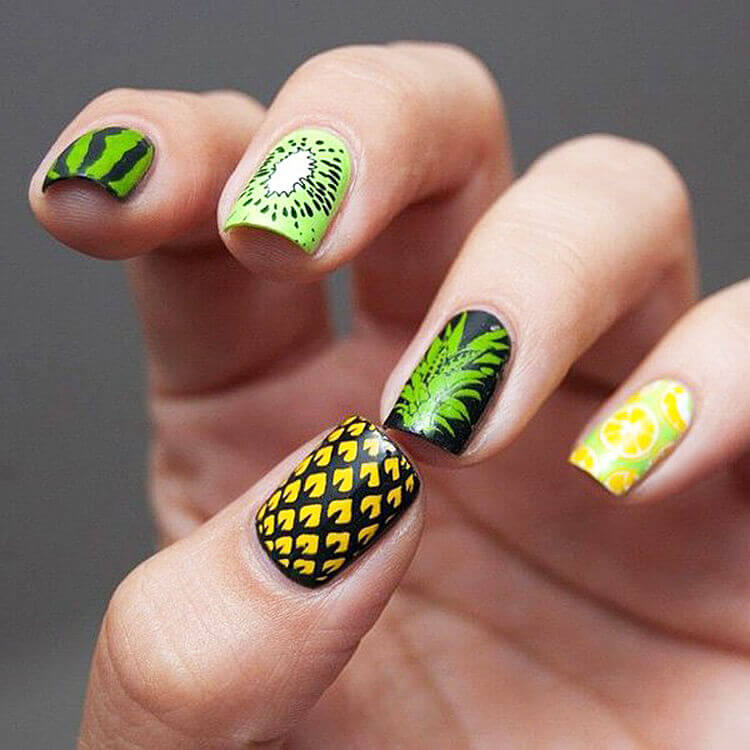
Fashionable manicure with pineapple 2018 photo options
If you decide to give yourself a summer manicure in the mood, then, for sure, one of the options that first came to mind was the option to make some fruit on your nails. And one of the most summery options is pineapple nails. If summer is outside or you want warmth and rich colors, then a fruit manicure is the perfect solution.
Cheerful berries, apple slices and kiwi look directly and cheerfully. Such a stylish manicure will suit energetic girls with a sense of humor. It looks great on artificial or natural nails. Fruits can be drawn or glued. A variety of fimos will help create miniature fruit baskets on your nails.
Strawberry manicure photo 2018 ideas new options
Strawberry style manicure is an extraordinary solution for summer nail design. The bright colors of strawberries can bring a touch of enthusiasm even to the most gray days and make it unforgettable.
 Modern trends in nail design will help make the manicure very stylish. Various variations of strawberry decor can become relevant for girls different ages or status.
The berry can also be drawn in pink. To add brightness, the background can be made saturated black in a glossy version. Summer nail design with strawberries is combined with a lemon, light green and soft pink background. When choosing a manicure background, you should take into account the color type of the skin. Saturated tones suit girls with summer and spring skin types. At the same time, cold shades of the background for manicure are best used by women with a winter or autumn color type. Separate elements of juicy strawberries can decorate a French or moon manicure.
Manicure with kiwi photo 2018 new options
Of course, any decor, pattern or nail design done by a professional looks much neater, more stylish and more beautiful. Moreover, there are options for nail decor, which are simply impossible to reproduce at home without being a Master. But as far as the fruit paradise is concerned, you can even reproduce it on your hands on your own and improvised materials.
This shaggy, sour, round fruit, which can compete with any storehouse of vitamin C, is not very presentable outwardly, but when you cut it in half, saliva immediately flows, it is so beautiful and appetizing. That's exactly why many fashionistas have already tried not only the kiwi fruit, but also the kiwi manicure on the nails. By the way, in general, fruit on nails is a fairly popular topic for manicure.
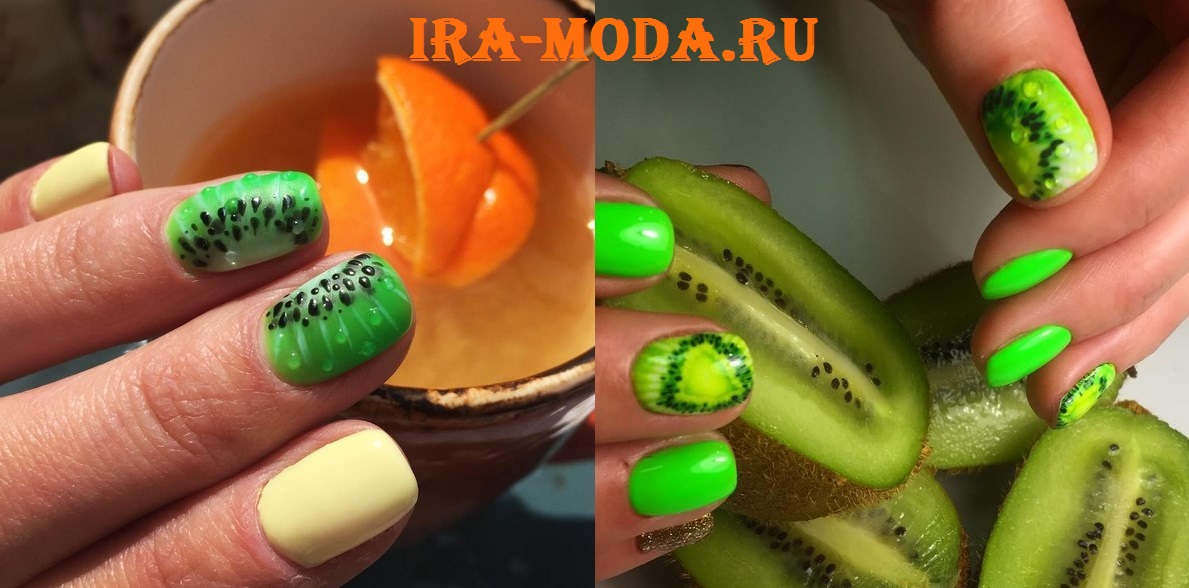 So, fashionistas experimented with styles, with techniques, with varying degrees brightness and saturation of colors, creating a manicure with kiwi. And I must say that some of these options turned out to be very appetizing. Kiwi manicure is a great all-season option. This is not only a summer manicure, since kiwi is found on our store shelves all year round, and you can use such a pattern on your nails all year round, thanks to the versatility of colors.

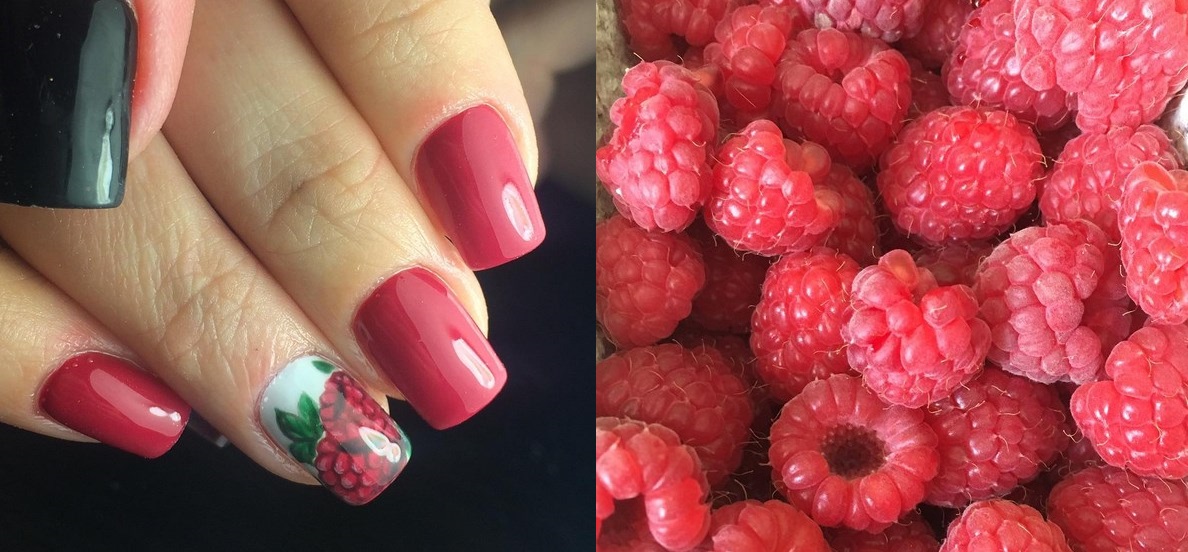
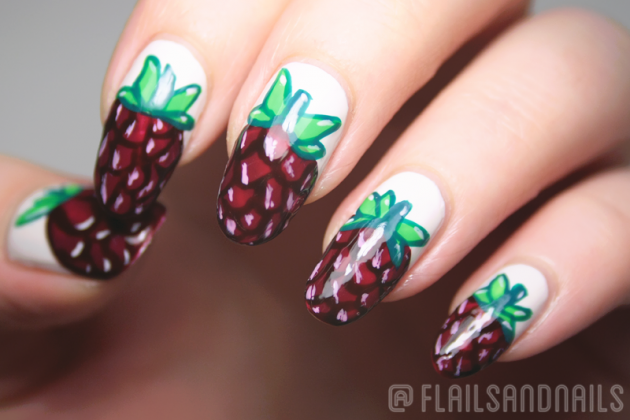
Raspberry manicure 2018 photo new ideas options
Summer is the time of sun, warmth and, of course, ripe sweet berries. This is a special mood that everyone wants to support. possible ways: colorful light outfits, flying hairstyles and themed manicures. That is why today we suggest you do a manicure in raspberry tones or depict ripe berries in nail art. Raspberry on the nails looks very provocatively and cute.
 The most ordinary varnish can become the basis for creativity in skillful hands. If desired, the design can be supplemented with sparkles, rhinestones, combined with other styles, play on contrasts or use smooth transitions in ombre manicure. Do as your fantasy tells you. The image can be applied to only one nail or draw berries on all at once. If you have insufficiently developed artistic talent or you do not want to dive into the process of drawing, then use stickers. The most diverse slider design for nails is now easy to find in specialized stores. With stickers, the nail art procedure will be not only simple, but also very fast.
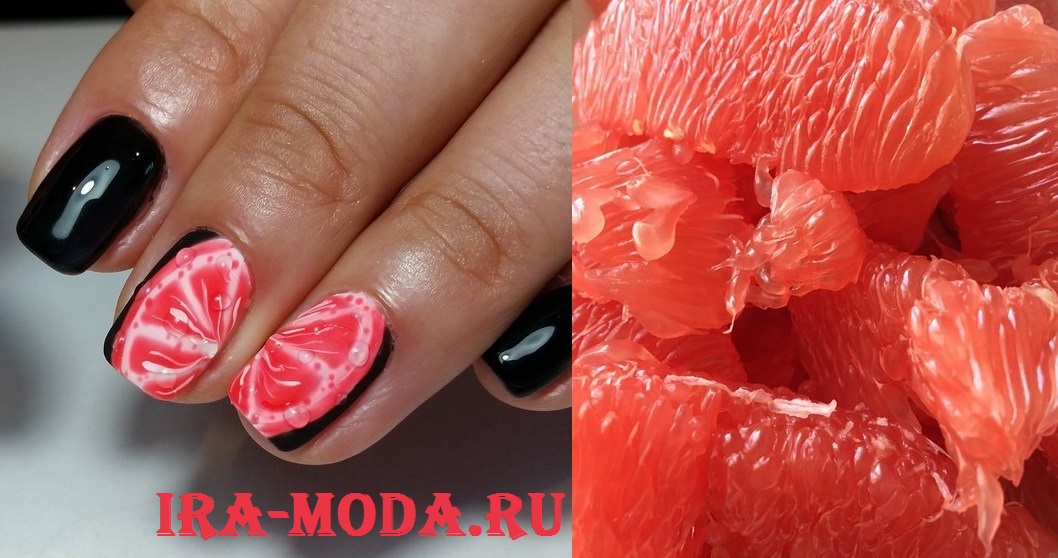
Citrus manicure 2018 photo stylish options
There are times in life when you really want to add “sourness” to your image. And if the bright style of clothing in acid shades has become the norm of the image, then the citrus manicure will acquire the status of the final stage in the image. After all, such a joyful color will always cheer you up, invigorate and give a touch of freshness. To create a citrus manicure, stock up on acrylic multi-colored paints, a thin brush and a container of water for rinsing.
Fruit is a great summer treat, and this season it's also a source of inspiration for fashion manicure. Such a manicure will complement your image, as well as cheer you up. Moreover, for nail design, you can use the image of only one fruit or draw a different one on each nail.
If you have little experience in design, then start drawings with simpler fruits: kiwi or strawberries. They are the easiest to perform. If you want to create a kiwi, then draw a slice of this fruit using green varnish. Then dip the brush lightly in acetone and brush on the white center, which will be slightly smudged. You just have to draw black seeds. Delicious fruit is ready!
If you find it difficult to choose a suitable background for your summer nail design, then choose white. On it, all images of fruits will look very harmonious.
 Summer manicure: summer manicure ideas with blackberries.
 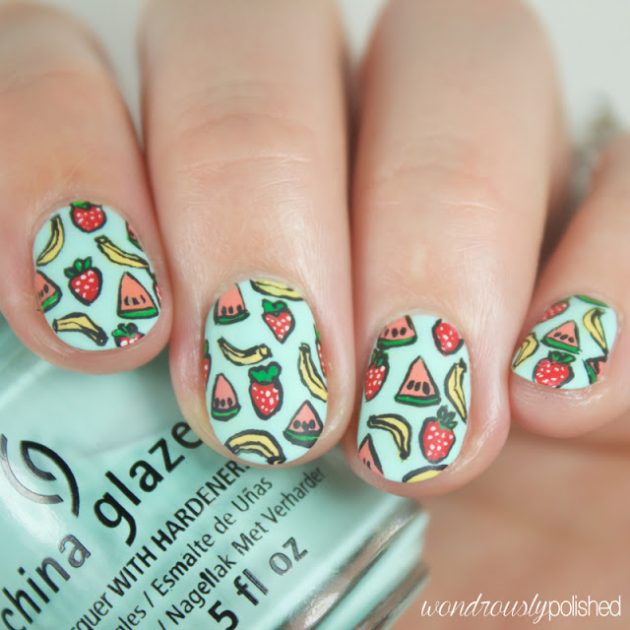 Summer manicure: summer manicure ideas with strawberry, banana and watermelon slices.
 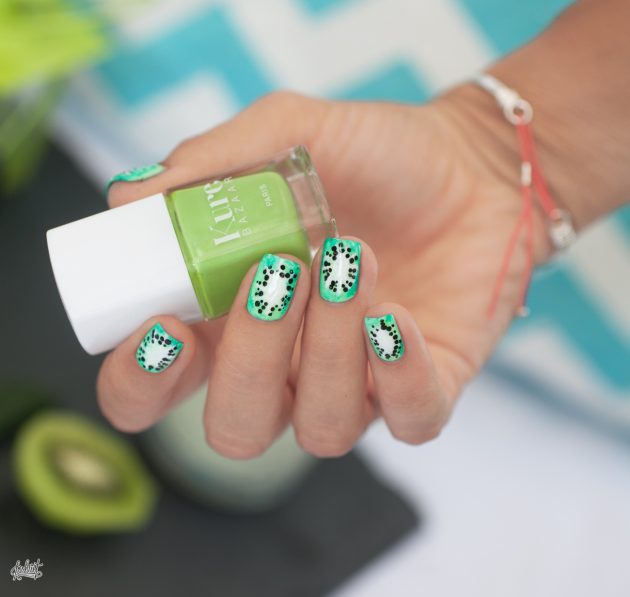 Summer manicure: summer manicure ideas with kiwi fruit.
More interesting summer manicure ideas with fruits
Draw delicious triangular pieces of watermelon with seeds on a couple of nails. Paint the rest of your nails light green and pink colors. You can also paint a striped watermelon rind structure on your nails and alternate this design with a watermelon design that will take up the entire nail.
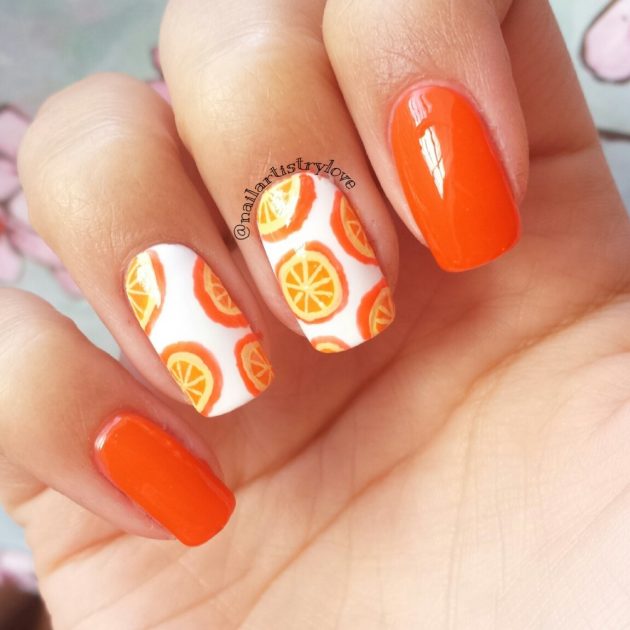
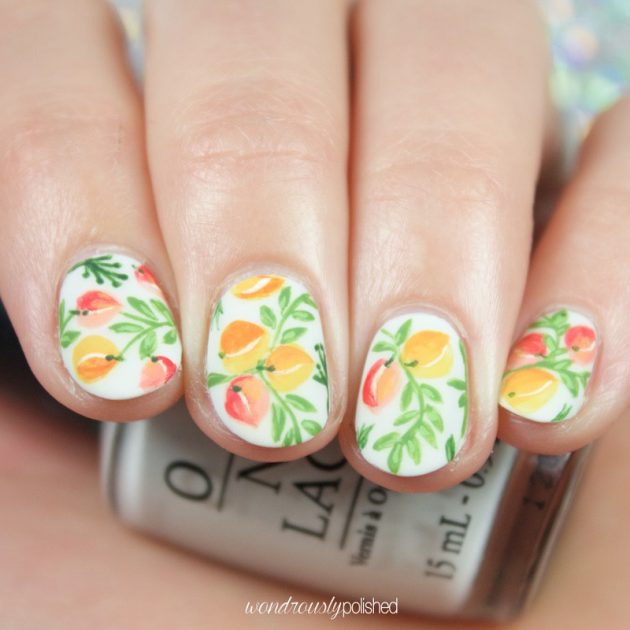
Juicy lemons with green branches on a white background look very bright. If you prefer other citrus fruits, then orange-yellow orange slices will surely cheer you up.
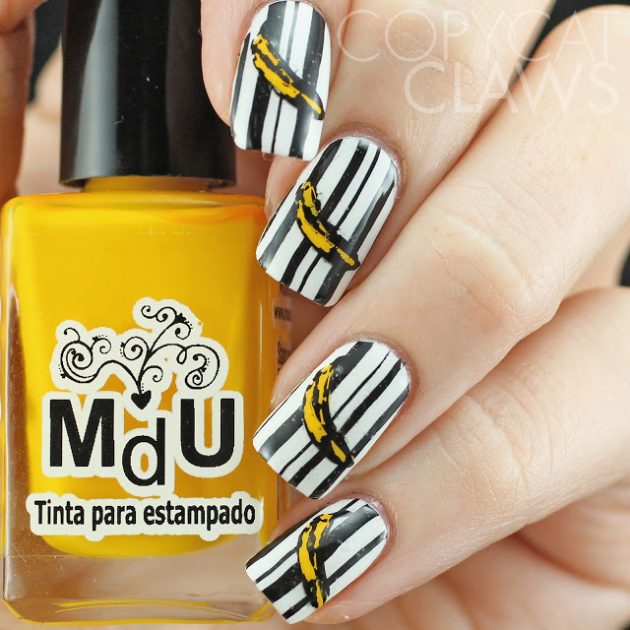
When drawing strawberries, make them both small and huge. Another easy-to-picture fruit is the pineapple. Try using a thin brush to paint the multi-colored silhouettes of this exotic fruit on a bright blue background. Alternate red and green apples on your nails if you want a bright defiant manicure. A yellow banana looks great against a striped black and white background.
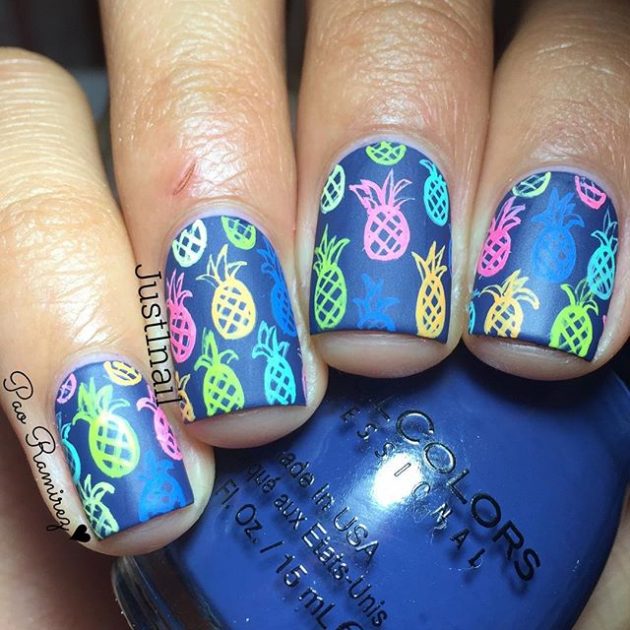 Summer Manicure: Summer manicure ideas are colorful pineapples on a blue background.
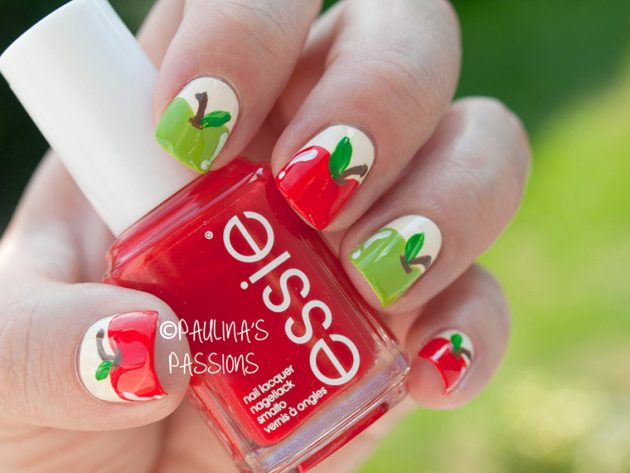
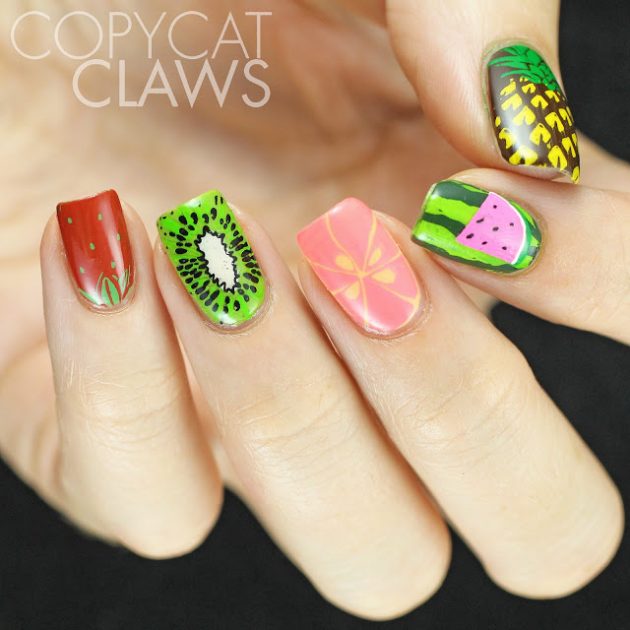 Summer manicure: summer manicure ideas with pineapple, kiwi, watermelon and strawberry slices.
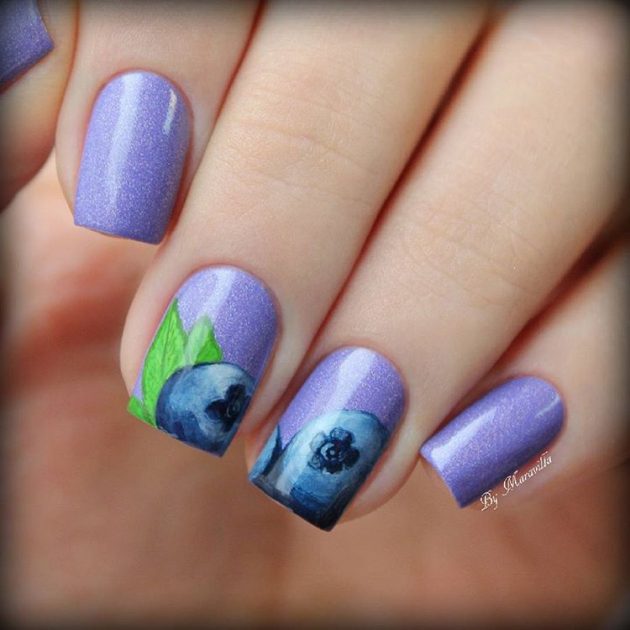
 If you prefer a more delicate version, then pay attention to blueberries on a lilac background. Such a manicure in a more relaxed range looks very beautiful. Branches with peaches look no less tender, which perfectly complement the romantic look. Do you find it difficult to choose the right pattern for your summer look? Make a fruit platter with bananas, strawberries and watermelon chunks! Or "stir" the fruit to your own taste.
Use your creative potential to create an unusual and delicious manicure this summer. And our options, we hope, will help you be inspired to create these little masterpieces.
With love, Editorial YavMode.ru
